Table of Contents
What is a Personalization package?
Personalization or branding packages are created using the WPSecure Personalization Packager (also known as the Windows Branding Tool). These packages enable organizations to deploy a wide range of branding elements in a consistent and manageable way across Windows devices.
WPSecure Personalization Packages support the deployment of multiple branding elements, including:
- Desktop backgrounds
- Lock screen images
- Outlook email signatures
- Microsoft Teams backgrounds
- Video screen savers
Up to 12 personalization packages can be installed side by side on a single device. Each package can contain one or more supported branding element types, depending on organizational requirements.
Personalization packages are not treated as monolithic units. Instead, the system evaluates each branding element type independently. For every branding element (for example, desktop backgrounds), the system automatically selects and applies the version from the installed package with the highest version number among all packages that include that element.
This per‑element, highest‑version‑wins precedence model allows branding assets to be freely mixed and matched across packages. A device always uses the most up‑to‑date version of each individual branding element available—without requiring a single package to contain every element type.
Details of the package precedence mechanism, including methods for overriding default behavior, are described in the Package Precedence Model section.
Finally, deploy personalization packages using Microsoft Endpoint Configuration Manager, Microsoft Intune, or other supported enterprise deployment tools.
| Branding item | Pkg 1 | Pkg 2 | Pkg 3 | ··· | Pkg 12 |
|---|---|---|---|---|---|
| 📧 Email Signature | |||||
| 🎬 Video Screensaver | |||||
| 🖥️ Desktop Wallpaper | |||||
| 🔒 Lock Screen | |||||
| 💬 Teams Backgrounds |
The device always applies the highest version of each branding item across all installed packages.
Are you not a big fan of reading technical documentation? The following article provides a functional, hands-on approach to creating and deploying WPSecure Personalization Packages using Microsoft Intune or Microsoft Endpoint Configuration Manager.
But, If you prefer to read our classic documentation, stay on this page.
Glossary of terms
Personalization Packager (also known as: The Windows Branding Tool, The Packager) Creates deployment packages containing desktop backgrounds, lock screen images, Outlook signatures, Teams background images, and screensavers. These packages can be deployed to on‑premises and cloud‑connected Windows devices.
Personalization Package (also known as: Branding Package, Package) Created using the Packaging Tool and deployed via software deployment utilities such as Microsoft Endpoint Configuration Manager (SCCM/MECM), Microsoft Intune, or similar tools.
Licence (also known as: Subscription) Device licensing costs USD $1 per device per year. Based on available local machine resources, up to 12 branding packages can be installed per device.
Campaign Manager (also known as: Campaign File) Generates the campaign file that defines start and end dates and package priority. The campaign file is optional and deployed using tools like Microsoft Endpoint Configuration Manager (SCCM/MECM), Microsoft Intune, or similar solutions.
Prerequisites
The operation of WPSecure Personalization Packages depends on two distinct categories of prerequisites:
- Hardware and software requirements that directly impact the ability of WPSecure Packages to install, execute, and apply personalization settings.
- Removal of conflicting management policies that may restrict or block the changes performed by the WPSecure packages.
Both prerequisite categories must be satisfied to ensure reliable operation and supportability of the WPSecure solution.
Hardware and Software Requirements
To ensure full functionality and supportability, devices hosting WPSecure Personalization Packages must meet the minimum requirements below. Deployments on systems that do not meet these specifications may function but are considered unsupported configurations.
Note: WPSecure adheres to the same prerequisites and support standards defined by Microsoft for Windows client operating systems
Supported Platforms
WPSecure Personalization Packages are supported exclusively on physical Windows devices — desktops, laptops, and tablets. RDS and VDI environments are not supported.
With Microsoft’s end of support for Windows 10, WPSecure no longer officially certifies that platform. Performance and compatibility are benchmarked against:
- Windows 10 (22H2) — Professional or Enterprise editions
- All Microsoft-supported editions of Windows 11 Professional and Enterprise
Note: WPSecure Packages generally work on Windows 11 Home, however this edition is not officially certified. Microsoft does not support PersonalizationCSP on Windows 11 Home.
- .NET Framework: Version 4.8 or later
- Processor: 2 GHz or faster, quad-core, 64-bit
- Memory: 8 GB or more
- Storage: At least 1 GB of free space. The installer will not proceed if this requirement is not met.
Additional Requirements
- The system must have a healthy configuration with fully functional WMI and .NET Framework components.
- Local, Group, or Cloud Policy settings must allow user-context modifications for desktop backgrounds, lock screens, Outlook signatures, and screensavers.
- AppLocker and other security solutions must be configured to include the necessary exceptions for WPSecure branding packages.
- Outlook signature deployment is supported for Microsoft 365 Outlook Classic. Default signatures for Outlook on the Web and New Outlook can be configured using Microsoft Azure services, as described later in this document.
- The system must be free of faulty drivers, particularly those related to graphics, storage, or CPU subsystems, as these can cause instability and execution failures.
Removal of conflicting management policies
The WPSecure Personalization Engine is designed according to the principle of least privilege. To minimize security risk, the majority of personalization actions are performed within the standard user context and do not require administrative rights.
For the engine to function correctly, system policies must allow user-level modification of the following personalization elements:
- Desktop background
- Lock screen image
- Outlook signature
- Microsoft Teams background
- Screensaver
Policies that explicitly prevent users from changing these settings will block the engine from applying or maintaining personalization configurations.
If unauthorized changes occur, WPSecure engine will automatically restore the affected personalization settings during designated system events to ensure branding consistency and policy compliance.
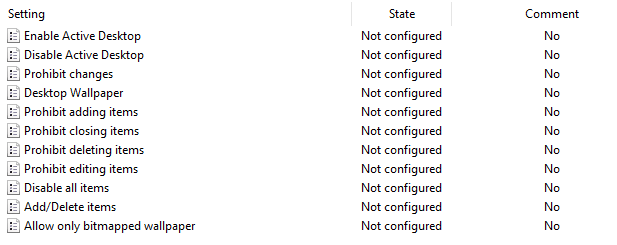
Remove AD Group Policies relating to Desktop backgrounds
Local or domain‑level Group Policies that prevent end users from modifying desktop backgrounds or themes will conflict with the WPSecure Desktop Background Processing Engine. These policies block changes made in the user context, which is required for WPSecure to apply and maintain personalization settings.
Below are two policies that will prevent the WPSecure engine from changing the desktop background in the User Context. You should either remove or not configure them.
Prevent Changing Desktop Background: This Group Policy can be found under User Configuration\Administrative Templates\Control Panel\Personalization. If this policy is enabled, the WPSecure engine will be prevented from changing the desktop background from within the User’s Context.
Desktop Wallpaper: This Group Policy can be found under User Configuration\Administrative Templates\Desktop\Desktop. If enabled, this policy will specify the desktop wallpaper and prevent the proper functioning of the WPSecure desktop background engine. We recommend setting all settings on the below page to “Not Configured“
To check for any Group Policy or Intune conflicts that might prevent desktop wallpaper changes:
- Copy the PowerShell script provided below.
- Open PowerShell as a standard user on the target machine.
- Paste the script and press Enter.
- Review the output — it will clearly show (in red) any detected blocking policies
					$conflictFound = $false

# Helper function to report conflict
function Write-Conflict {
    param(
        [string]$Message,
        [string]$Path,
        [string]$Fix
    )
    $script:conflictFound = $true
    Write-Host "CONFLICT: $Message" -ForegroundColor Red
    Write-Host "   Path: $Path" -ForegroundColor Red
    Write-Host "   → $Fix" -ForegroundColor Red
    Write-Host ""
}

# ───────────────────────────────────────────────
#   HKCU checks
# ───────────────────────────────────────────────

$hkcuAD = Get-ItemProperty -Path "HKCU:\Software\Microsoft\Windows\CurrentVersion\Policies\ActiveDesktop" -EA SilentlyContinue
if ($hkcuAD -and $hkcuAD.NoChangingWallPaper -eq 1) {
    Write-Conflict "NoChangingWallPaper = 1" `
                   "HKCU\...\Policies\ActiveDesktop" `
                   "Remove the policy that sets NoChangingWallPaper = 1"
}

$hkcuSys = Get-ItemProperty -Path "HKCU:\Software\Microsoft\Windows\CurrentVersion\Policies\System" -EA SilentlyContinue
if ($hkcuSys) {
    if ($hkcuSys.Wallpaper) {
        Write-Conflict "Wallpaper value is set" `
                       "HKCU\...\Policies\System" `
                       "Remove the policy that sets Wallpaper value"
    }
    if ($null -ne $hkcuSys.WallpaperStyle) {
        Write-Conflict "WallpaperStyle = $($hkcuSys.WallpaperStyle)" `
                       "HKCU\...\Policies\System" `
                       "Remove the policy that sets WallpapeStyle value"
    }
}

# ───────────────────────────────────────────────
#   HKLM checks
# ───────────────────────────────────────────────

if ($regHKLM) {
    $hlkmSys = Get-ItemProperty -Path "HKLM:\Software\Microsoft\Windows\CurrentVersion\Policies\System" -EA SilentlyContinue
    if ($hlkmSys) {
        if ($hlkmSys.Wallpaper) {
            Write-Conflict "Wallpaper value is set (machine policy)" `
                           "HKLM\...\Policies\System" `
                           "Remove the policy that sets Wallpaper value"
        }
        if ($null -ne $hlkmSys.WallpaperStyle) {
            Write-Conflict "WallpaperStyle = $($hlkmSys.WallpaperStyle)" `
                           "HKLM\...\Policies\System" `
                           "Remove the policy that sets WallpapeStyle value"
        }
    }

    $hlkmAD = Get-ItemProperty -Path "HKLM:\Software\Microsoft\Windows\CurrentVersion\Policies\ActiveDesktop" -EA SilentlyContinue
    if ($hlkmAD -and $hlkmAD.NoChangingWallPaper -eq 1) {
        Write-Conflict "NoChangingWallPaper = 1 (machine policy)" `
                       "HKLM\...\Policies\ActiveDesktop" `
                       "Remove the policy that sets NoChangingWallPaper = 1"
    }

    # Personalization CSP (MDM/Intune)
    $csp = Get-ItemProperty -Path "HKLM:\SOFTWARE\Microsoft\Windows\CurrentVersion\PersonalizationCSP" -EA SilentlyContinue
    if ($csp) {
        if ($csp.DesktopImagePath) {
            Write-Conflict "DesktopImagePath is set (MDM/Intune)" `
                           "HKLM\...\PersonalizationCSP" `
                           "Remove value: DesktopImagePath"
        }
        if ($csp.DesktopImageUrl) {
            Write-Conflict "DesktopImageUrl is set (MDM/Intune)" `
                           "HKLM\...\PersonalizationCSP" `
                           "Remove value: DesktopImageUrl"
        }
    }
}

# ───────────────────────────────────────────────
#               Final Result
# ───────────────────────────────────────────────

Write-Host "`n" -NoNewline

if ($conflictFound) {
    Write-Host "RESULT: Blocking Group Policy or Intune/MDM policy detected" -ForegroundColor Red
    Write-Host "       Desktop background change will most likely be prevented." -ForegroundColor Red
} else {
    Write-Host "RESULT: No blocking policies detected" -ForegroundColor Green
    Write-Host "       Desktop background should be changeable." -ForegroundColor Green
}

# Cleanup
if ($regHKLM) { $regHKLM.Dispose() }
The best test is to change the desktop wallpaper image manually. If you can, your system will be ready to handle desktop wallpaper changes using WPSecure packages.
Remove AD Group Policies relating to Lockscreen images
The WPSecure Personalization Engine will manage the Lock Screen image. Remove other policies that govern these settings and set them to ‘Not Configured‘.
- Open AD Group Policy editor.
- Navigate to Computer Configuration\Administrative Templates\Control Panel\Personalization.
Remove AD Group Policies relating to Screensavers
The WPSecure Personalization Engine will manage Screensavers. Remove other policies that govern these settings and set them to ‘Not Configured‘.
- Open AD Group Policy editor
- Navigate to User Configuration / Policies / Administrative Templates / Control Panel / Personalization
- Double-click the policy named “Force specific screen saver“.
- Set the policy to “Not Configured“.
Remove AD Group Policies relating to Outlook Signatures
The WPSecure Personalization Engine will manage Outlook Signatures. Remove other policies that govern these settings and set them to ‘Not Configured‘.
- Open AD Group Policy editor.
- Navigate to User Configuration / Administrative Templates / Microsoft Outlook / Outlook Options / Mail Format.
- Double-click on the “Do not allow signatures for e-mail messages” setting.
- Choose “Not Configured”
Log location
The Personalization Packager records its progress, failures, and exceptions in the below log file.
%temp%\wpsecure-packager.log
The Personalization package installer which runs as the SYSTEM user or as an elevated Administrator records its progress, failures, and exceptions in the below log file.
%SystemDrive%\Windows\Temp\wpsecure-install.log
The Personalization package uninstaller which runs as the SYSTEM user or as an elevated Administrator records its progress, failures, and exceptions in the below log file.
%SystemDrive%\Windows\Temp\wpsecure-uninstall.log
Following are the log files pertaining to loading, brokering, events, and selection of the Personalization packages.
					%temp%\wpsecure-xx.xx.xxxx.xxxx.log
%temp%\wpsecureloader.log
%temp%\wpsecurebr.log
Personalization Packager installation
Note: The WPSecure Personalization Packager requires the Microsoft Win32 Content Prep Tool to convert the Personalization Packages into a Win32 app that can be deployed using Microsoft Intune. Due to Microsoft’s license restrictions, we can not distribute the Microsoft Win32 Content Prep Tool with our product. Click here to read about it and download the Microsoft Win32 Content Prep Tool.
Download for free, save locally, and make the IntuneWinAppUtil.exe file available during the first run of the WPSecure Personalization Packager.
WPSecure Personalization Packager can be installed from the Microsoft Store. The Microsoft Store provides a secure way to deliver updates to your device on demand. Click the download button in the top-right corner of this page.
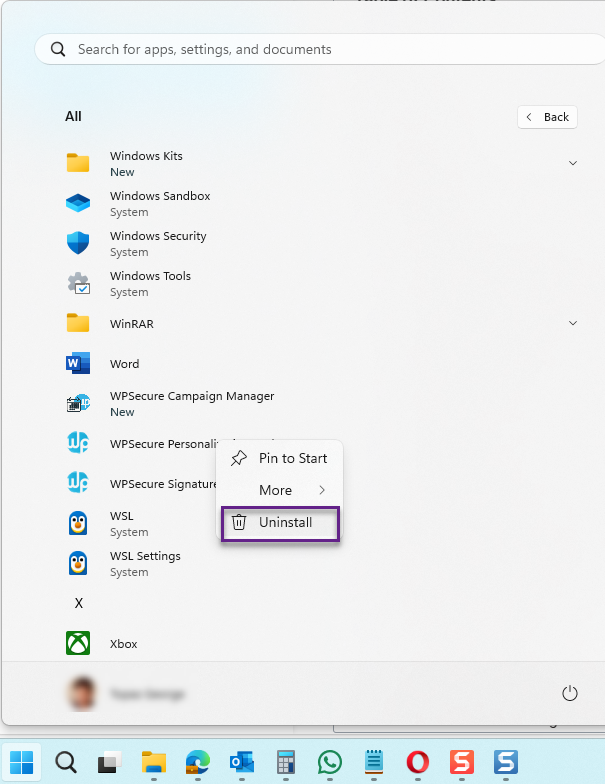
To uninstall the Packager, right-click the application in the Start Menu, then click Uninstall.
The process installs the following applications.
- WPSecure Personalization Packager
- WPSecure Campaign Manager.

Personalization/branding items
The Personalization Packager enables you to bundle your branding elements, such as those listed below, into a deployment package that can be easily deployed to locally networked and Cloud-connected devices.
- Desktop backgrounds (Multiple screen sizes and orientations).
- Lock screen images (Multiple screen sizes and orientations).
- Teams background images.
- Outlook Classic signature for ‘New‘ messages.
- Outlook Classic signature for ‘Reply‘ messages.
- Outlook New/OWA signature for ‘New‘ messages.
- Outlook New/OWA signature for ‘Reply‘ messages.
- Exchange Online default mailbox signature.
- A Video screensaver (1 Landscape and 1 Portrait screen).
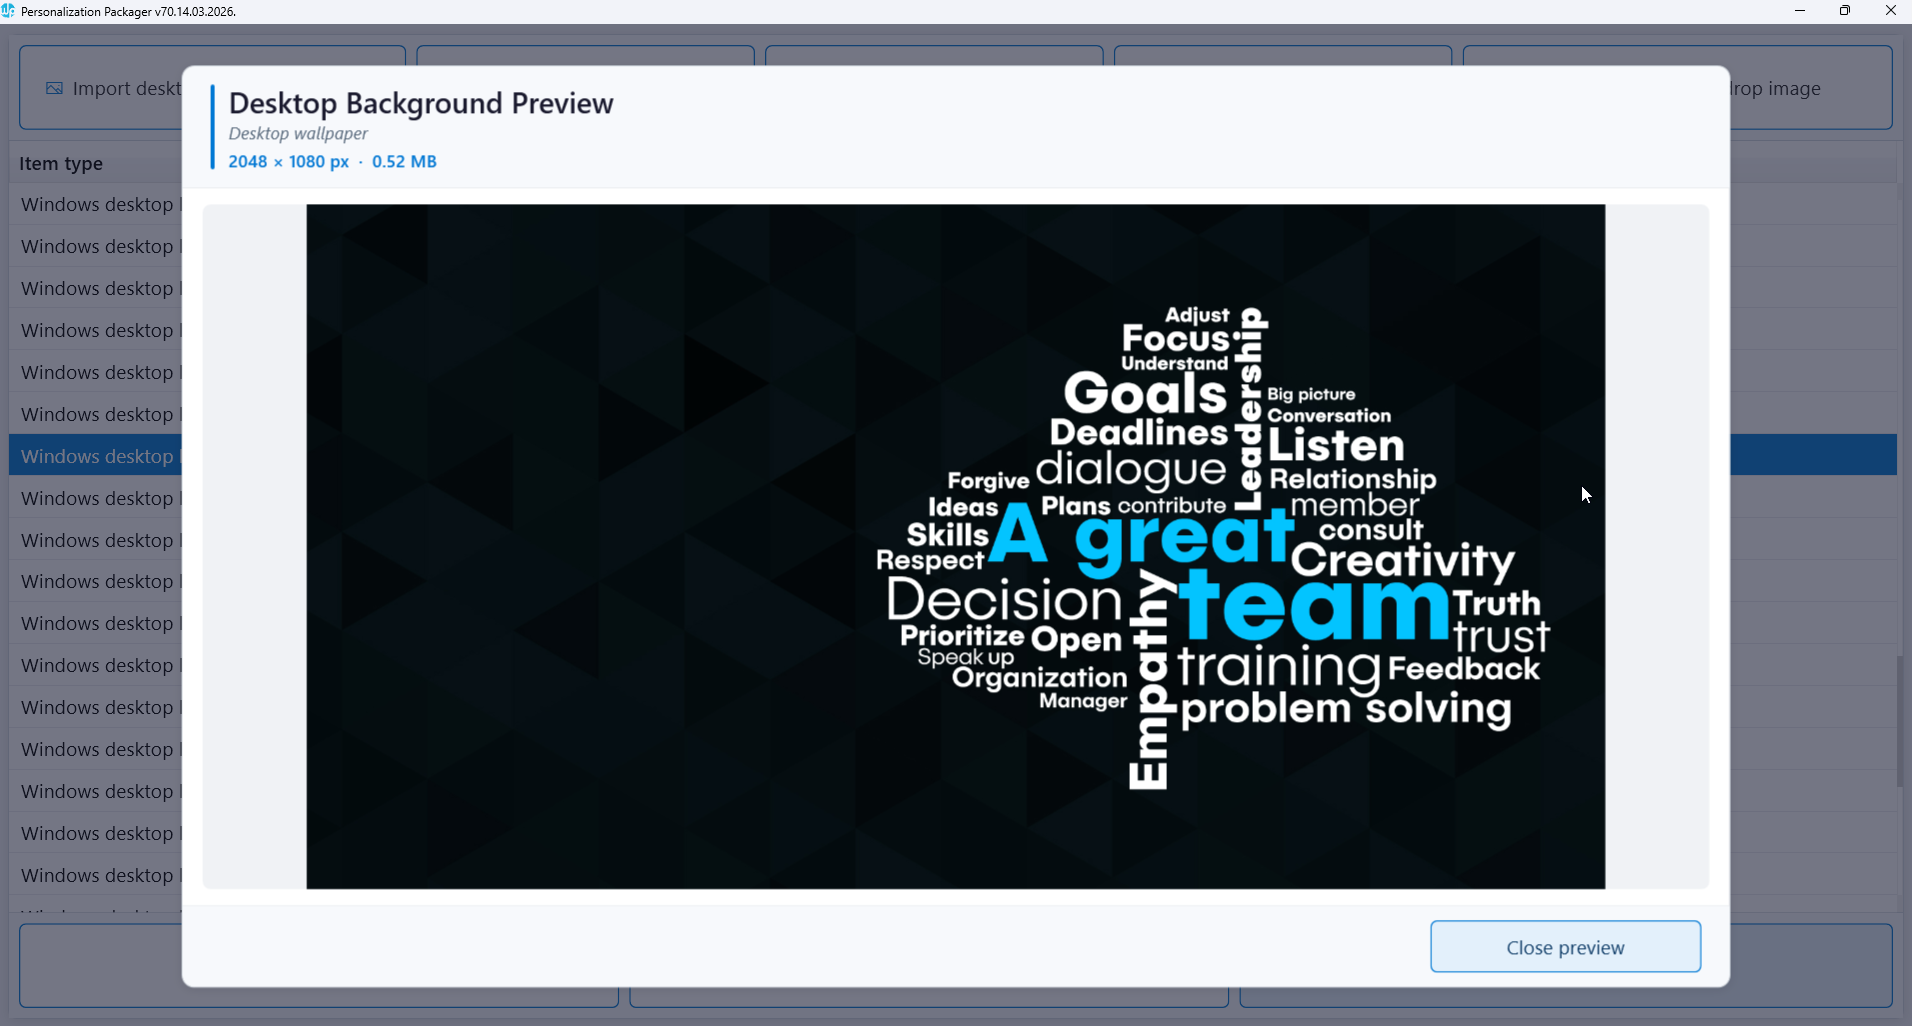
Desktop backgrounds
Remove Group Policies or similar Microsoft Intune CSP policies that prevent changing Desktop backgrounds. For information on how to hide these options, please read the content under the Policies topic at the top of this document.
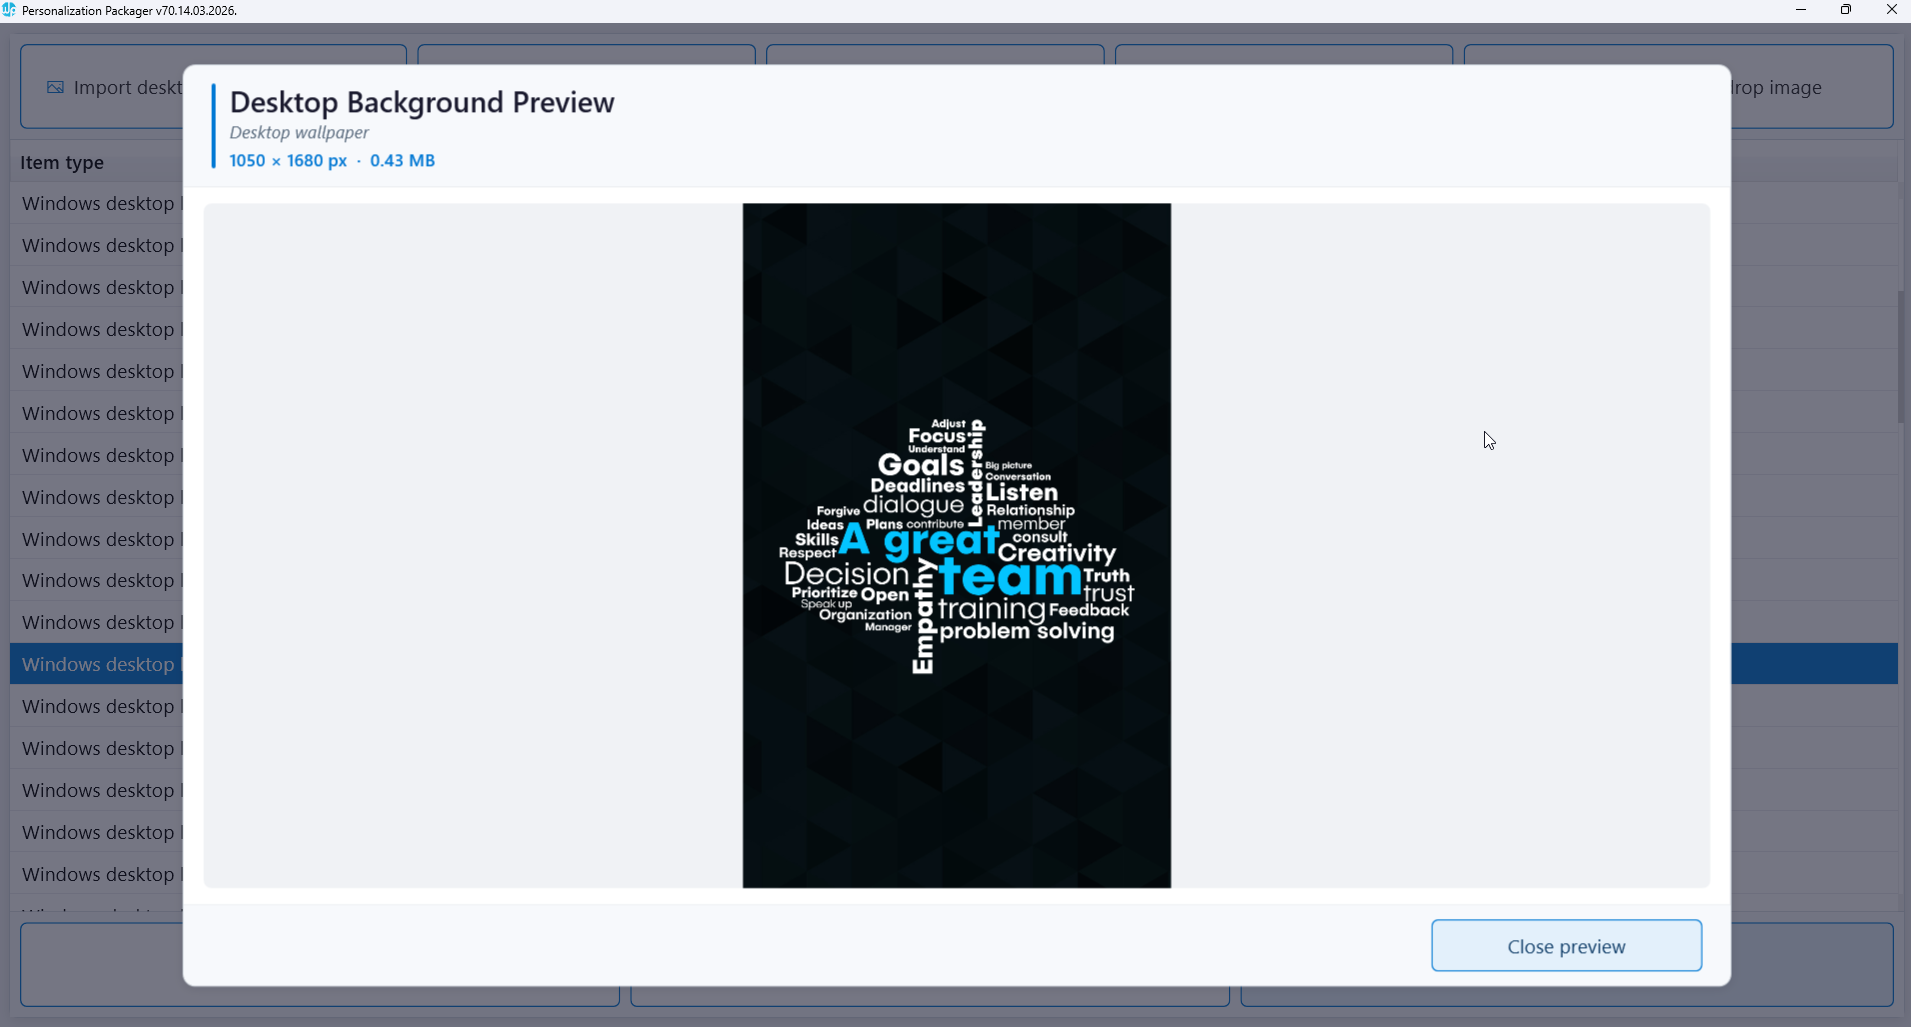
This module assigns unique desktop background images to each screen, ensuring that the image’s structure and message are preserved. For instance, a landscape-oriented computer monitor will be assigned a landscape background image, while a portrait-oriented monitor will be assigned a portrait background image. This ensures that the message remains clear.
If an image with the exact width and height of the screen is available, it will be assigned to that screen. If not, the desktop background engine will select an image with the same aspect ratio from a list of available images. If no such image is available, the engine will choose an image with the same orientation. If no such image is available, the engine will select the closest fitting image to the screen’s dimensions.
The module can also recalibrate and assign appropriately sized images in response to changes in screen resolution, orientation, or the addition of another screen, thereby preventing distortion or cropping. This feature enables laptop users to seamlessly transition between desks without manually resetting their wallpaper when connecting to different external monitors, thereby saving time and effort.
Each image’s file size must not exceed 10 MB, and we recommend keeping the total size of the personalization package under 500 MB. Ensure the image PPI (Pixels Per Inch) is set to 72 PPI.
You can set a personalization package as a 'Pending Reboot' reminder package, displaying a 'Pending Reboot' message on Desktop backgrounds. For additional details, refer to the extra settings section below.
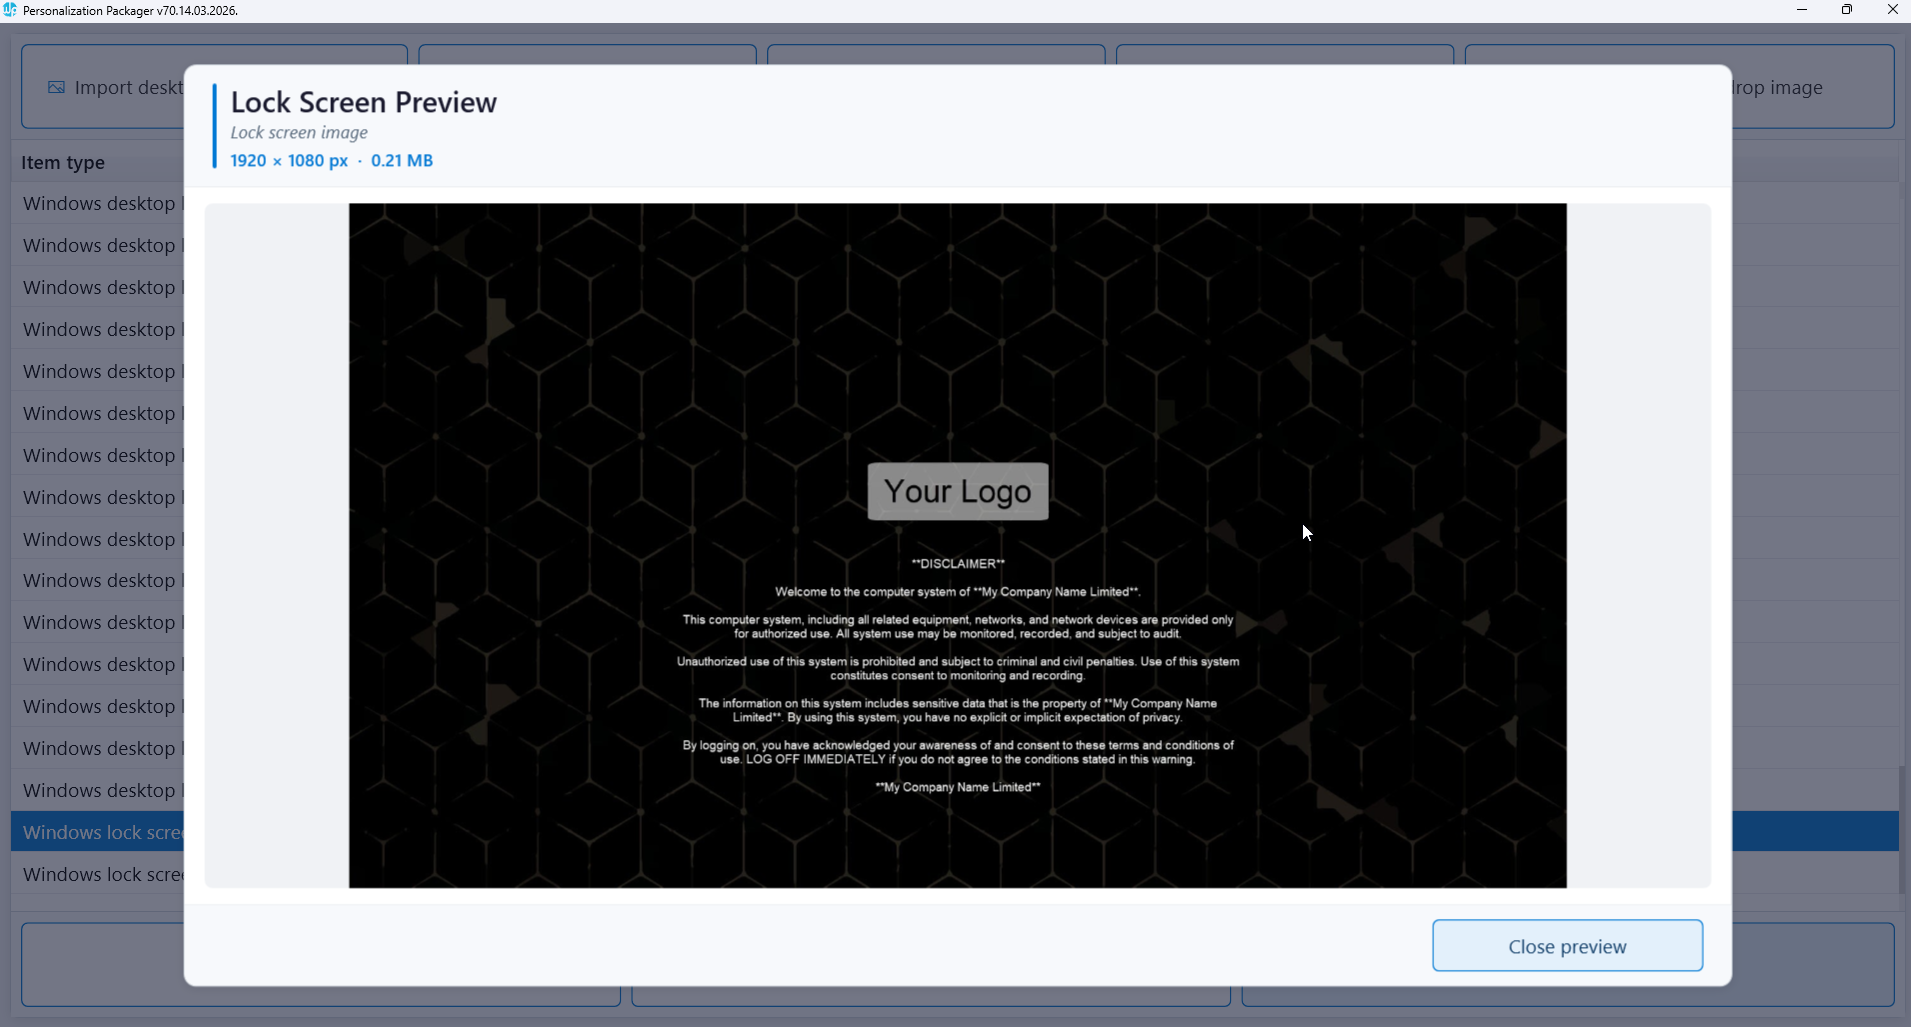
Lock screen images
Remove Group Policies or similar Microsoft Intune CSP policies that prevent changing Lock screen images. For information on how to hide these options, please read the content under the Policies topic at the top of this document.
You can include multiple lock screen images in the package for Screens with landscape and portrait orientations. Keep the file size as small as possible without compromising the quality of the image. The maximum file size cannot exceed 25 MB.
The lock screen is applied to the device’s primary display. Depending on image availability, a portrait image will be assigned to a screen-oriented portrait, and a landscape image will be assigned to a screen set as landscape.
You can set a personalization package as a 'Pending Reboot' reminder package, displaying a 'Pending Reboot' message on Lockscreen images. For additional details, refer to the extra settings section below.
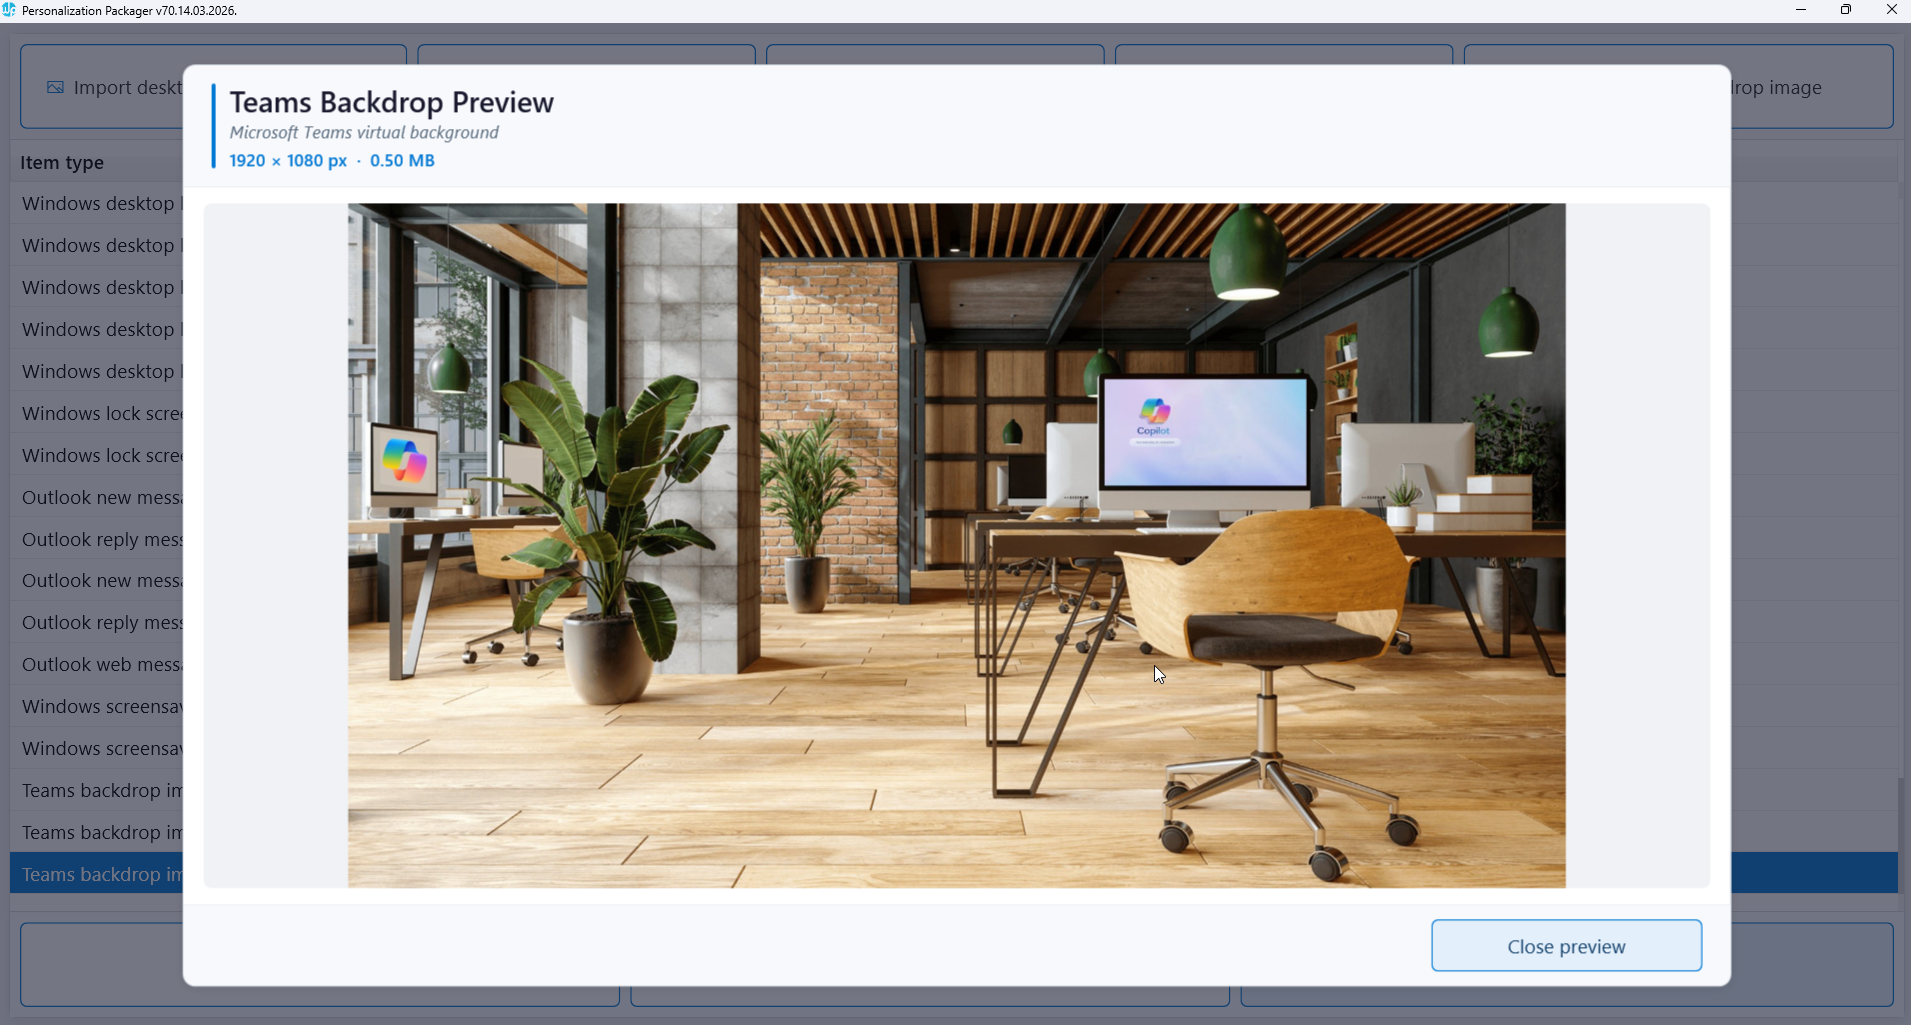
Teams background images
You can include multiple background images for Microsoft Teams in a single package.
- Recommended dimensions: 1920 × 1080 pixels
- File size: Keep as small as possible while maintaining good visual quality (maximum 25 MB per image)
- File type: Only supports importing .jpg files
- Naming: The original filename (without extension) will be displayed as the background name in Teams

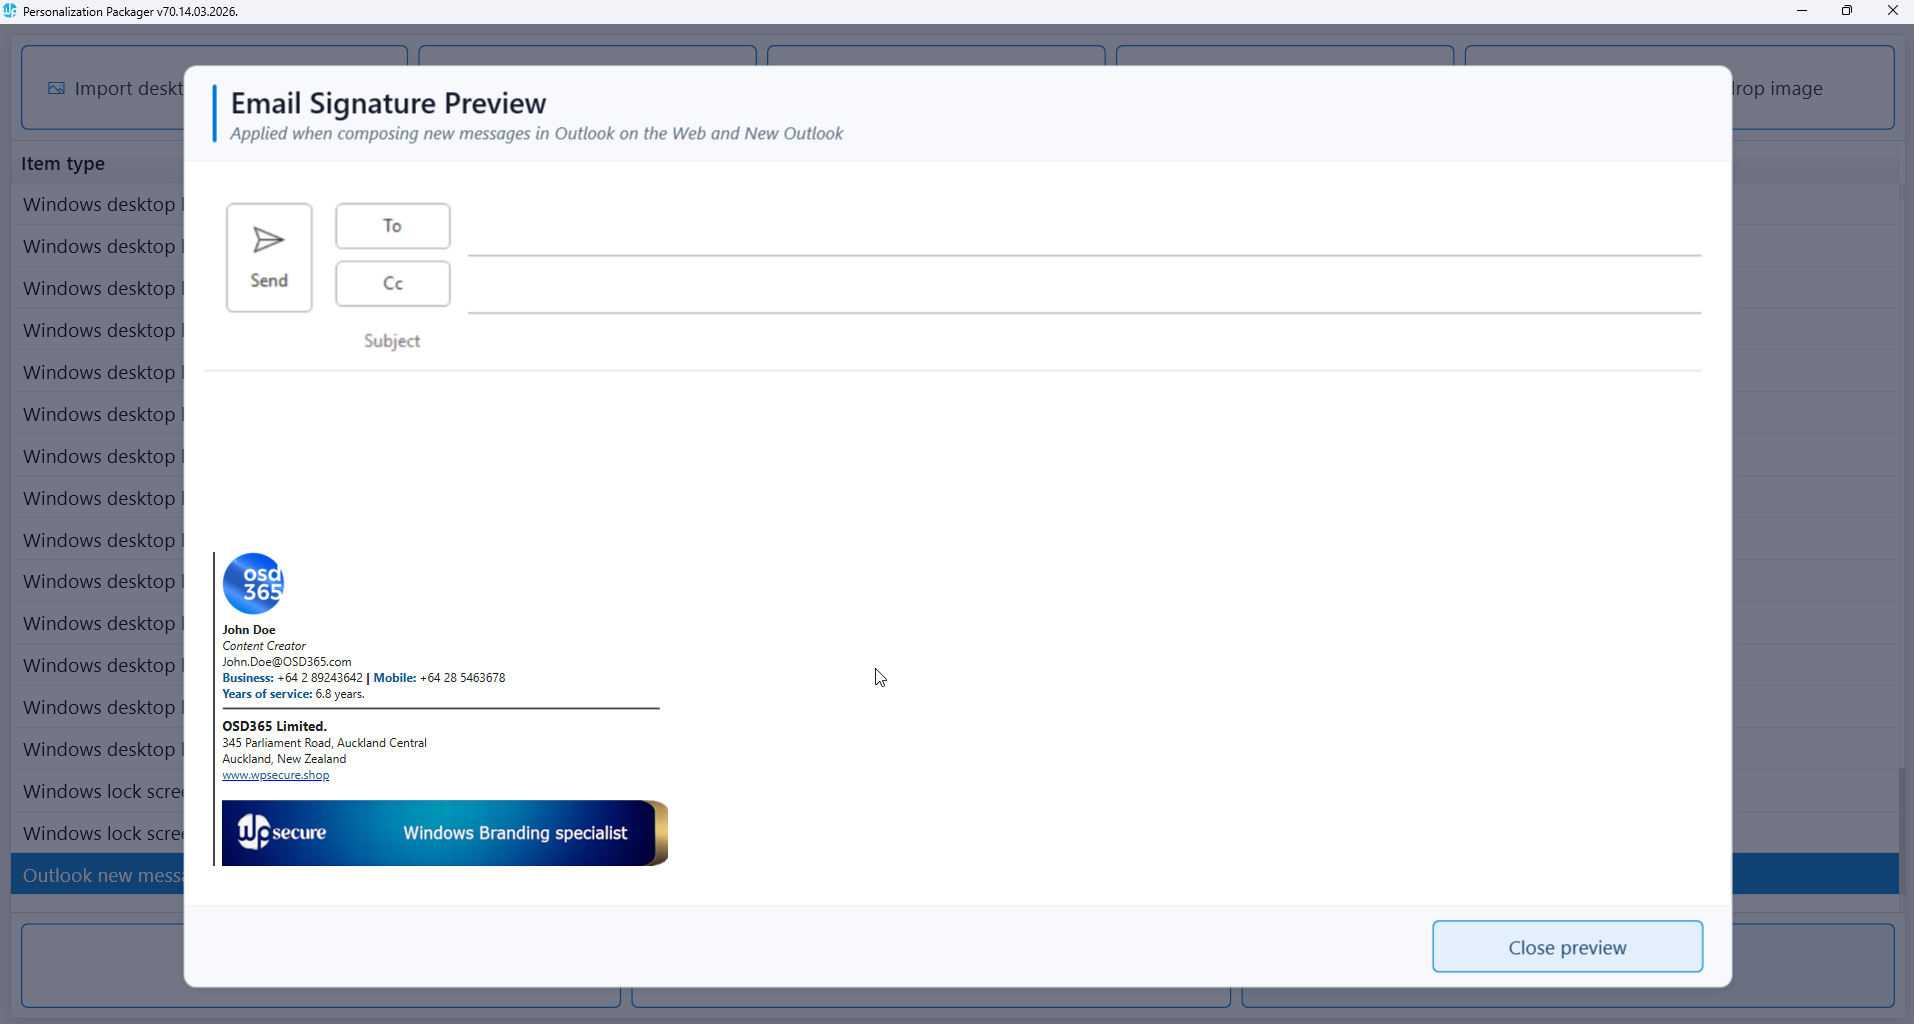
Microsoft Outlook signatures
Remove Group Policies or similar Microsoft Intune CSP policies that prevent changing Outlook Signatures. Please read the content under the Policies topic at the top of this document.
There are three types of Microsoft Outlook clients:
- Outlook Classic is the traditional Office 365 desktop application, bundled with Microsoft Word, Excel, PowerPoint, and other Microsoft 365 products.
- Outlook on the Web is the browser-based version of Outlook, formerly known as Outlook Web Access (OWA). All operations are performed entirely within the web browser.
- New Outlook presents itself as a locally installed application, but is functionally a web client — essentially Outlook on the Web running within a native window. It should be treated as a web-based client accordingly. As Microsoft plans to replace Classic Outlook with New Outlook in the near future, we recommend transitioning your email signatures to the cloud format now to ensure a seamless migration.
Email signatures are available in three file formats:
- HTM (HTML Format) is the primary format and is required for both Outlook Classic and Outlook on the Web/New Outlook. This should always be created and available as the default format.
- RTF (Rich Text Format) is an optional format used exclusively by Outlook Classic. It is not applicable to web-based clients.
- TXT (Plain Text Format) is an optional format supported by both Outlook Classic and Outlook on the Web/New Outlook. It serves as a fallback for email clients that do not render HTML.
Use the following guidelines when designing and creating Outlook email signature templates. These guidelines apply to all signature types.
The total file size of each signature and its associated assets must not exceed 10 MB. To ensure optimal performance and compatibility, it is recommended to keep HTML file character counts below 25,000 for New and Reply signatures, and below 8,000 for Web signatures.
Types of email signature templates:
New Message Signature (Classic Outlook)
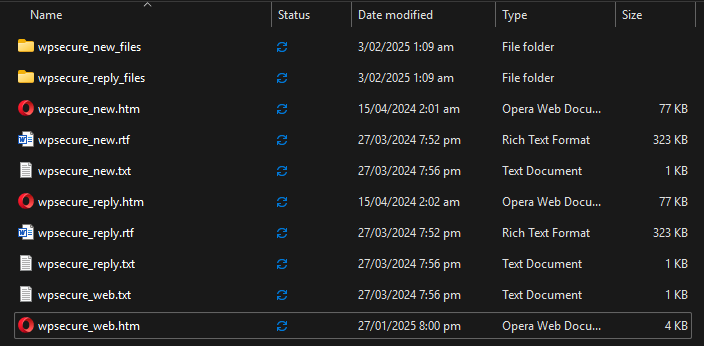
The New Message signature is applied when composing a new message in Outlook Classic. It requires the wpsecure_new.htm file. The wpsecure_new.txt and wpsecure_new.rtf Files are optional.
Microsoft Word is recommended for creating HTM signatures, as it embeds images using VML, ensuring consistent rendering across Outlook clients. When saving the HTM file from Word, any referenced images are automatically stored in a companion folder named wpsecure_new_files. If this folder exists, it will be automatically included in the signature package.
Reply Message Signature (Classic Outlook)
The Reply Message signature is applied when responding to a message in Outlook Classic. It requires the wpsecure_reply.htm file. The wpsecure_reply.txt and wpsecure_reply.rtf files are optional.
As with the New Message signature, Microsoft Word is recommended for authoring the HTM file. Referenced images are automatically stored in a companion folder named wpsecure_reply_files and will be included in the signature package if present.
Web Signature (Exchange Online)
The Web signature is used by organisations that deploy signatures via Exchange Online. It requires the wpsecure_web.htm file. The wpsecure_web.txt file is optional. RTF is not supported for this signature type.
All images referenced in the Web signature must use HTTPS-based URLs. Local image files are not supported by Exchange Online and must not be used. When deployed via Exchange Online, this signature is applied to both new messages and replies.
New Message Cloud Signature (New Outlook & Outlook on the Web)
The New Message Cloud signature is applied when composing a new message in New Outlook or Outlook on the Web (OWA). It requires the wpsecure_cloud_new.htm file and an optional wpsecure_cloud_new.txt.
Microsoft Word is recommended for creating the HTM file; the file must be saved as Web Page, Filtered — unlike the HTM files created for Classic Outlook. Referenced images are automatically stored in a companion folder named wpsecure_cloud_new_files and will be included in the signature package if present.
Reply Message Cloud Signature (New Outlook & Outlook on the Web)
The Reply Message Cloud signature is applied when replying to or forwarding a message in New Outlook or Outlook on the Web (OWA). It requires the wpsecure_cloud_reply.htm file and an optional wpsecure_cloud_reply.txt.
As with the Cloud New signature, the HTM file must be saved from Word as Web Page, Filtered. Referenced images are automatically stored in a companion folder named wpsecure_cloud_reply_files and will be included in the signature package if present.
Placeholders
Use placeholders like {{az_displayname}}, {{az_mobilephone}}, or {{az_jobtitle}} in the ‘wpsecure_new.htm’, ‘wpsecure_new.rtf’, ‘wpsecure_new.txt’, ‘wpsecure_reply.htm’, ‘wpsecure_reply.rtf’, ‘wpsecure_reply.txt’, ‘wpsecure_web.htm’, and ‘wpsecure_web.txt’ files to automatically load user-specific data at runtime.
Since Packager version 65.15.11, you can use placeholders like {{az_displayname, ad_displayname, custom_displayname}} to get the first available value from left to right. If az_displayname is not available, ad_displayname is used; if ad_displayname is also unavailable, custom_displayname is used.
The WPSecure Outlook signature engine replaces the placeholders with the information in the registry corresponding to each placeholder. For example, the following registry entry will replace the placeholder {{az_surname}}.

IMPORTANT NOTE
If the Outlook signature template deployed to a device includes multiple placeholders for user attributes that are not populated, the signature may fail to appear in the Outlook client. However, if only a few attributes are missing, those specific placeholders will simply render as blank fields.
To ensure proper rendering of the signature, make sure user attributes are correctly synced from EntraID or Active Directory and available locally on the device.
How to get and set placeholders?
Placeholder values, whether standard or custom, must not contain any of the characters listed below.
& < > " ' \ { }
The characters {{placeholder-name}} are allowed as part of the placeholder construct, but not as individual characters.
You can use the below methods to sync placeholders for user attributes.
1. Active Directory | Getting default attributes from Active Directory
If your organization uses a legacy Active Directory domain, user attributes are automatically synced to the registry location above, using the device’s ADSI cache.
2. EntraID | User-Initiated via Start Menu Shortcut
A shortcut is deployed to the user’s Start Menu. When the user selects this shortcut, they are redirected to an authentication workflow.
Upon successful authentication, the user’s attributes are retrieved from Microsoft Entra ID and securely written to the Windows registry location specified above.
3. EntraID | Scheduled Silent Attribute Synchronization (Every 8 Hours)
User attributes are silently retrieved from Microsoft Entra ID every eight hours, without user interaction and written to the above registry location.
This approach relies on several Azure services that will introduce additional operational and licensing costs from Microsoft. For this reason, it is primarily suited to larger enterprise environments that might already use these services.
The following Azure services are used as part of this method:
- Azure API Management (APIM)
- Azure Functions
- Client authentication certificate, issued either by:
- An internal Certificate Authority (CA), or
- Microsoft Intune Cloud PKI
4. EntraID | Administrator‑Initiated Deployment (One‑Off Action)
This method involves a one‑time, administrator‑initiated deployment to retrieve and write user attributes to the registry.
This approach is not recommended due to its reliance on client secrets, which are inherently less secure and increase the risk of credential exposure or misuse.
Using this method, administrators execute a command across managed devices that authenticates using a client secret, retrieves user attributes from Microsoft Entra ID, and writes those attributes to the user’s registry hive. The command is executed in the user’s security context via a device management or software deployment platform, such as:
- Microsoft Endpoint Configuration Manager (MECM)
- Microsoft Intune
User attributes and prefix
- Attributes synchronized from Azure have a prefix of ‘az_‘. Example: ‘az_attributename‘,
- Attributes synchronized from Active Directory Services have an ‘ad_‘ prefix. Example: ‘ad_attributename‘.
- Custom attributes have a prefix of ‘custom’. Example: ‘customattributename‘.
The following table outlines the supported attributes for Azure and Active Directory Services.
| Active Directory | Azure (Entra) | Description |
|---|---|---|
| ad_telephonenumber | az_businessphones1 | Phone number associated with the user. |
| ad_l | az_city | City where the user is located. |
| ad_company | az_companyname | Name of the user's company or organization. |
| ad_c | az_country | Country code or name where the user resides. |
| ad_department | az_department | Department or team within the organization. |
| ad_displayname | az_displayname | User's display name (usually first and last name). |
| ad_employeeid | az_employeeid | Unique identifier for the employee. |
| ad_facsimiletelephonenumber | az_faxnumber | Fax number associated with the user. |
| ad_givenname | az_givenname | User's first name. |
| ad_title | az_jobtitle | Job title or position within the organization. |
| ad_mail | az_mail | Email address of the user. |
| ad_mailnickname | az_mailnickname | Unique nickname for the user's email address. |
| ad_mobile | az_mobilephone | Mobile phone number of the user. |
| ad_office | az_officelocation | Physical office location or workspace. |
| ad_postalcode | az_postalcode | Postal code or ZIP code of the user's address. |
| ad_st | az_state | State or region where the user resides. |
| ad_streetaddress | az_streetaddress | Street address of the user. |
| ad_sn | az_surname | User's last name or surname. |
| ad_userprincipalname | az_userprincipalname | Principal name used for authentication (usually the email address). |
Getting additional attributes from Active Directory or Entra ID for use in email signatures
For most organizations, the above-listed attributes will suffice. But if you want to use (Available from WPSecure version 61.25.7.2025) other Active Directory or Entra ID attributes within your Outlook email signature template, run the following command as an Administrator. The ‘Version‘ switch is only used to detect this setting on a device where this setting is deployed.
"c:\Program Files (x86)\wpsecure\wpsecure-set.exe" -extraattributescsv "extensionattribute1,extensionattribute2,extensionattribute3" -version 1.3.2.5
Run the following command as an Administrator to remove this setting.
"c:\Program Files (x86)\wpsecure\wpsecure-set.exe" -dextattfsig
Use the following registry setting (Version) to identify this setting during fleet-wide deployments. Use detection methods that look for a version that is greater than or equal to the version corresponding to this setting.
Creating administrator‑defined custom attributes managed by users
As mentioned earlier, custom fields begin with the prefix custom . But these custom attributes are managed by users. These custom attributes begin with the prefix custom_user_set_. A few examples are listed below.
- custom_user_set_givenname
- custom_user_set_jobtitle
- custom_user_set_yourthoughtfortheday
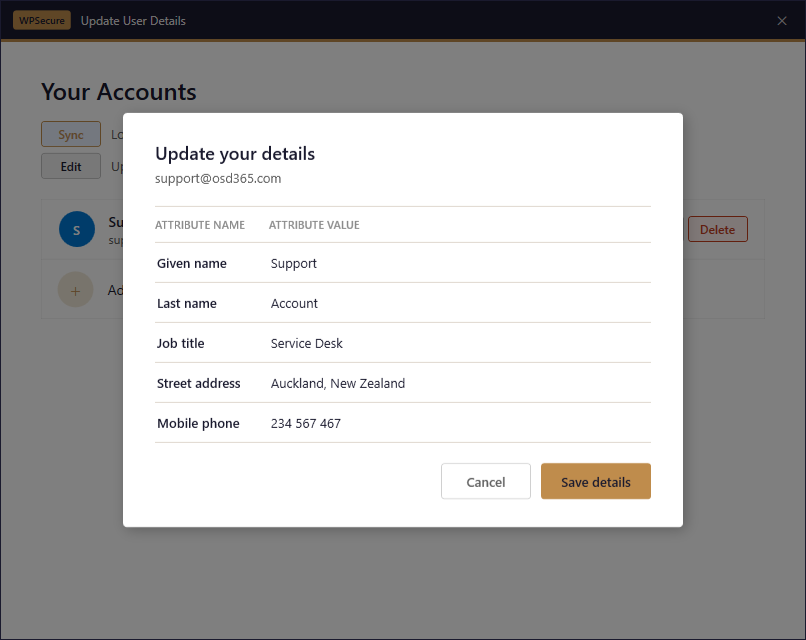
Click the button below to learn how to set up the “Update User Details” tool. Users launch this tool using the modern shortcut on their start menu. After you click the button below, when you read the instructions on the page, make sure you focus only on the modern shortcut. The tool associated with the legacy shortcut does not support setting customer-administered placeholders.
If you have deployed a legacy shortcut in the past, make sure you uninstall the legacy shortcut before you install the modern start menu shortcut.
Creating custom calculated fields
As mentioned earlier, custom fields begin with the prefix custom. A few examples are listed below.
- customyearsofservice
- customphonedetails
- customnewyearsmessage
- customattribute1
Custom attribute names can only use the following characters.
- Letters (a–z, A–Z)
- Underscore (
_)
Just like standard Entra ID or Active Directory placeholders, custom fields are placed under the following registry key.

Custom calculated fields allow you to create placeholders by combining existing placeholder values using arithmetic, conditional, and date‑difference calculations. Click the button below for detailed information on creating and deploying custom calculated placeholders.
Since the release of version 68 of the tool, custom-calculated placeholders are deployed using a PowerShell script named signature.ps1, leveraging the WPSecure script deployment method documented at the bottom of this page.
Set default Signature in Classic Outlook
Setting the default signature in Classic Outlook is the easiest. If you have completed the above steps and if the signature engine is enabled, the branded signatures from the winning brand package will appear in Classic Outlook. Make sure the following signature templates are included in the brand/personalization package.
New Message Signature
The New Message signature is applied when composing a new message in Outlook Classic. It requires the wpsecure_new.htm file. The wpsecure_new.txt and wpsecure_new.rtf Files are optional.
Reply Message Signature
The Reply Message signature is applied when responding to a message in Outlook Classic. It requires the wpsecure_reply.htm file. The wpsecure_reply.txt and wpsecure_reply.rtf files are optional.
Insert Signature in New Outlook and OWA using Outlook Addin
The button below will guide you to a step-by-step deployment article for the WPSecure Signature Inserter — an Outlook web add-in that enables automatic signature insertion for both new messages and replies/forwards in New Outlook and Outlook on the Web (OWA).
New Message Cloud Signature
The New Message Cloud signature is applied when composing a new message in New Outlook or Outlook on the Web (OWA). It requires the wpsecure_cloud_new.htm file and an optional wpsecure_cloud_new.txt.
Reply Message Cloud Signature
The Reply Message Cloud signature is applied when replying to or forwarding a message in New Outlook or Outlook on the Web (OWA). It requires the wpsecure_cloud_reply.htm file and an optional wpsecure_cloud_reply.txt.
Set up the signature Inserter add-in. Why this extra step?
Microsoft does not currently provide a programmatic way to set default signatures in New Outlook or OWA. WPSecure addresses this gap with a purpose-built solution that delivers full signature insertion capability — deployed entirely within your own Azure tenant.
All operations performed by the Signature Inserter add-in run exclusively within your Azure network. No transport rules. No forwarding of emails to third-party processors. Your data stays where it belongs — with you. This is the foundation of our value proposition.
Please follow the deployment instructions exactly as described to ensure a successful setup. The article also includes a troubleshooting guide and an Azure usage estimate at the end.
Windows Branding Tool
stored per user
backend — fetches &
processes templates
caches & inserts
silently
on compose & reply
Set a Default Email Signature in Exchange Online
The Web signature is used by organisations that deploy signatures via Exchange Online. It requires the wpsecure_web.htm file. The wpsecure_web.txt file is optional. RTF is not supported for this signature type.
All images referenced in the Web signature must use HTTPS-based URLs. Local image files are not supported by Exchange Online and must not be used. When deployed via Exchange Online, this signature is applied to both new messages and replies.
This approach relies on several Azure services, which will incur additional operational and licensing costs from Microsoft. For this reason, it is primarily suited to larger enterprise environments that might already use these services.
- Azure API Management (APIM)
- Azure Functions
- Client authentication certificate, issued either by:
- An internal Certificate Authority (CA), or
- Microsoft Intune Cloud PKI
Note: Automatic sync will happen when the email signature content changes or every eight hours.
Windows video screensaver
Remove Group Policies or similar Microsoft Intune CSP policies that prevent changing Screensavers. Please read the content under the Policies topic at the top of this document.
Ensure that the “Turn My Screen Off After” setting under System > Power is configured to a duration longer than the ScreenSaver activation time. This setting is typically managed via Active Directory Group Policy or through SCCM Power Settings within Collection Settings. If not configured correctly, the display may turn off before the ScreenSaver has a chance to activate.
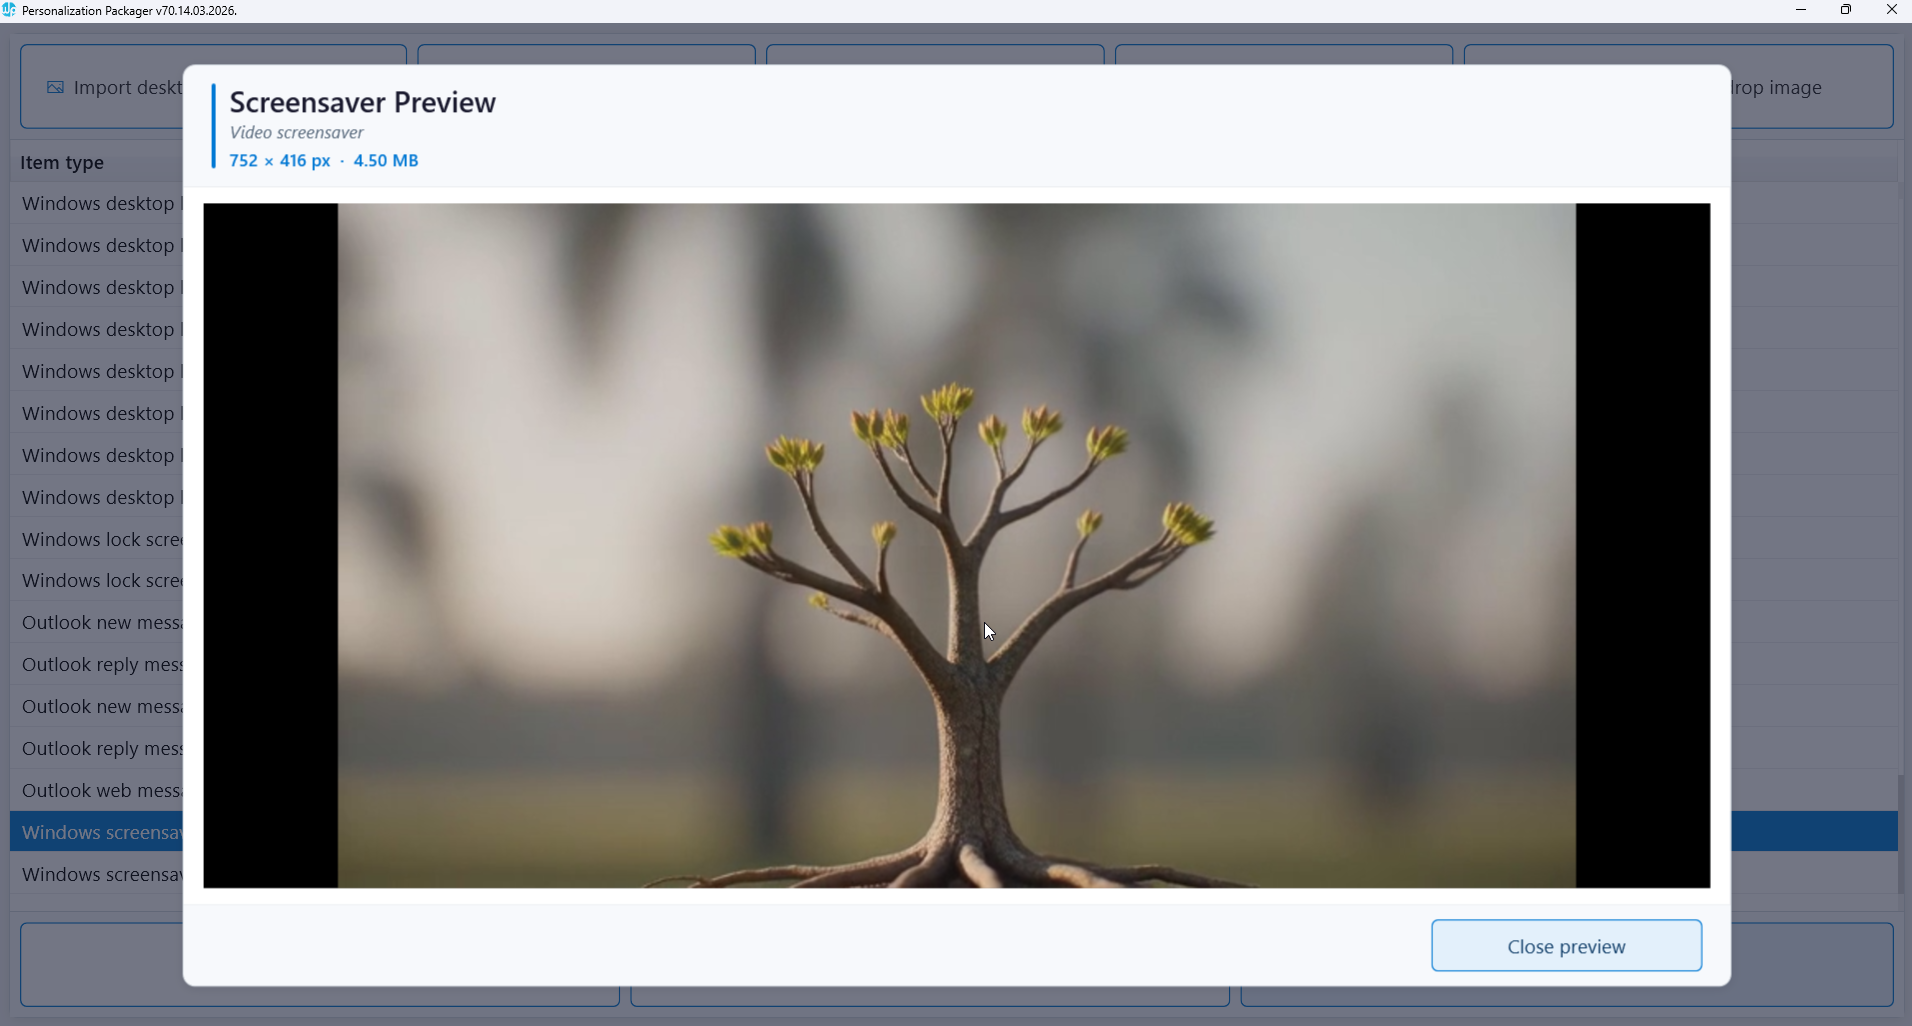
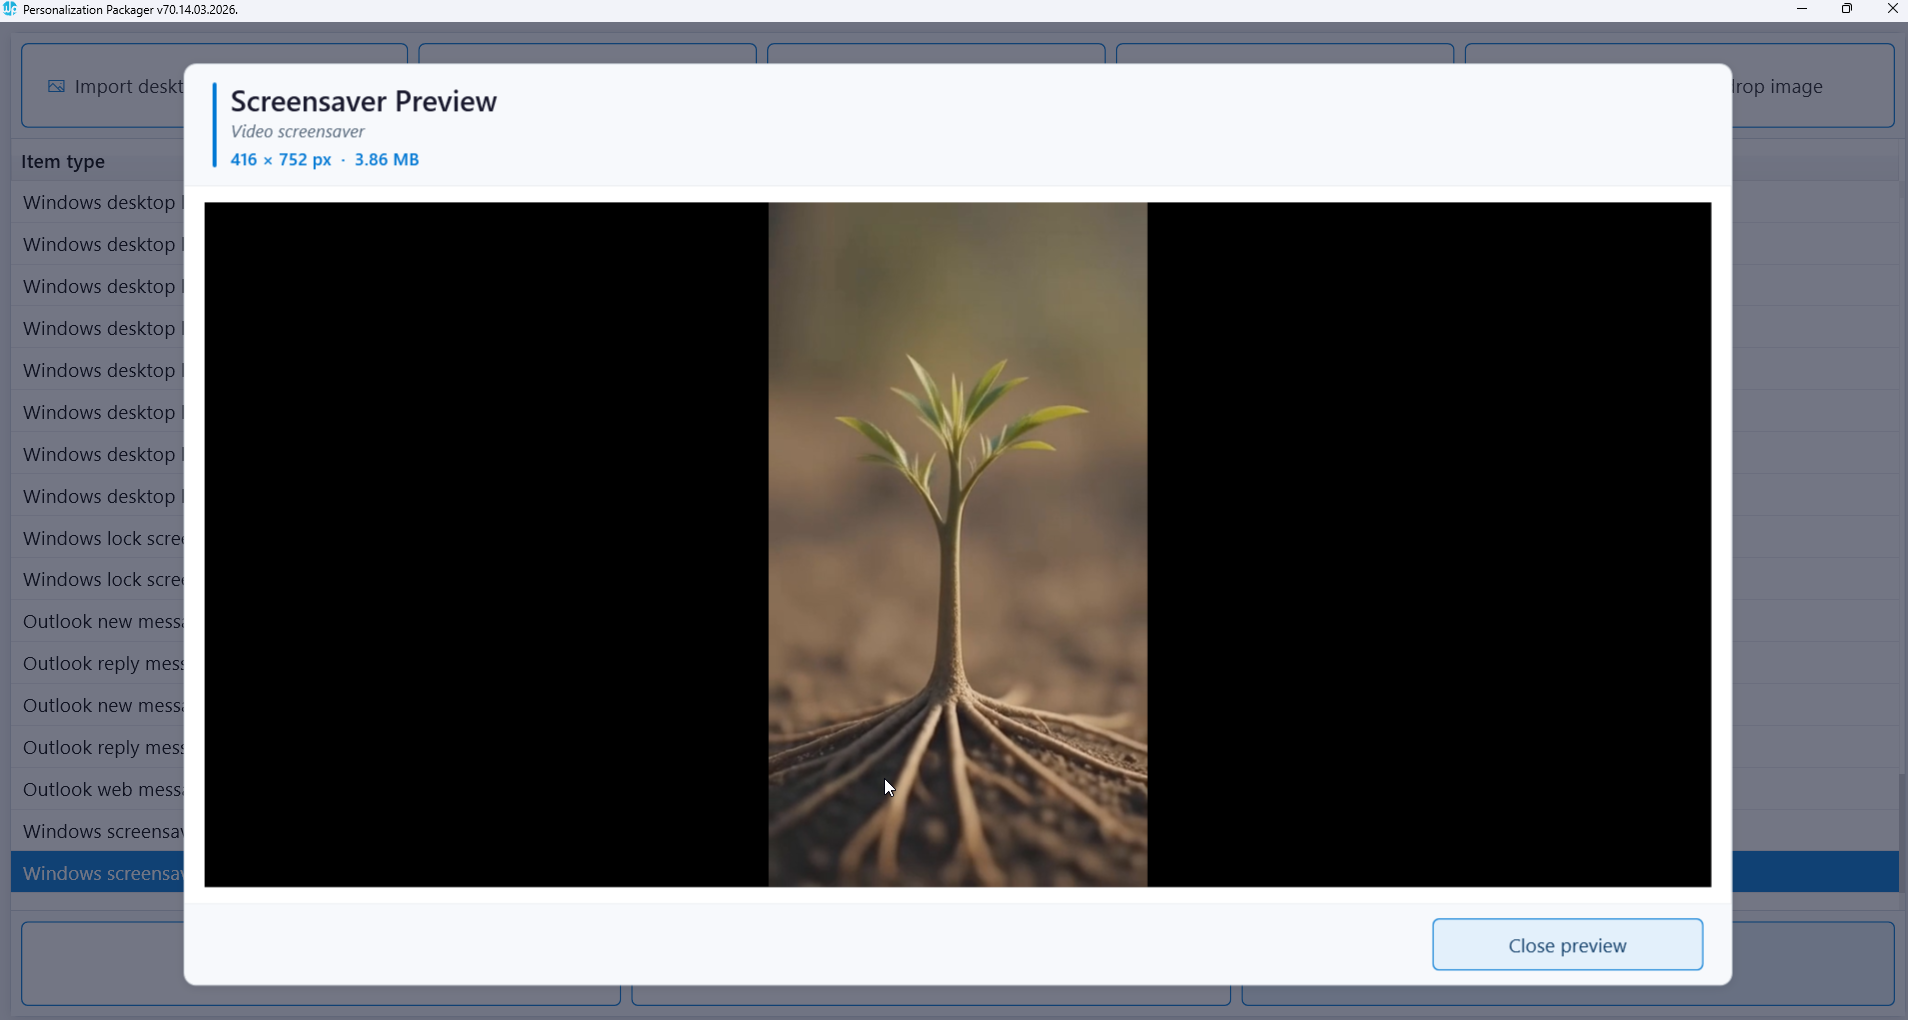
The file size of the screensaver video file must be at most 50 MB. Import a video with the .MP4 file extension. WPSecure utilizes MP4 files, also known as MPEG-4 video files, for Screensaver.
Ensure that the videos used are of high resolution and quality. This will help to create a visually appealing and professional-looking screensaver.
You can set a personalization package as a 'Pending Reboot' reminder package, displaying a 'Pending Reboot' message on the video Screensaver. For additional details, refer to the extra settings section below.
The Personalization Packager does not control Screensaver settings like ‘Wait‘ or ‘On resume, display logon screen.‘ Set these values using Global or Local Policies. Ensure there are no Policies preventing users from changing the Screensaver is being applied.

Using the Personalization packager
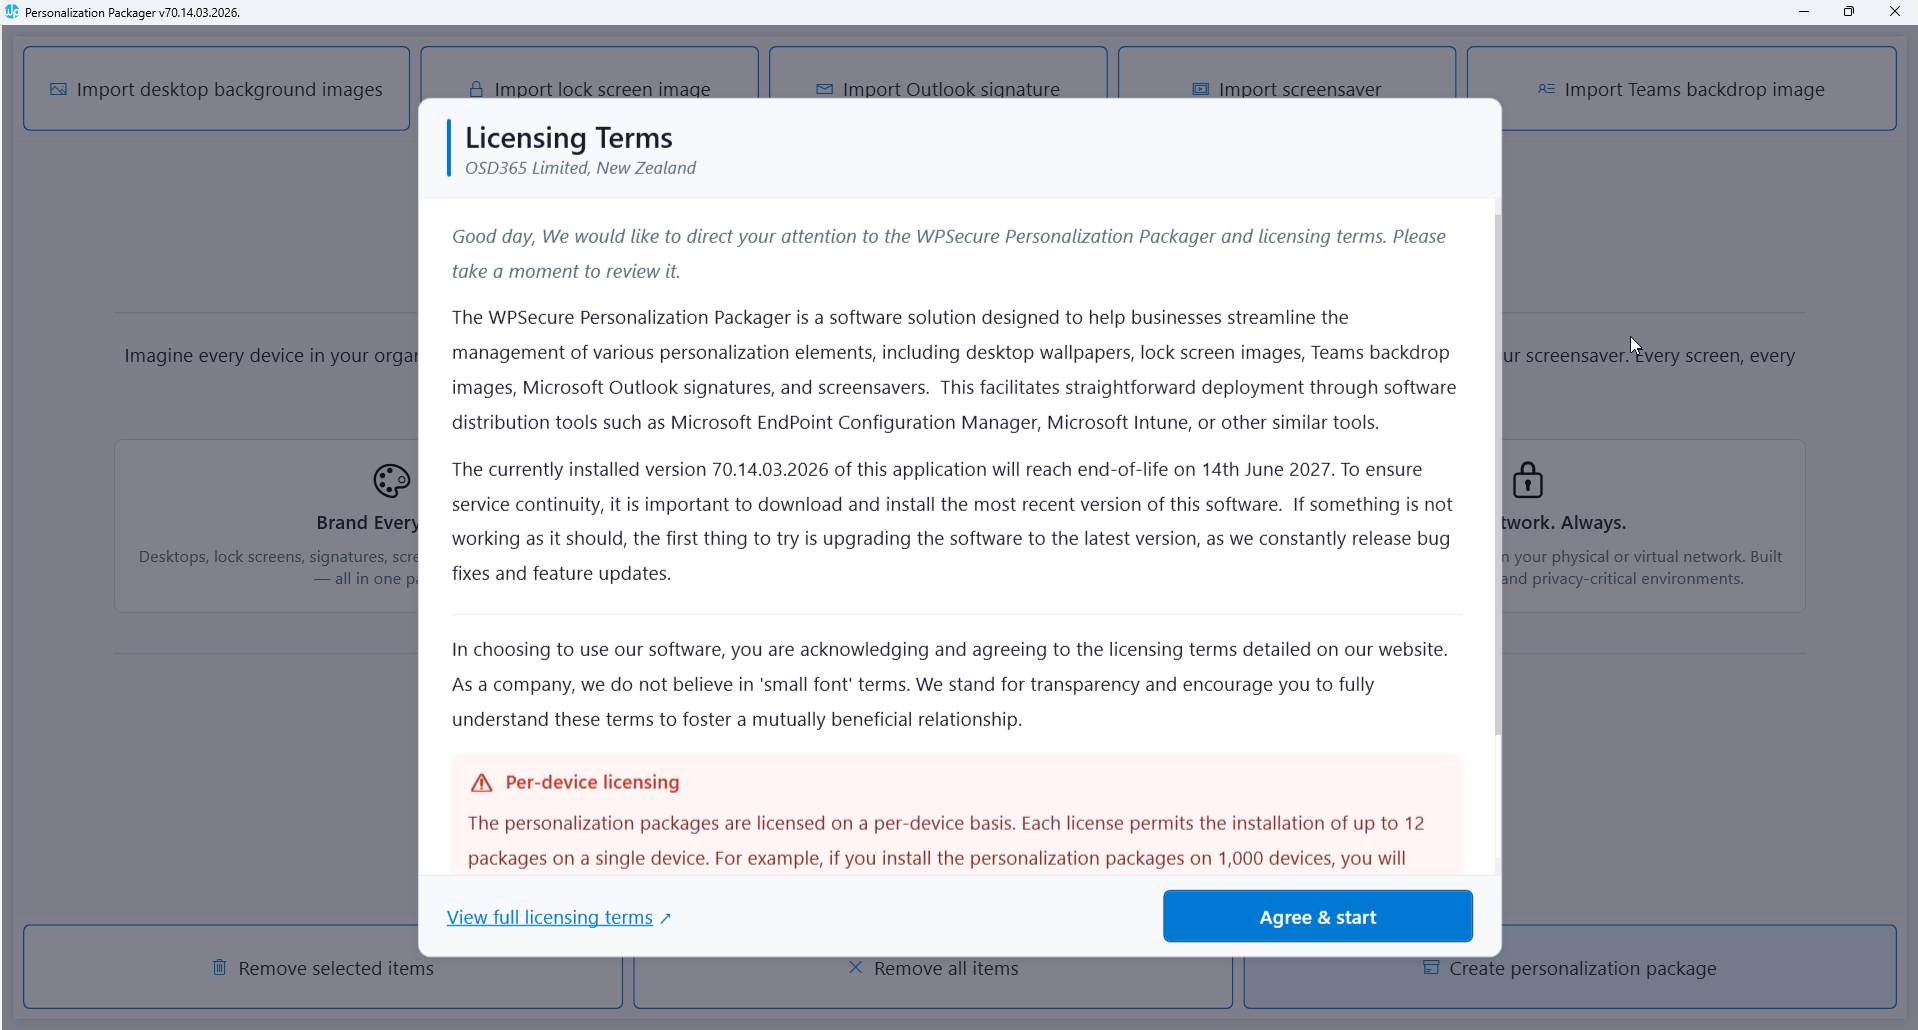
You can launch the Personalization Packager from the start menu. Upon opening the application, you will be presented with the ‘Terms of Use and Service’ page. Please take a moment to review it.
Note: The WPSecure Personalization Packager requires the Microsoft Win32 Content Prep Tool to convert the Personalization Packages into a Win32 app that can be deployed using Microsoft Intune. Due to Microsoft’s license restrictions, we can not distribute the Microsoft Win32 Content Prep Tool with our product. Click here to read about it and download the Microsoft Win32 Content Prep Tool.
Download for free, save locally, and make the IntuneWinAppUtil.exe file available during the first run of the WPSecure Personalization Packager.
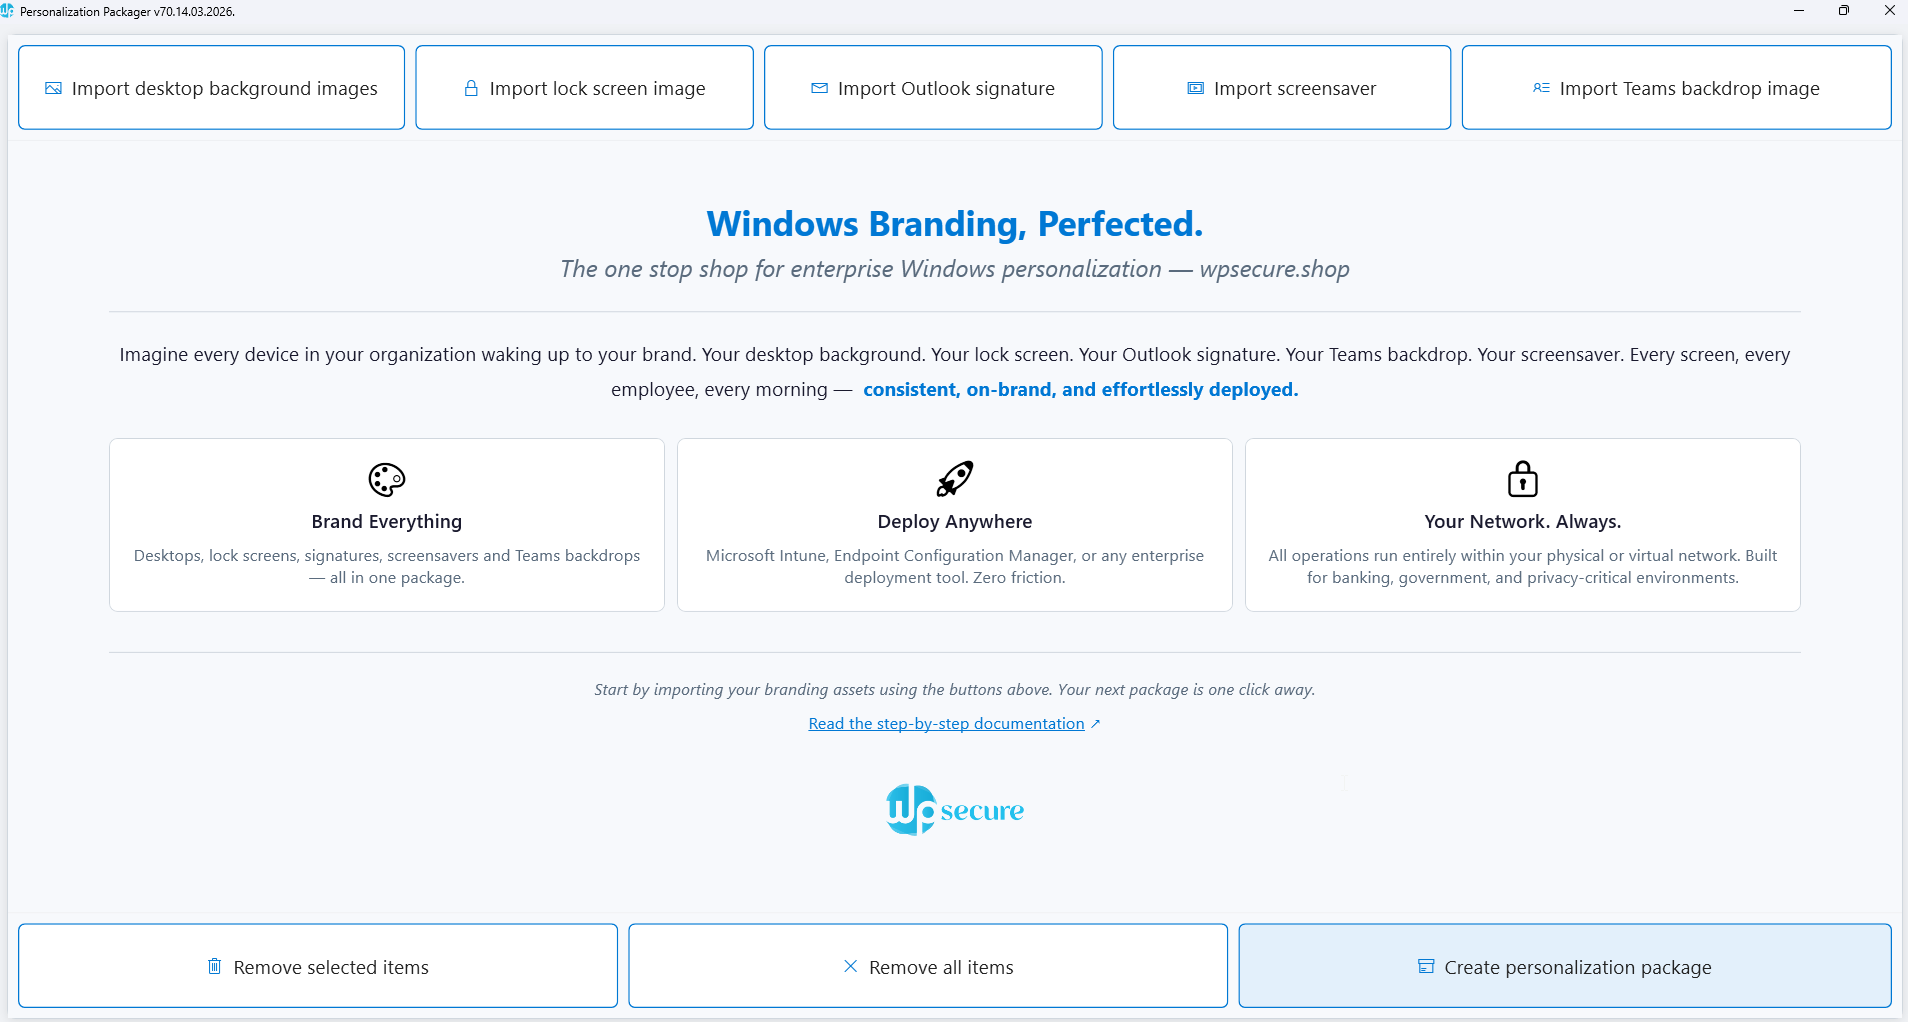
Listed below are the actions triggered by each button on this page.
Import desktop background images: To import multiple images in JPG format, click on this button. A file explorer window will open, allowing you to select a folder containing the images you want to import. Please note that the packager only allows up to 90 desktop background images of varying dimensions and orientations. Each image should not exceed 10 MB, and the Image Width and Height cannot be a decimal/fraction. If any of these conditions are not met, the import process may fail.
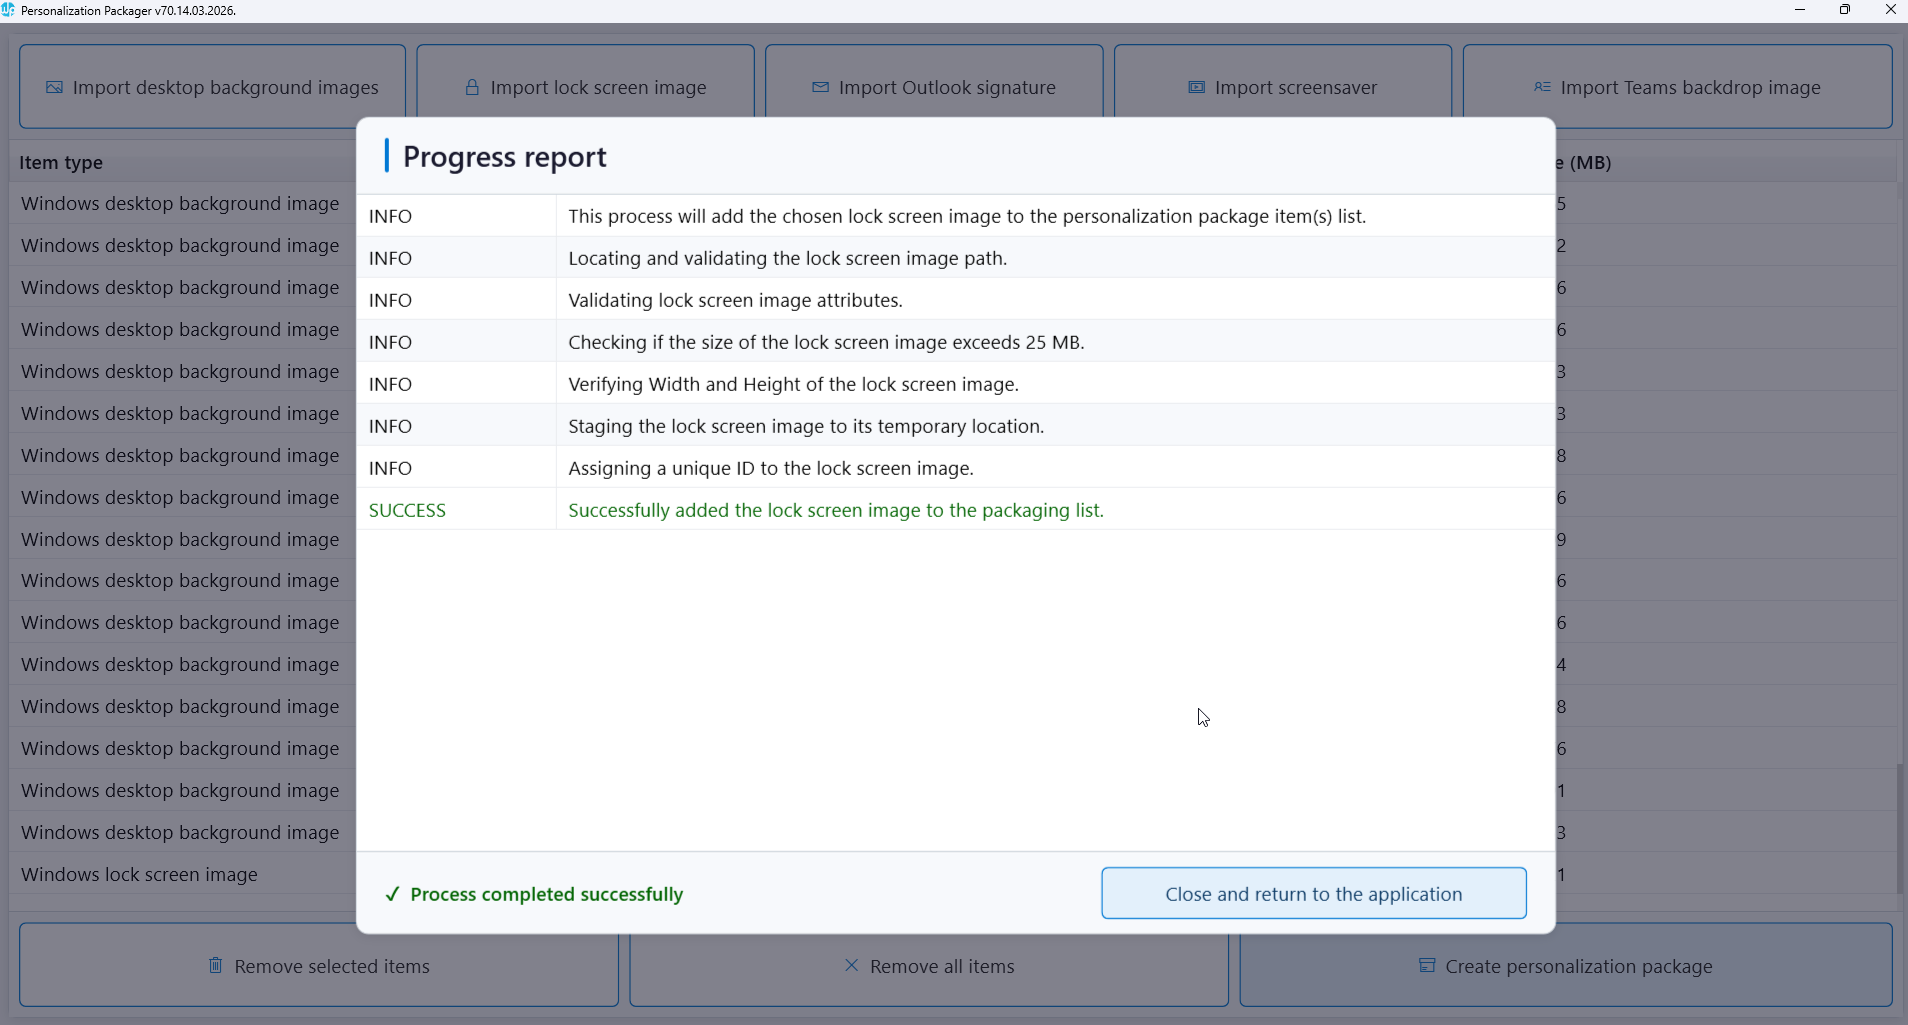
Import lock screen image: You can import multiple lock screen images for both landscape and portrait orientations. The file size of each image should not exceed 25 MB.
Import Outlook signature: Import a Microsoft Outlook signature HTM file. When importing the signature templates into the Personalization Packager, you will choose either the ‘wpsecure_new.htm’ , ‘wpsecure_reply.htm’, or ‘wpsecure_web.htm’ HTM files. The options TXT and RTF files and the supporting folder that correspond to the HTM file, if present, will be automatically imported.
Import screensaver: Import a video file in MP4 file format.
Import Teams backdrop image: You can import multiple Teams background images. Each imported image should be 1920 pixels wide and 1080 pixels high, and the file size of each image should not exceed 25 MB.
Remove selected items: Select an item from the list to remove it.
Remove all items: Click this button to remove all items in the list. This can be useful when you want to clear out all existing items before uploading new ones, or if you want to start fresh with a new personalization package.
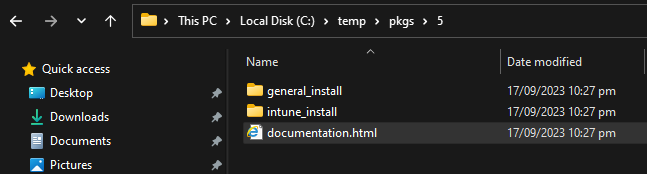
Create personalization package: Use this button to export the personalization package to a folder. A personalization package is a collection of all the settings and files you have imported or created for your desktop backgrounds, Outlook signatures, and screensavers. The selected destination folder has to be empty. The personalization package creation process creates two folders: general_install and intune_install.
The general_install folder contains installation files for deployment via enterprise software management tools like Microsoft Endpoint Configuration Manager (MECM/SCCM). Run the ‘wpsecure-install.exe’ to install the personalization package. More details regarding the enterprise installation and uninstallation process are in the ‘documentation.html’ file.
The intune_install folder contains the ‘wpsecure-install.intunewin’ file to be uploaded to the Microsoft Endpoint Device Management portal (Intune). The command-line for this is identical to the general install.
The process also creates a ‘documentation.html’ file that provides all the information required to deploy the personalization package, like package version, install command line, uninstall command line, and detection methods.
We release security and feature updates for the Personalization Packager approximately once a month. After Microsoft tests and approves the release, your device will automatically update from the Microsoft Store.
To update the Packages that have been deployed to your Windows fleet, create a WPSecure Package without any branding/personalization items included. On deployment, this will automatically update the WPSecure Package engine without affecting the personalization/branding items.
The image below displays the Packager interface when one or more personalization items have been loaded. To preview the content, click on each item.

If one or more items should fail import, the following screen will report the failed item. You can understand the problem better by looking at the log file in the following location.
%temp%\wpsecure-packager.log
The personalization package creation process creates two folders: general_install and intune_install.
The general_install folder contains installation files for deployment via enterprise software management tools like Microsoft Endpoint Configuration Manager (SCCM). Run the ‘wpsecure-install.exe’ to install the personalization package. More details regarding the enterprise installation and uninstallation process are in the ‘documentation.html’ file.
The intune_install folder contains the ‘wpsecure-install.intunewin’ file to be uploaded to the Microsoft Endpoint Device Management portal (Intune). The command line for this is identical to the general install.

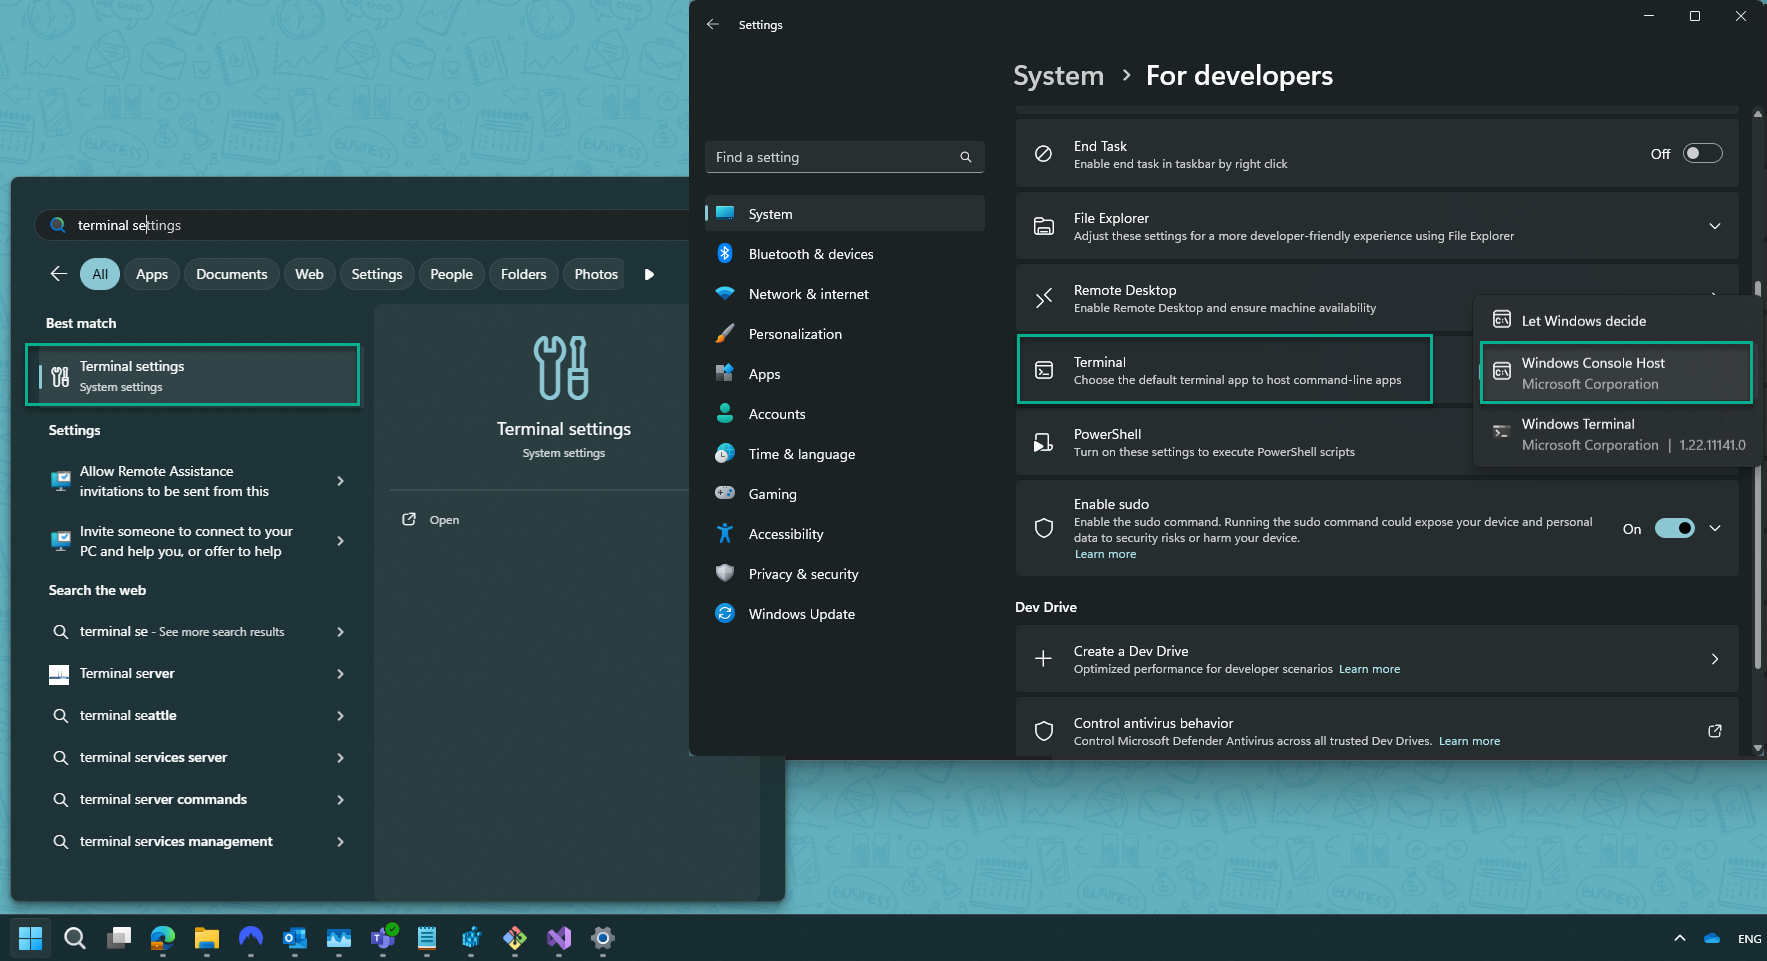
Suppose the process fails to create an Intune Package. Open “Terminal Settings” and set “Windows Console Host” as the default terminal viewer. Most Users will not experience this issue, but we’ve had reports of 2 Users experiencing a failure to create an Intune Package. The WPSecure Personalization Packager has sophisticated subroutines to identify and remediate such scenarios, but it’s good to know about a workaround if an issue exists.
Personalization package installation
This section is just a brief overview of the Personalization package installation process. Detailed documentation is specifically generated for each package when it is created.
The package creation process creates a ‘documentation.html’ file that provides all the information required to deploy the personalization package, including the package version, the installation and uninstallation commands, and detection methods.
A personalization package is a collection of all the settings and files you have imported, such as desktop backgrounds, lock screen images, Outlook signatures, and screensavers. The personalization package creation process creates two folders: general_install and intune_install.
The general_install folder contains installation files for deployment via enterprise software management tools like Microsoft Endpoint Configuration Manager (SCCM). Run the ‘wpsecure-install.exe’ to install the personalization package. More details regarding the enterprise installation and uninstallation process are in the ‘documentation.html’ file.
The intune_install folder contains the ‘wpsecure-install.intunewin’ file to be uploaded to the Microsoft Endpoint Device Management portal (Intune). The command line for this is identical to the general install.
Install command line
The install command line is the same for deployment via Microsoft Endpoint Configuration Manager, Intune, or other deployment tools.
The general install package is in the ‘general_install‘ folder of the Personalization package output directory.
The install package for Microsoft Intune is in the ‘intune_install‘ folder of the Personalization package output directory.
Use the switch ‘-silent‘ to install the package silently.
wpsecure-install.exe
wpsecure-install.exe -silent
wpsecure-install.exe -silent -only
wpsecure-install.exe -silent -onlyafter
Use the -only switch to remove any existing Personalization packages and install the current package. If your organization deploys a single package that includes all personalization items, this is the recommended option.
[Since version 66.21.1.0] Use the -onlyafter switch to remove any existing Personalization packages with a version lower than the current package before installing the current package.
Install detection
Use the following file paths to detect if the Personalization package is installed on the target device.
For x86 Systems
'C:\Program Files\wpsecure\packages\20.24.0421.1758\wpsecure.exe'
For x64 Systems
'C:\Program Files (x86)\wpsecure\packages\20.24.0421.1758\wpsecure.exe'
In this example, ‘C:\‘ is the drive containing the ‘Program Files’ directory and ‘20.24.0421.1758‘ is the Personalization package version. Also, note that every single file in the above folder is crucial to the proper functioning of the Personalization package. Avoid moving, adding, or changing files outside the Personalization Packager before or after deployment.
Uninstall command line
The uninstall command line is the same for deployment via Microsoft Endpoint Configuration Manager, Intune, or other deployment tools.
The general uninstall package is in the ‘general_install’ folder of the Personalization package output directory.
The uninstall package for Microsoft Intune is in the ‘intune_install’ folder of the Personalization package output directory.
The Personalization package can also be uninstalled from the Control Panel’s Programs and Features section.
wpsecure-uninstall.exe
The above command line will uninstall the version corresponding to this package.
wpsecure-uninstall.exe -silent
The above command line will silently uninstall the version corresponding to this package.
wpsecure-uninstall.exe -all
The above command line will uninstall all Personalization packages.
wpsecure-uninstall.exe -all -silent
The above command line will silently uninstall all Personalization packages
wpsecure-uninstall.exe -all -scrub
The above command line will uninstall all Personalization packages and forcibly remove all registry settings and the Start menu shortcut for the Microsoft Outlook Signature attribute Sync.
We recommend using this option only if you will never need to install WPSecure Personalization Packages again.
wpsecure-uninstall.exe 20.24.0421.1758
The above command line will uninstall the Personalization package version “20.24.0421.1758”.
wpsecure-uninstall.exe 20.24.0421.1758 -silent
The above command line will silently uninstall the Personalization package version “20.24.0421.1758”.
Package precedence model
Curious about how WPSecure handles multiple personalization packages on the same device—and ensures the right branding shows up?
Whether you’re deploying a single corporate standard, running seasonal campaigns, or targeting specific teams, WPSecure’s local engine intelligently selects the active elements using a clear, layered precedence system—all without any external services or cloud dependency.
Read the full guide here → Understand the default “highest version wins” behavior, how to pin stable defaults, and how the powerful Campaign Manager lets you schedule, target, and prioritize branding with precision.
Extra settings
If you have one or more WPSecure Packages installed on a device, you will find the executable ‘wpsecure-set.exe‘ in the WPSecure application directory. Use this executable to deploy extra settings for the WPSecure Personalization Packages.
Set default for ALL branding types
Run the command below as administrator to set the default package version for all personalization types. This can only be overridden by the use of a Campaign Manager.
"C:\Program Files (x86)\wpsecure\wpsecure-set.exe" -dpv 20.24.2244.2135
Set default for Desktop backgrounds only
Run the command below as administrator to set the default package version for desktop backgrounds. This can only be overridden by the use of a Campaign Manager.
"C:\Program Files (x86)\wpsecure\wpsecure-set.exe" -dpvbg 20.25.1230.2135
Set default for Lock screen images only
Run the command below as administrator to set the default package version for lock screen images. This can only be overridden by the use of a Campaign Manager.
"C:\Program Files (x86)\wpsecure\wpsecure-set.exe" -dpvls 20.25.1230.2202
Set default for Outlook email signatures only
Run the command below as administrator to set the default package version for Outlook email signatures. This can only be overridden by the use of a Campaign Manager.
"C:\Program Files (x86)\wpsecure\wpsecure-set.exe" -dpvsigall 20.25.1230.2143
Set default for Video screensavers only
Run the command below as administrator to set the default package version for video screensavers. This can only be overridden by the use of a Campaign Manager.
"C:\Program Files (x86)\wpsecure\wpsecure-set.exe" -dpvss 20.25.1230.2147
Set default for Microsoft Teams backgrounds only
Run the command below as administrator to set the default package version for Microsoft Teams backgrounds. This can only be overridden by the use of a Campaign Manager.
"C:\Program Files (x86)\wpsecure\wpsecure-set.exe" -dpvtbg 20.25.1230.2157
Delete default package versions
The commands below must be run with administrator privileges. Use them to delete either all default package version assignments or those for specific personalization types. The first command deletes all assignments.
					"c:\Program Files (x86)\wpsecure\wpsecure-set.exe" -dpv delete
"c:\Program Files (x86)\wpsecure\wpsecure-set.exe" -dpvbg delete
"c:\Program Files (x86)\wpsecure\wpsecure-set.exe" -dpvls delete
"c:\Program Files (x86)\wpsecure\wpsecure-set.exe" -dpvsigall delete
"c:\Program Files (x86)\wpsecure\wpsecure-set.exe" -dpvss delete
"c:\Program Files (x86)\wpsecure\wpsecure-set.exe" -dpvtbg delete
Pending reboot messaging
Windows Operating System health is directly related to consistent device restart cycles. Use Desktop backgrounds, lock screen images, and Video screensavers to remind Users when a restart cycle is pending. Designate a personalization package as a ‘Pending Restart’ reminder package. Only the following modules can use this feature.
- Desktop backgrounds
- Lock Screen images
- Screensavers
Run the following command as an administrator or as a SYSTEM.
"c:\Program Files (x86)\wpsecure\wpsecure-set.exe" -prpv 20.24.0623.1319
You can detect this setting using the following registry location.
Compliance and remediation scripts in Microsoft Intune or SCCM can help you set the above ‘pendingreboot‘ flag.
Your ‘detection’ script can look similar to the below Powershell script.
					if (!(Get-Module -ListAvailable -Name PendingReboot)) {
    #Install Nuget Provider.
    Install-PackageProvider -Name Nuget -Force
    #Install Nuget Pending Reboot Module.
    Install-Module -Name PendingReboot -Force
}
if (Get-Module -ListAvailable -Name PendingReboot -ErrorAction SilentlyContinue) {
    #Check pending reboot
    if((Test-PendingReboot -ErrorAction SilentlyContinue).IsRebootPending) {
        #Reboot is pending
        exit 1
    } else {
        #Reboot is not pending
        Remove-ItemProperty -Path HKLM:\SOFTWARE\WPSecure -Name pendingreboot -Force -ErrorAction SilentlyContinue
        exit 0
    }
} else {
    #Module was not installed or is not available. How would you like to handle this.
    #if exit value is 1 Pending Reboot flag will be set. If exit value is 0 Pending Reboot value will not be set.
    exit 0
}
Your ‘remediation’ script can look similar to the below Powershell script.
Set-ItemProperty -Path HKLM:\SOFTWARE\WPSecure -Name pendingreboot -Type DWord -Value 1 -Force -ErrorAction SilentlyContinue
Disable or enable the WPSecure management engine.
There may be instances where it is desirable to disable WPSecure without uninstalling the WPSecure Windows Personalization Packages. Run as administrator.
"c:\Program Files (x86)\wpsecure\wpsecure-set.exe" -disable
"c:\Program Files (x86)\wpsecure\wpsecure-set.exe" -enable
Run the following command as administrator to turn off only the background processing engine. Do this on devices where you want to permanently turn off the desktop background deployments using WPSecure. Default is enabled
"c:\Program Files (x86)\wpsecure\wpsecure-set.exe" -disablebg
"c:\Program Files (x86)\wpsecure\wpsecure-set.exe" -enablebg
Run the following command as administrator to turn off only the Outlook signature processing engine. Do this on devices where you want to permanently turn off the Outlook signature deployments using WPSecure. Default is enabled
"c:\Program Files (x86)\wpsecure\wpsecure-set.exe" -disablesig
"c:\Program Files (x86)\wpsecure\wpsecure-set.exe" -enablessig
Run the following command as administrator to turn off only the lock screen processing engine. Do this on devices where you want to permanently turn off the lock screen image deployments using WPSecure. Default is enabled
"c:\Program Files (x86)\wpsecure\wpsecure-set.exe" -disablels
"c:\Program Files (x86)\wpsecure\wpsecure-set.exe" -enablesls
Run the following command as an administrator to turn off only the Teams backdrop processing engine. Do this on devices where you want to permanently turn off the Teams background image deployments using WPSecure. The default is enabled
"c:\Program Files (x86)\wpsecure\wpsecure-set.exe" -disabletbg
"c:\Program Files (x86)\wpsecure\wpsecure-set.exe" -enabletbg
Run the following command as administrator to turn off only the Windows screensaver processing engine. Do this on devices where you want to permanently turn off the screensaver deployments using WPSecure. Default is enabled
"c:\Program Files (x86)\wpsecure\wpsecure-set.exe" -disabless
"c:\Program Files (x86)\wpsecure\wpsecure-set.exe" -enablesss
Campaign Group number
Assign a collection of Users with the same ‘Group number’ and target specific Personalization Packages to them based on a schedule. The group number can be assigned to a User using the command below.
This command has to be run in the User context.
"c:\Program Files (x86)\wpsecure\wpsecure-set.exe" -groupid 1475
Logging
When something goes wrong within a complex system like WPSecure, log files provide a detailed list of events that occurred before the malfunction. This information helps troubleshoot issues effectively. You can turn ON and OFF logging by using the following command. Run as administrator. Default is ON. ‘el‘ = Enable and ‘dl‘ = Disable.
"c:\Program Files (x86)\wpsecure\wpsecure-set.exe" -el
"c:\Program Files (x86)\wpsecure\wpsecure-set.exe" -dl
Real-time Loading
This value determines if WPSecure packages load immediately after installation or wait until the user locks/unlocks the screen. Run as administrator. Default is enabled. ‘eroi‘ = Enable and ‘droi‘ = Disable.
"c:\Program Files (x86)\wpsecure\wpsecure-set.exe" -eroi
"c:\Program Files (x86)\wpsecure\wpsecure-set.exe" -droi
Screensaver
It is not ideal for the Screensaver to run endlessly. So, by default, it will return to the lockscreen & turn off the display after a 60-minute run. This setting can be changed using the below command. In this example, the Screensaver will return to the lockscreen after a 120-minute run. Input is in minutes.
This has to be run as an administrator.
"c:\Program Files (x86)\wpsecure\wpsecure-set.exe" -ssrtls 120
AD Group Policy or Intune Configuration Service Provider usually sets the below value. But sometimes, the values have to be reinforced. This value pertains to the initiation of the Screensaver. How long after the device is idle should the Screensaver start? Make this value the same as other Providers who enforce the same setting. In the below example, the Screensaver timeout is set to 360 seconds or 6 minutes. Input is in seconds.
This command has to run in the User context.
"c:\Program Files (x86)\wpsecure\wpsecure-set.exe" -ssto 360
AD Group Policy or Intune Configuration Service Provider usually sets the below value. But sometimes, the values have to be reinforced. Show the login screen after Screensaver exits. ‘0‘ does not return to the login screen, and ‘1‘ returns to the login screen.
This command has to run in the User context.
"c:\Program Files (x86)\wpsecure\wpsecure-set.exe" -ssis 1
Outlook Signature
Azure AD users can automatically synchronize their account attributes (supported attributes are listed below) with the registry location mentioned above. Users can initiate the synchronization process by clicking on the StartMenu shortcut, created by running the below-specified executable and providing the necessary parameters. Click here to read more.
TenantID and ClientID values will be generated during the Azure app registration (Discussed above). The version is just your internal deployment identifier to be used if you were to deploy this using Software deployment tools like SCCM or Microsoft Intune.
Users can click on the shortcut to trigger the synchronization. The command below has to be run as administrator.
"c:\Program Files (x86)\wpsecure\wpsecure-set.exe" -source azure -tenantid 9fb4d4d6-7541-490f-a49a-111d3393731f -clientid 55eba948-6cdd-4b98-ad9b-7ff7b36138c6 -createsc -version 1.23.56.9
The above shortcut can be removed using the following command. The last personalization package that gets uninstalled from a device will also remove the shortcut. The command has to be issued as an administrator.
"c:\Program Files (x86)\wpsecure\wpsecure-set.exe" -smsssc
"C:\Program Files (x86)\wpsecure\wpsecure-set.exe" -azauth china
"c:\Program Files (x86)\wpsecure\wpsecure-set.exe" -azauth usgovernment
"c:\Program Files (x86)\wpsecure\wpsecure-set.exe" -azauth public
Run the command below as a standard user to remove the user’s Outlook signature data synced from Azure AD (Entra ID) or Active Directory. If you want to permanently uninstall WPSecure, run this command before uninstalling the last WPSecure Personalization package.
"c:\Program Files (x86)\wpsecure\wpsecure-set.exe" -sigdatadel
The WPSecure Outlook signature processing engine sets the default ‘New’ and ‘Reply’ message signatures. If the user changes the default signatures or creates a new signature, the engine will reset the defaults at the next lock/unlock event. There is some flexibility for the duration of the Windows session.
To disable any changes whatsoever, run the following command as an administrator to prevent users from modifying the defaults. The default setting is “enabled“.
Note:
- When disabled, only the primary Outlook account (Office license holder) will have the default Outlook signature set. Additional Mail profiles loaded into Outlook Classic will not have the default signatures set and will be unable to change the default from within the secondary Mail profile (But they can choose an existing signature).
- Additionally, the primary user must have the same UPN and Email attribute value for this option to function correctly.
- Lock and unlock your device to apply the changes.
"c:\Program Files (x86)\wpsecure\wpsecure-set.exe" -dsigchange
Run the following command as administrator to allow users to change the defaults.
"c:\Program Files (x86)\wpsecure\wpsecure-set.exe" -esigchange
Run the following command as an administrator to prevent the signature processing engine from setting the signature in the branding package as the default signature.
"c:\Program Files (x86)\wpsecure\wpsecure-set.exe" -dssadef
Run the following command as an administrator to reallow the signature processing engine to set the WPSecure Signature as the default.
"c:\Program Files (x86)\wpsecure\wpsecure-set.exe" -essadef
Outlook roaming signature files (HTM, TXT, and RTF) usually have the User’s Outlook account email address suffixed to the file’s name, such as ‘wpsecure_new (my.email@myorg.com).htm‘. However, in some hybrid environments, the suffix might be the User UPN (User Principal Name) instead of the User email address.
WPSecure Outlook signature processing engine makes every effort to identify the relevant suffix regardless of the Exchange server configuration. However, the setting below helps the process by directing the engine to use UPN or Email.
Industry experts recommend that User accounts in O365 environments use the same email and UPN. However, your organization might prefer different values. These settings might not be required, but if the Outlook default signatures are not correctly set because the User email is not the same as the User’s UPN, use the command below to force the use of either the UPN or the email. Run the command as an Administrator.
"c:\Program Files (x86)\wpsecure\wpsecure-set.exe" -osaeu 1
Run the above command as administrator to direct the engine to use the Users email address.
"c:\Program Files (x86)\wpsecure\wpsecure-set.exe" -osaeu 2
Run the above command as administrator to direct the engine to use the User’s UPN (User Principal Name).
"c:\Program Files (x86)\wpsecure\wpsecure-set.exe" -osaeu 0
Run the above command as administrator to delete the above setting.
The “Store my Outlook settings in the cloud” feature was introduced in Outlook Desktop for Microsoft 365 accounts with cloud mailboxes using the Monthly Enterprise Channel, Current Channel, or Semi-Annual Enterprise Channel (version 2108).
We recommend using this feature. The feature SYNC’s the Outlook signatures created by the WPSecure signature processing engine to the Cloud.
But if you want to turn off Outlook signature roaming, run the below command as a standard user.
"c:\Program Files (x86)\wpsecure\wpsecure-set.exe" -drstt
The above command disables Outlook signature roaming.
"c:\Program Files (x86)\wpsecure\wpsecure-set.exe" -erstt
The above command enables Outlook signature roaming. If you disabled it in the past, use the command to reenable it.
The Campaign Manager
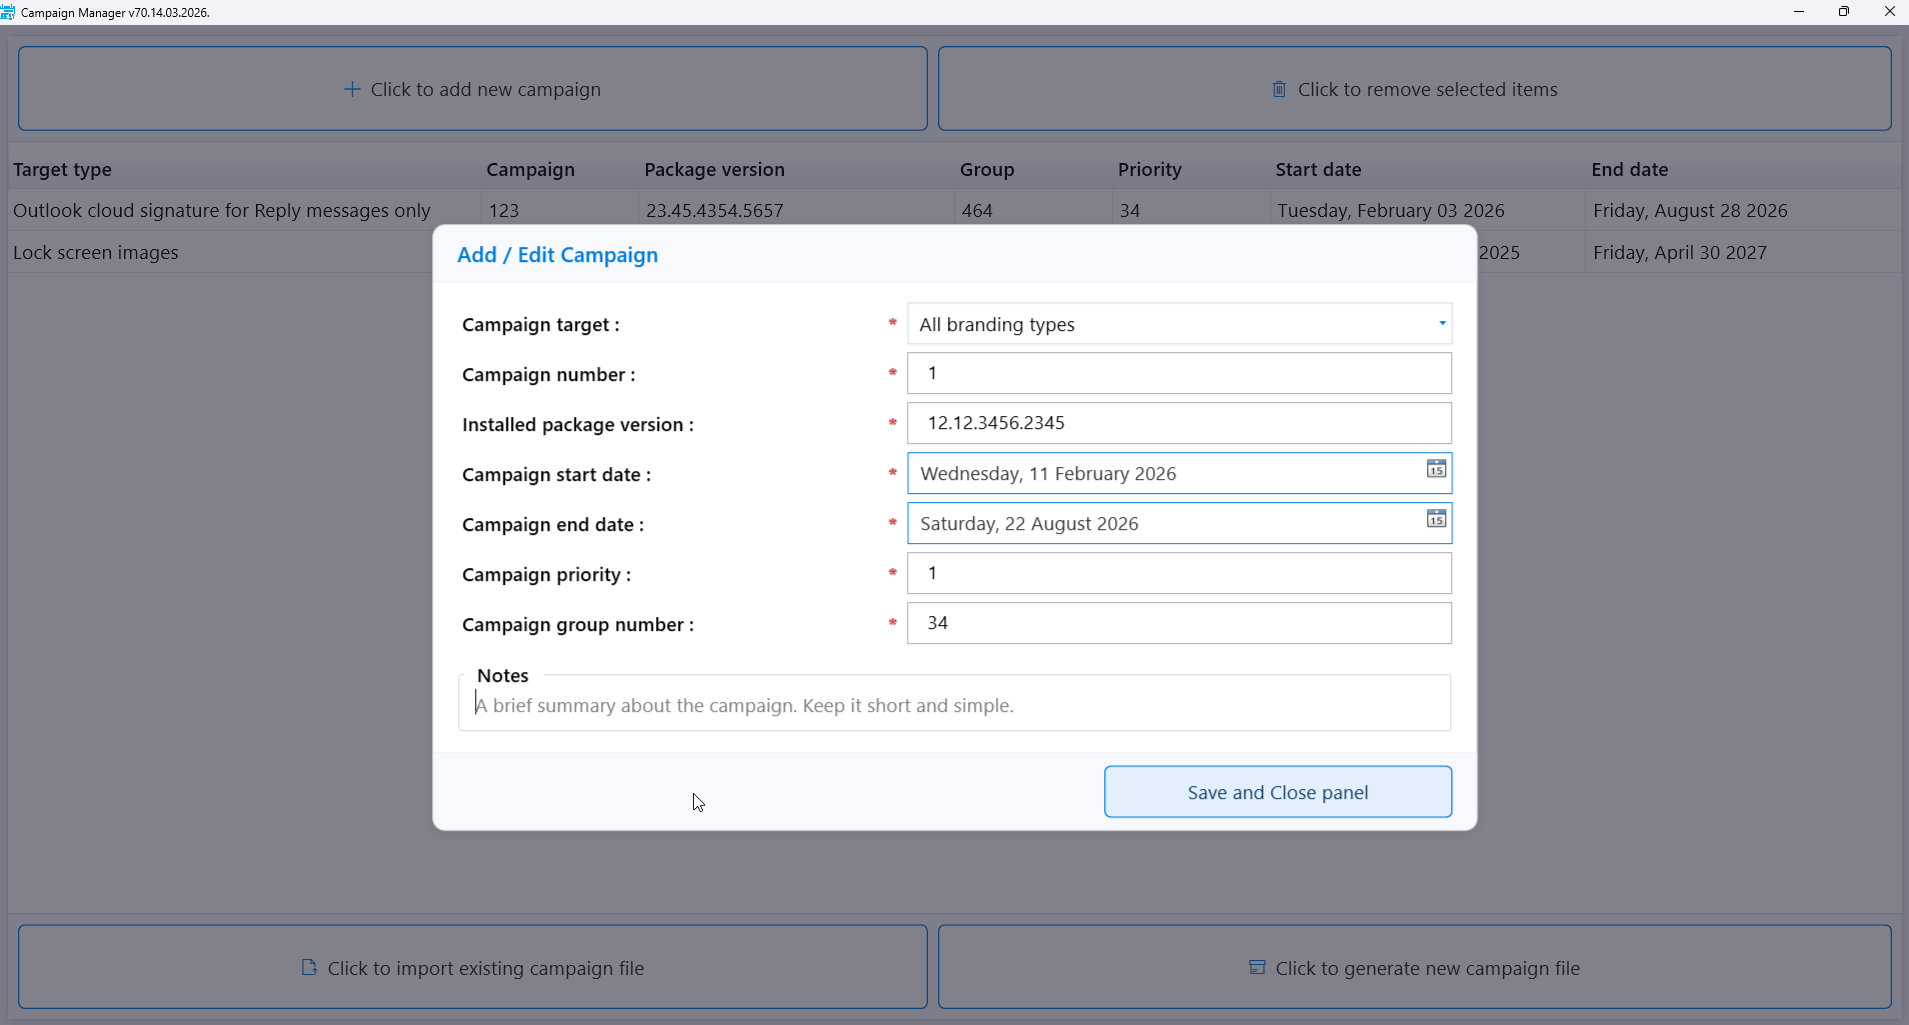
This tool creates a campaign file. The campaign file gets mass deployed to devices. The file name of the campaign file is ‘wpsecure.campaigns’. The file contains information regarding each personalization package’s start date, end date, and priority. Click the add new campaign button below to add a new campaign and the remove selected items button to remove one or more campaigns. You can open the Campaign Manager from the Windows start menu. A successful sign-in will land you on the following Screen.

Click on the add new campaign button to create a new campaign. Alternatively, click on Import an existing campaign file to open campaigns saved into a previously saved campaigns file.
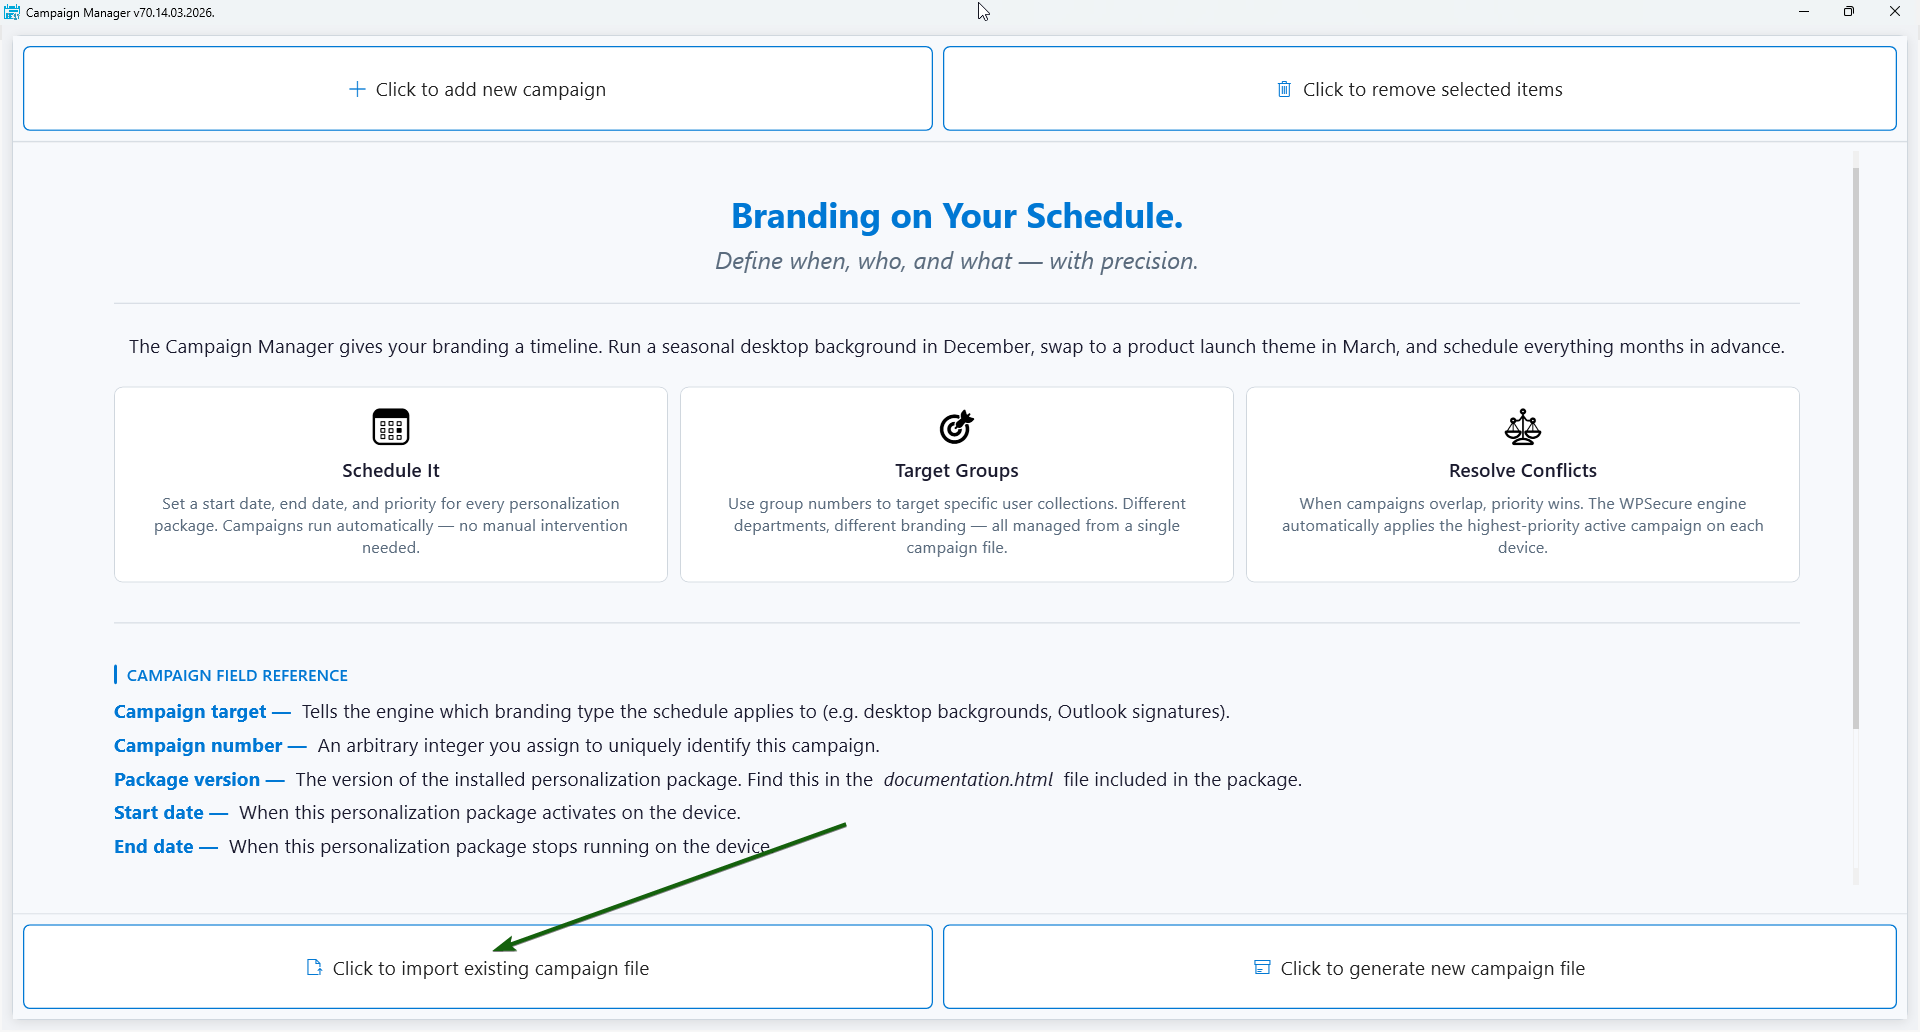
Campaign number: Assign a positive numeric value. While this does not have technical value, this value is used to maintain uniqueness.
Package version: This is the version corresponding to the Personalization package. You’ll find the value in the ‘documentation.html‘ file of the Package installer.
Start and End dates: When the campaign will start and end.
Campaign Priority: This numeric value plays a crucial role in conflict resolution. In scenarios where two Personalization packages share the same schedule, and the WPSecure personalization engine encounters a conflict, the Priority value determines which Personalization package takes precedence.
Group number: Assign a collection of Users the same ‘Group number’ and target specific Personalization Packages to them based on a schedule. The group number can be assigned to a User using the command below. This command has to be run in the User context.
"C:\Program Files (x86)\wpsecure\wpsecure-set.exe" -groupid 1475
Click the button below to import an existing campaign file.
The window that appears after adding a campaign or importing an existing campaign file will look similar to the one below. Click the button below to generate a new campaign file. The file name of the campaign file is ‘wpsecure.campaigns’.
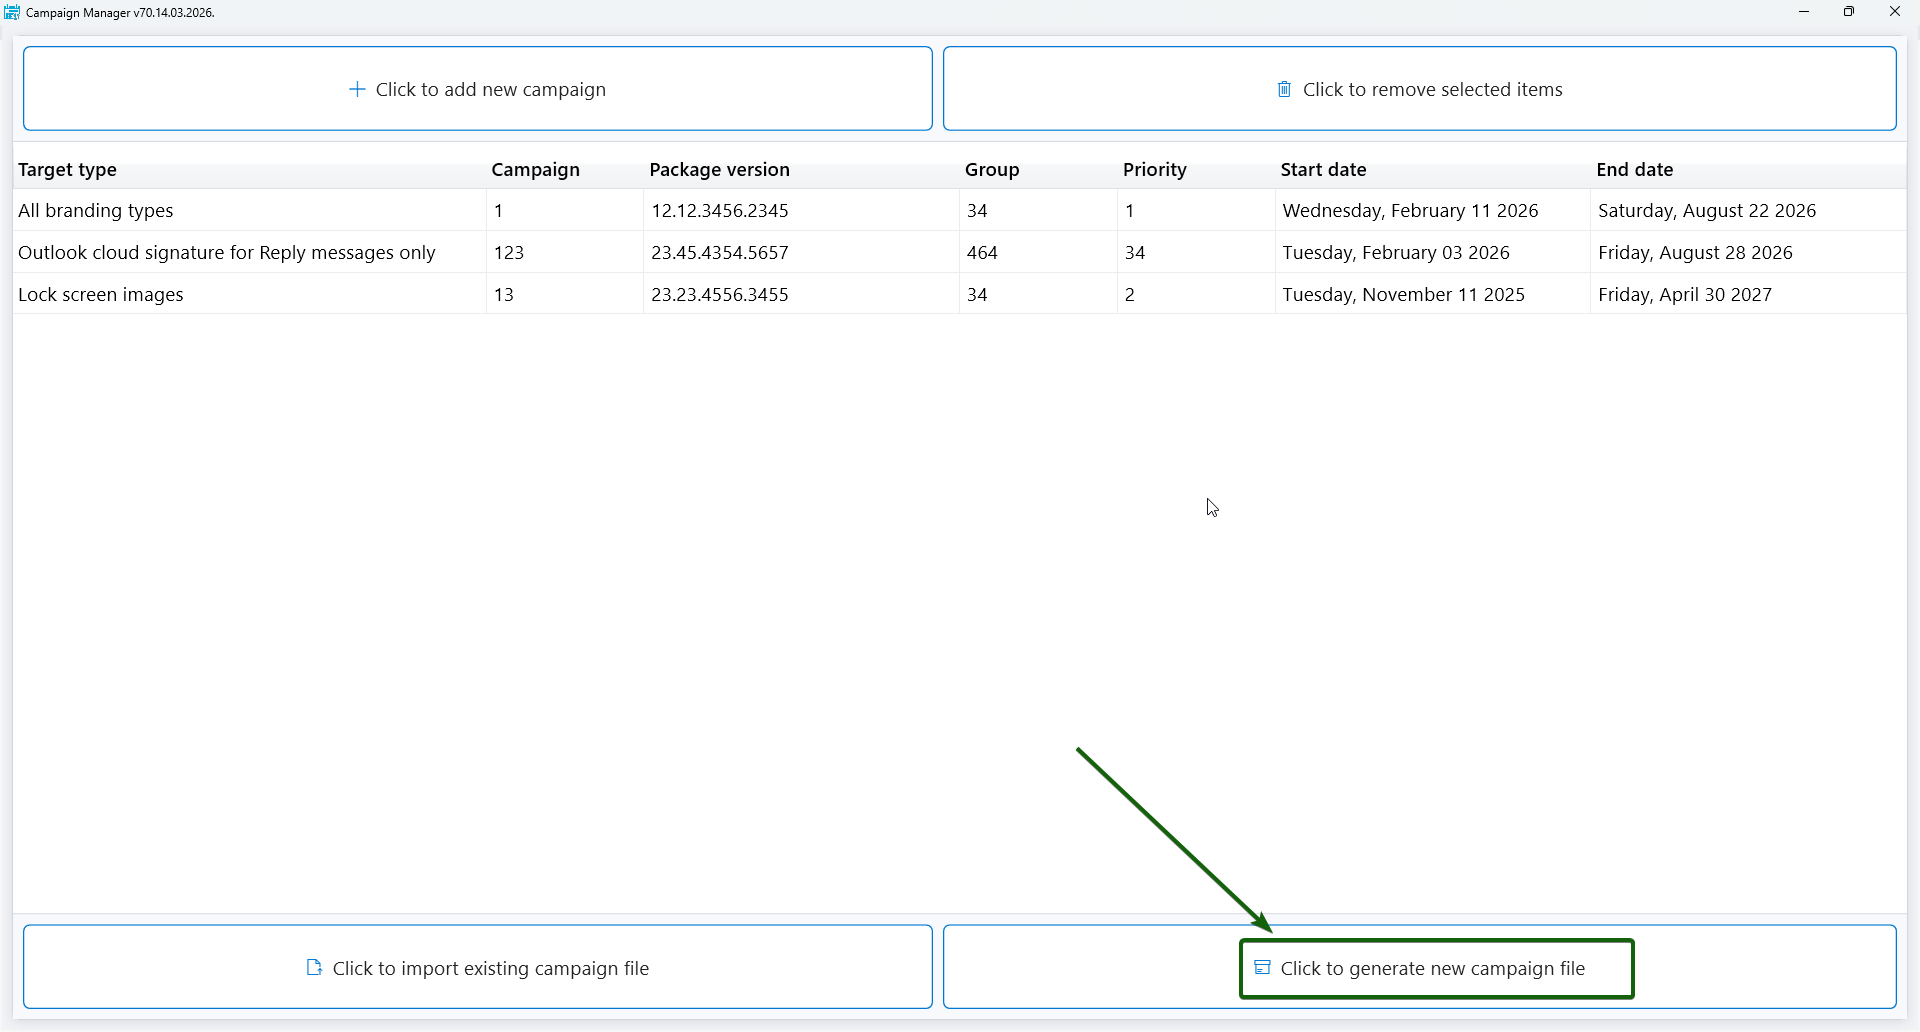
The campaign generation process creates two folders: general_install and intune_install. The general_install folder contains installation files for deployment via enterprise software management tools like Microsoft Endpoint Configuration Manager (SCCM). Run the ‘wpsecurecc.exe’ file to copy the campaign file to the correct location.
The intune_install folder contains the ‘wpsecurecc.intunewin’ file that can be uploaded to the Microsoft Endpoint Device Management portal (Intune). The command line for this is identical to the general install.
The process also creates a ‘documentation.html’ file that provides all the information required to deploy the campaign file, like install command line, uninstall command line, and detection methods. Save this file for future reference regarding the personalization Package versions, start dates, end dates, and priority.
Once the campaign file has been deployed to Windows 10 and 11 devices, the Personalization Packages corresponding to the best-fitting campaign listed in the campaign file will be triggered.
Campaign file installation
The install command line is the same for deployment via Microsoft Endpoint Configuration Manager, Intune, or other deployment tools.
The general campaign install package is in the ‘general_install‘ folder of the Campaign package output directory.
The campaign install package for Microsoft Intune is in the ‘intune_install‘ folder of the Campaign package output directory.

Install command line
Campaign file installation always runs in silent mode. Use the below command line to install the campaign file.
wpsecurecc.exe
Install detection
Use the following Windows Registry key/value pair to detect if the campaign is installed on the target device.
The campaign version number will be referenced in the ‘documentation.html‘ file generated during the “campaign file deployment package” creation process.
Uninstall command line
The uninstall command line is the same for deployment via Microsoft Endpoint Configuration Manager, Intune, or other deployment tools.
The general campaign uninstall package is in the ‘general_install‘ folder of the Campaign package output directory.
The campaign uninstall package for Microsoft Intune is in the ‘intune_install‘ folder of the Campaign package output directory.
wpsecurecc.exe -remove
Using the Beacon feature
WPSecure Beacon is used to collect essential Windows device logon and usage telemetry, including logon time, boot time, and geolocation, for Windows 10 and Windows 11 devices.
The Beacon operates seamlessly in the background and uses certificate‑based authentication to securely collect data that describes who is using a device, where it is being used, and when access occurs. This data provides valuable insight into device usage patterns without requiring user interaction.
The guide linked below walks through the configuration of the following Azure components:
- Azure API Management (APIM) Service
- Azure Function App running a PowerShell Core runtime
Once configured, these services periodically receive telemetry from WPSecure Beacon and publish the collected data to a SharePoint Online list.
Although the reference implementation targets SharePoint Online, the PowerShell‑based Azure Function can be easily adapted to write data to alternative data stores, including:
- Microsoft SQL Server (MSSQL)
- MySQL
- Microsoft Dataverse
This flexibility allows the solution to be tailored to meet specific organizational reporting and data‑storage requirements.
Cost and Suitability Considerations
This approach relies on multiple Azure services that will introduce additional operational overhead and licensing costs. As a result, it is best suited to larger enterprise environments that already utilize these technologies or require centralized, scalable telemetry collection.
Running Startup, Login, and Signature scripts
This method allows you to deploy three different types of PowerShell scripts. Not all scripts have to be deployed.
Computer startup PowerShell Script is a script that runs when the computer starts up, before any user logs in. The purpose of this script is to do the following
- Set system-wide configurations (e.g., network settings, services)
- Install or update software
- Apply security settings
User login PowerShell script runs when a specific user logs into Windows. The purpose of this script is to do the following
- Set user-specific environment variables
- Map network drives or printers for that user
- Customize desktop settings
The signature PowerShell script runs each time a user unlocks their device and authenticates. Its purpose is to deploy custom calculated placeholder attributes for email signature templates.
Create PowerShell scripts with the following names.
- device.ps1
- user.ps1
- signature.ps1
Navigate to the directory containing the aforementioned PowerShell scripts. Run the following command as an administrator to copy the scripts to their appropriate locations.The -scriptversion parameter specifies the version of the scripts being deployed. This versioning is used to detect the presence or absence of these PowerShell files during organization-wide deployments.
"c:\Program Files (x86)\wpsecure\wpsecure-set.exe" -scriptsversion 1.2.3.5

Note:
- To ensure successful execution of the command, at least one Personalization Package must be installed on the device.
- Important!!! Do not copy or run the PowerShell scripts outside the prescribed process. Doing so will compromise the integrity of the script’s security validation mechanism.
- The runtime of the scripts cannot exceed 60 seconds.
Detect the successful deployment of these PowerShell scripts using the following registry setting.
Run the below command as an administrator to remove the Powershell scripts.
"c:\Program Files (x86)\wpsecure\wpsecure-set.exe" -deletescripts