Insert Email Signatures in Microsoft New Outlook and Outlook on the Web Using the Signature Inserter Add-in
This article provides a step‑by‑step guide to deploying the WPSecure Signature Inserter Outlook web add-in, which facilitates signature insertion into email messages (new and reply/forward) when using New Outlook and Outlook on the Web.
Please be aware that Microsoft has not provided a way to set default signatures programmatically for New Outlook and OWA. So we have built a solution that provides signature insertion capability that runs within your Azure tenant.
All operations performed by the Signature Inserter add-in occur within your Azure network. No transport rules, no forwarding of your mails to third-party processing. Keep your data where it belongs, with you. More than anything, this is our value proposition.
Windows Branding Tool
stored per user
backend — fetches &
processes templates
caches & inserts
silently
on compose & reply
Follow the instructions exactly as described to ensure a successful setup. At the end of the article, there is a troubleshooting guide and an Azure usage estimate.
Prerequisites and required expertise
Execution of the procedures outlined below requires the involvement of an experienced Azure administrator with the necessary permissions to create an Azure Web App instance, Azure Storage, and an Entra ID app registration.
Technology touchpoints
The configuration of signatures in ‘New Outlook‘ and ‘Outlook on the Web‘ using the Signature Inserter add‑in involves the following key technology touchpoints:
| Component | Description |
|---|---|
| WPSecure Signature Engine | Generates user-specific cloud signatures — covering both New and Reply/Forward variants — by applying the appropriate user attributes and placing the resulting files into the designated OneDrive folder. The user's OneDrive content is refreshed automatically whenever changes are detected, or at minimum every eight hours. |
| Azure Web App | The configured Azure Web App instance provides a secure and reliable endpoint through which the New Outlook and Outlook on the Web clients request and retrieve the correct email signatures for both New and Reply/Forward scenarios. |
| Azure Blob Storage | Signature image assets fall into two categories: online images delivered over HTTPS and images embedded directly within the email as attachments. Online assets are hosted in Azure Blob Storage, which serves them on demand. |
| Entra ID App Registration | As with all Azure AD–related architecture, each endpoint must be secured through Entra ID app registrations configured with the required permission scopes. These permissions enable secure communication between the New Outlook / Outlook on the Web clients, the Azure Web App, and the user's OneDrive. |
Steps involved in setting up the Outlook Web add-in
The entire process can be divided into multiple steps. Please follow these steps carefully to successfully set up the Outlook add-in.
- Create a branding package containing the Cloud signature templates.
- Create an Azure Web App (Part A)
- Create an EntraID App registration
- Create two EntraID groups
- Set up Azure Blob Storage
- Set Azure Web App environment variables (Part B)
- Uploading the backend files to Azure Web App
- Test the Outlook web add-in by sideloading it to Outlook
- Deploying the Outlook Web Add-in to everyone
- Validation Powershell script
1. Create a branding package containing the Cloud signature templates
Before proceeding, make sure you have added the email signature templates below to a branding package and have deployed the package to your test device. Branding packages are generated using the Windows Branding Tool. Read more about these packages in the main documentation page. If these packages include Cloud signature templates, the engine will personalize those templates for each user and place them in the user’s OneDrive under a system folder named:
z__WPSECURE__SYSTEM_DO_NOT_TOUCH
This folder is created at the root of the user’s OneDrive. Each Branding package puts one or more of the following files inside this folder:
| File | Description |
|---|---|
| wpsecure_cloud_new.htm | Inserted as the signature for New messages composed in HTM format for Outlook New and Outlook on the Web. |
| wpsecure_cloud_new.txt | Inserted as the signature for New messages composed in TXT format for Outlook New and Outlook on the Web. |
| wpsecure_cloud_reply.htm | Inserted as the signature for Reply messages composed in HTM format for Outlook New and Outlook on the Web. |
| wpsecure_cloud_reply.txt | Inserted as the signature for Reply messages composed in TXT format for Outlook New and Outlook on the Web. |
Do not proceed with this article until you see one or more of these files in the above folder.
2. Create an Azure Web App (Part A)
The reason we reference Part A is that you will need to switch back and forth between creating the Azure Web App, setting up the Entra ID app registration, Azure Blob Storage, and then returning to complete the configuration of the Web App created earlier. Part A covers the initial creation of the Web App, while Part B focuses on completing its configuration. The Entra ID app registration process takes place between these two parts. As mentioned earlier, please ensure you follow the instructions word‑for‑word and line‑by‑line to guarantee a successful deployment.
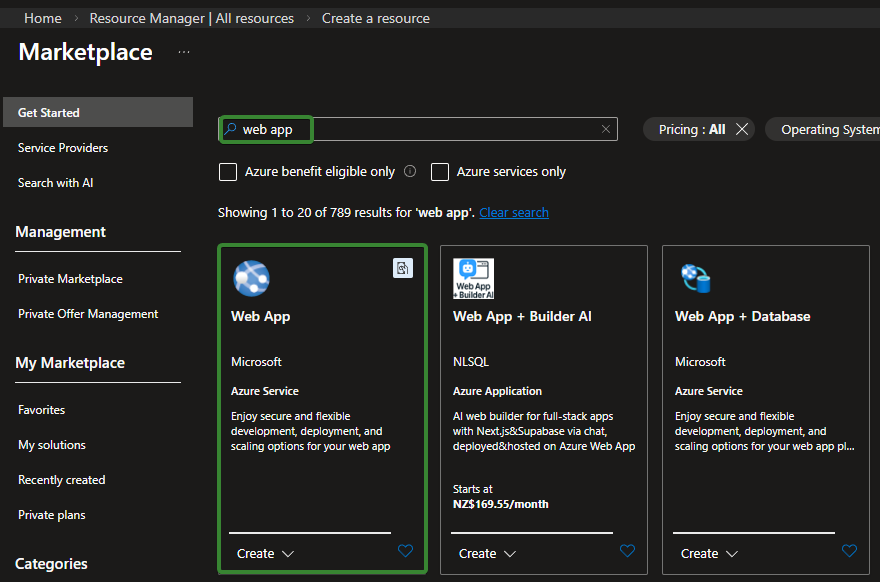
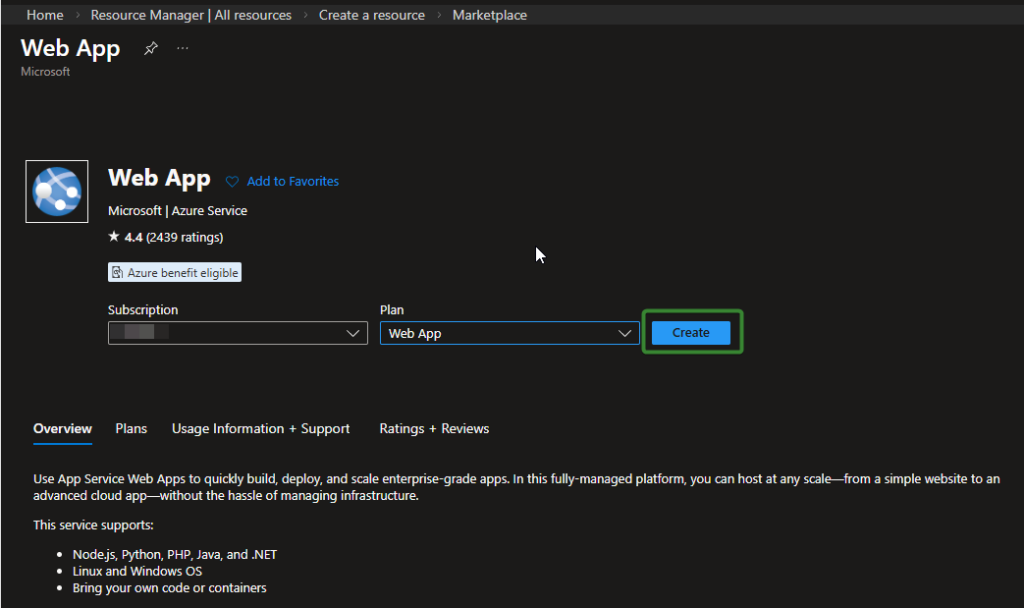
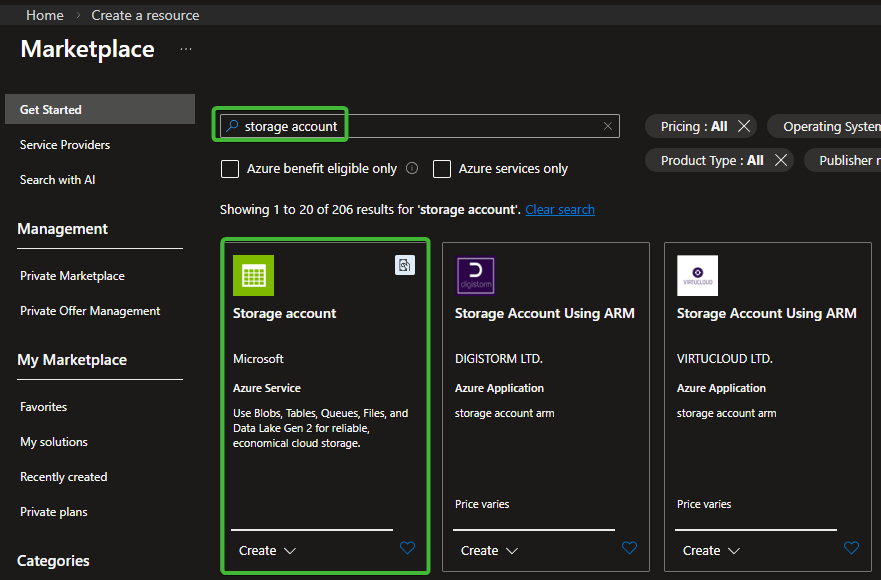
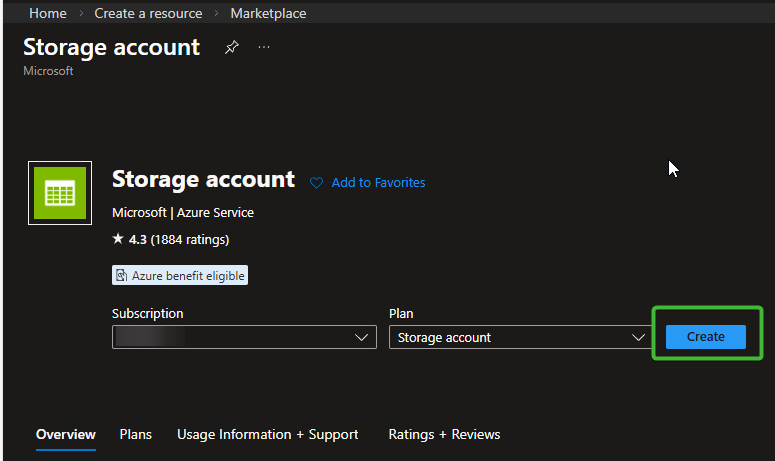
To create an Azure Web App, sign in to the Azure Portal and use the search bar at the top to locate Web App. Open the Web App blade and click Create to start the deployment process. This launches the Create Web App wizard, where you will select your subscription, choose or create a resource group, and assign a unique name to the Web App. You will then configure the runtime stack, operating system, and choose an App Service Plan that defines the hosting capacity. After reviewing each section, select Review + Create. Once validation completes successfully, choose Create to provision the new Web App.
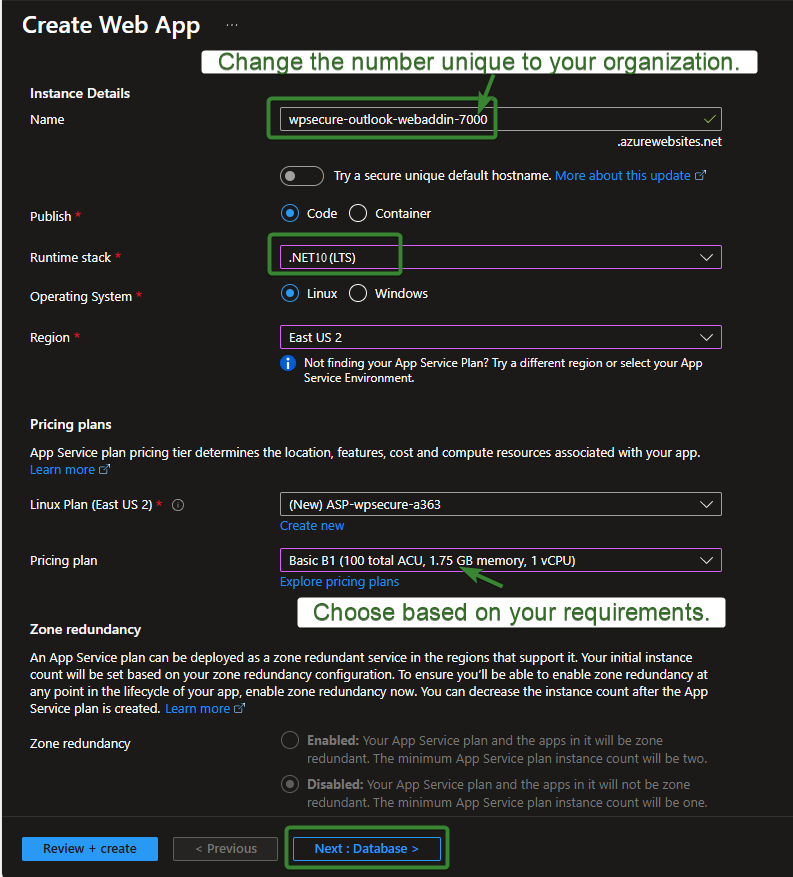
The name of your Azure Web App can be anything but we recommend using the name similar to the below.
wpsecure-outlook-webaddin-XXXX [Where XXXX is a random number like 7000, 3456 or 8000]
It is important that you set the Runtime stack to .NET 10 (LTS). The Pricing plan should be selected based on your organization’s performance and capacity requirements. Each New Outlook and Outlook on the Web client will, on average, check back with the Web App every 4 hours to determine whether any signature files have changed (this interval can be adjusted from the Azure Web App settings page).
Ensure you choose a plan with sufficient capacity to handle the volume of requests from your Outlook clients. Please see Azure usage estimates as an addendum at the end of this article.
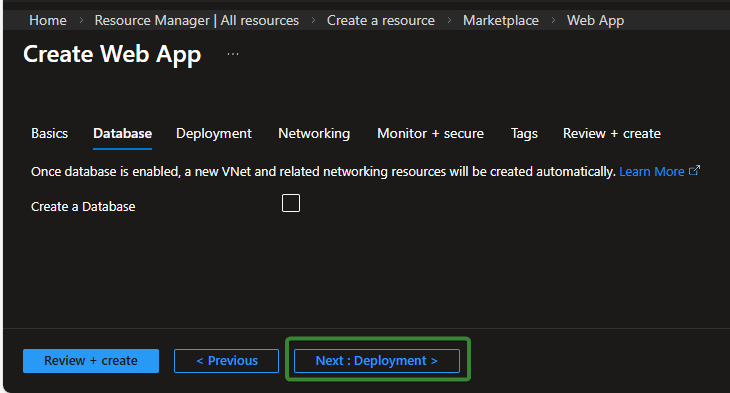
Click Next to continue. The settings on the following two screens should be configured according to your organization’s specific requirements and governance standards. However, for the initial setup process, we recommend that you follow the steps exactly as shown.
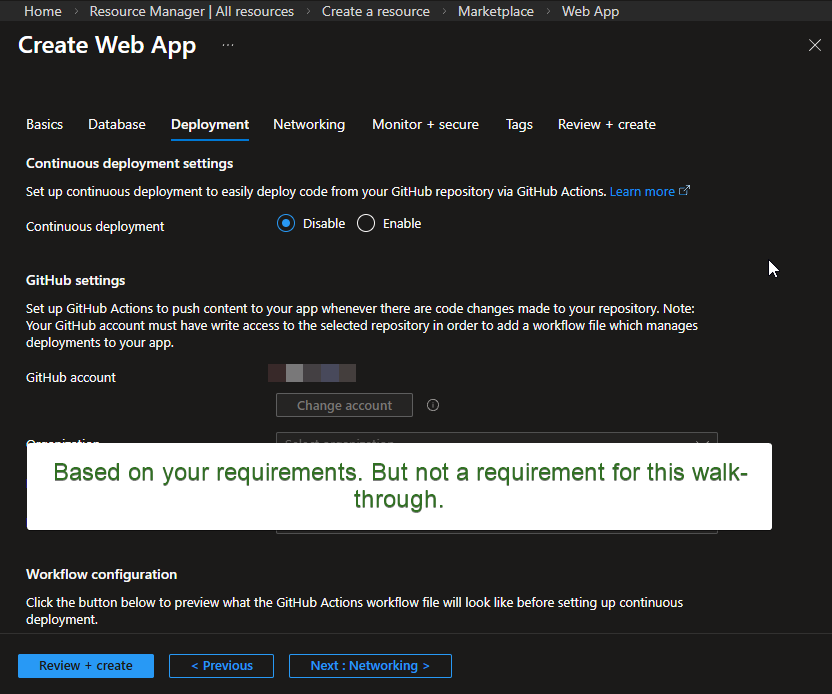
Click Next to continue. For the purposes of this article, we will enable public access. Most customers keep this setting enabled because the Azure Web App must be publicly reachable but privately authenticated. In our scenario, only users of New Outlook and Outlook on the Web—who have already authenticated into Outlook and received a valid token—will be able to get their Outlook email signatures from the Web App.

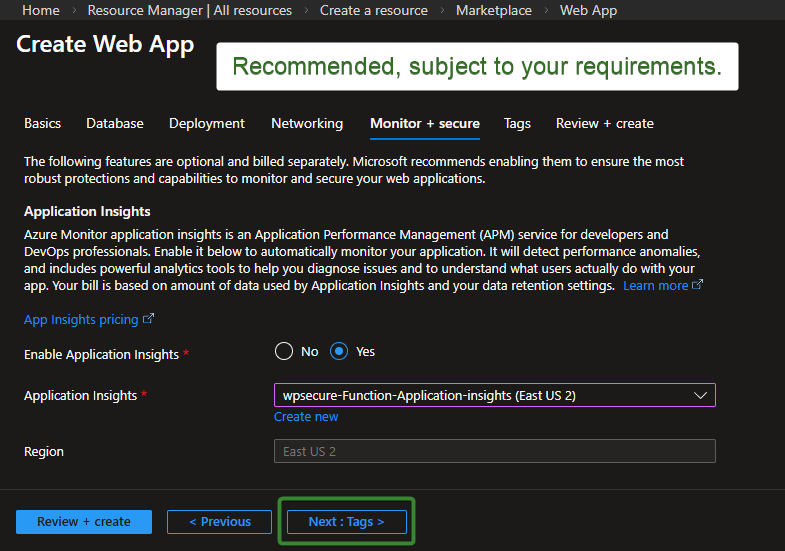
Click Next to continue through the remaining screens. Make sure you enable Application Insights, as this will allow you to monitor the Log Stream for errors, performance issues, and security‑related events. On the final screen, click Create to complete the deployment.
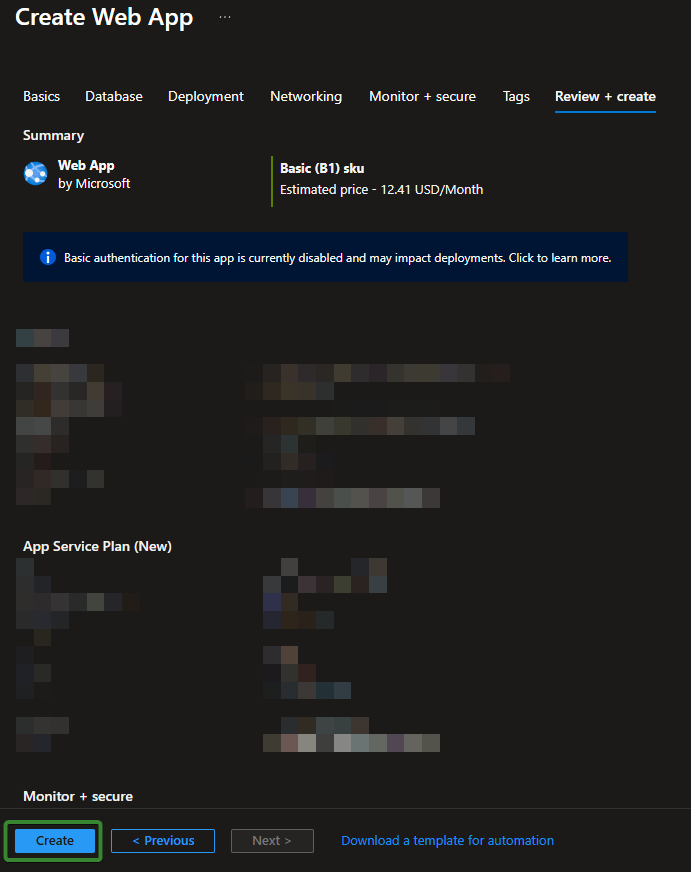
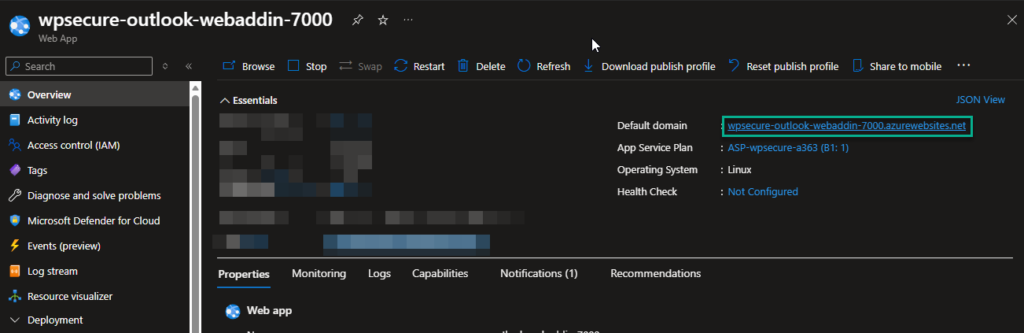
To complete Part A, open the newly created Web App resource and, from the Overview panel, copy the Default Domain value into your Notepad file. You will need this information later.
Let’s pause any further work on the Azure Web App and proceed to create the Entra ID app registration and Azure Blob storage to gather the required information. Once that is complete, we will return and continue with Part B of the Azure Web App configuration process.
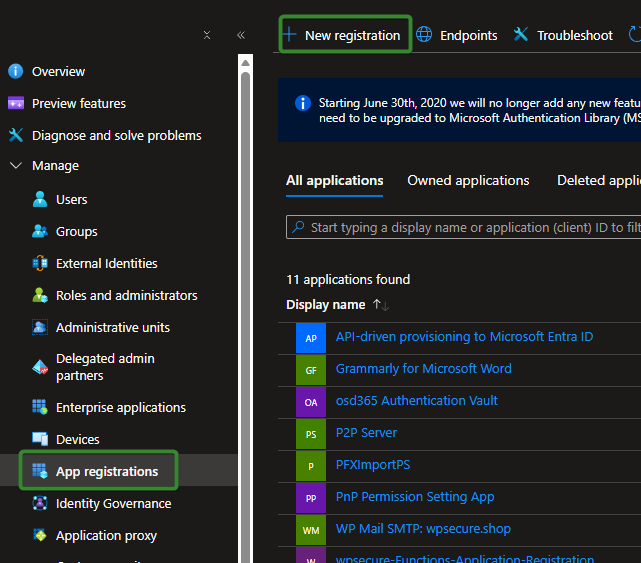
3. Create an EntraID App registration
Begin by accessing Microsoft Entra ID in the Azure Portal. You will create the application object that enables secure authentication and API access.
Open https://portal.azure.com and sign in with an account that has the required administrator permissions. In the left‑hand navigation pane, select Microsoft Entra ID. If you don’t see it, use the search bar at the top and type “Entra ID” or “Azure Active Directory” (both point to the same service).
Navigate to App Registrations: Inside the Entra ID blade, select App registrations from the left‑hand menu. To start a new App registration click ‘New registration‘ at the top of the App registrations page to begin the setup process.
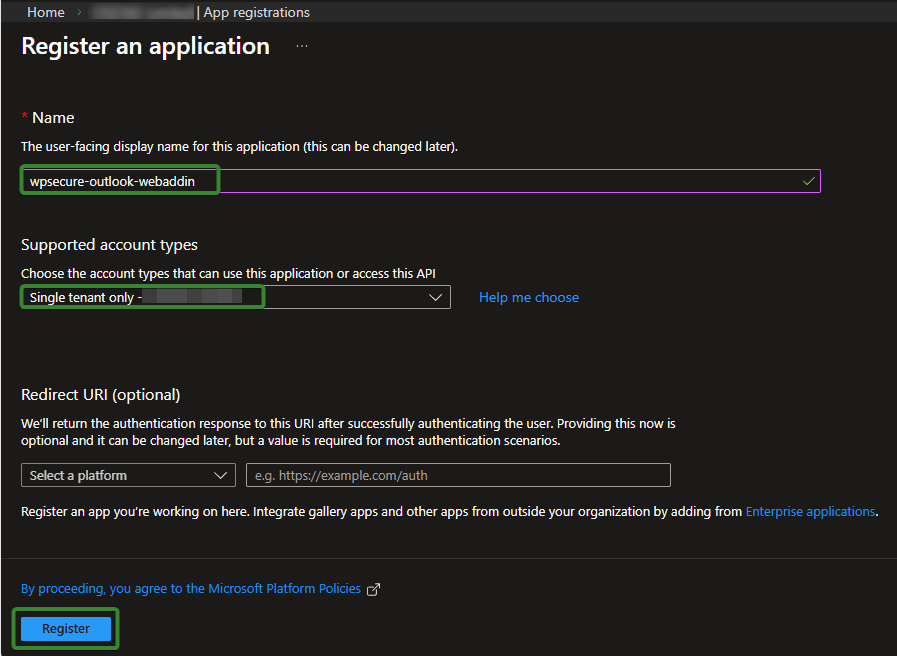
In the Register an application window, enter wpsecure‑outlook‑webaddin as the application name. For Supported account types, select Single tenant.
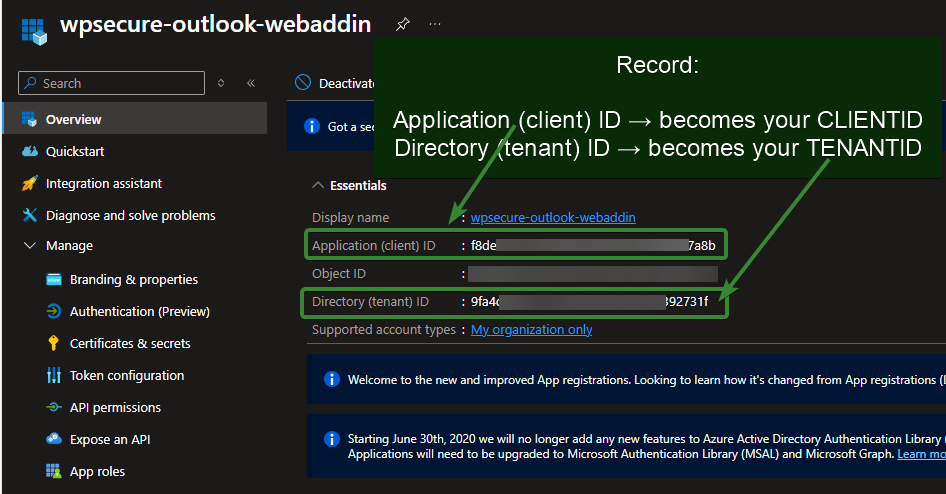
After completing the registration, the first step is to copy the Application (Client) ID and the Directory (Tenant) ID.
Save these values in a Notepad file, as you will need to reference them later when configuring the Azure Web App instance.
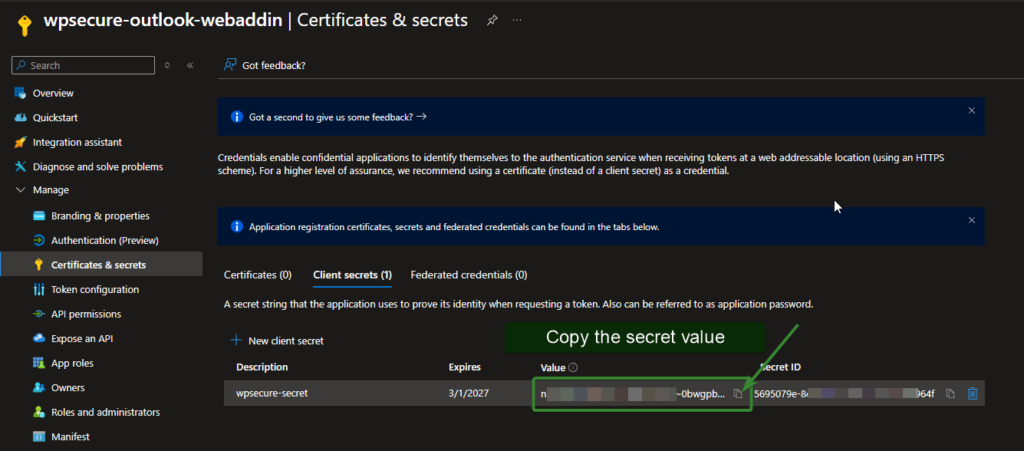
Click Certificates & Secrets in the left‑hand menu, then create a new client secret. Set the expiration period according to your organization’s security governance requirements.
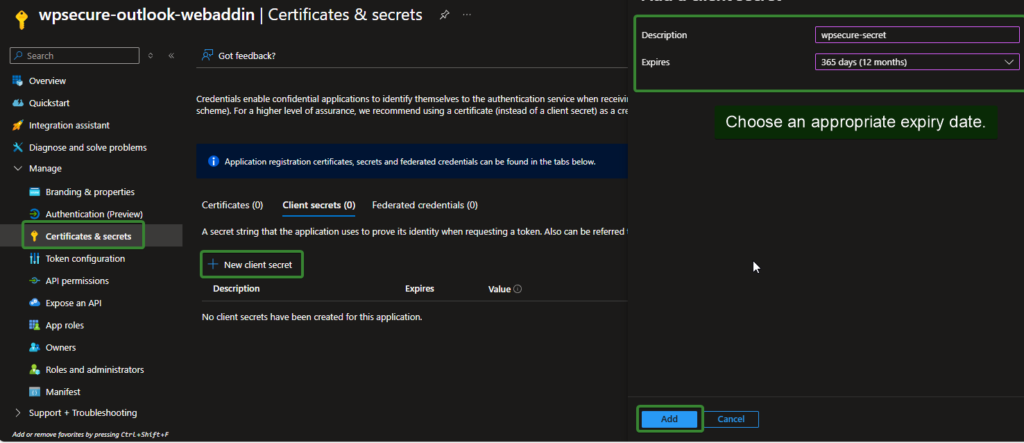
Be sure to copy the value of the client secret and temporarily save it in your Notepad file. Once the setup process is complete, delete the Notepad file to prevent unauthorized access to sensitive credentials.
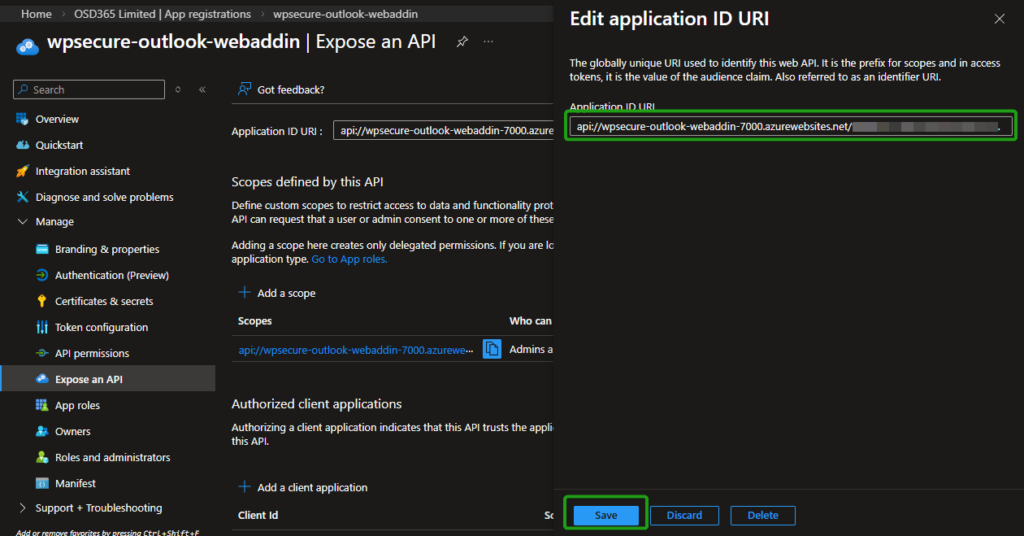
Click Expose an API in the left‑hand menu. In the Application ID URI field, insert the Default Domain value you copied into your Notepad file earlier when we created the Azure Web App, placing it in the domain portion of the URI. The final value will take the following form:
api://<your-default-domain>/<app-registration-client-id>
For the purposes of this demonstration, the test details will be as follows:
api://wpsecure-outlook-webaddin-7000.azurewebsites.net/f9de811a-1855-4ad7-b618-1126d6d87b8c
For this demonstration:
f9de811a-1855-4ad7-b618-1126d6d87b8cis the Application (Client) ID that was copied into the Notepad file. Automatically populated.wpsecure-outlook-webaddin-7000.azurewebsites.netis the Default Domain value that was also copied into the Notepad file.
Copy the Application ID URI into your Notepad file for future reference.
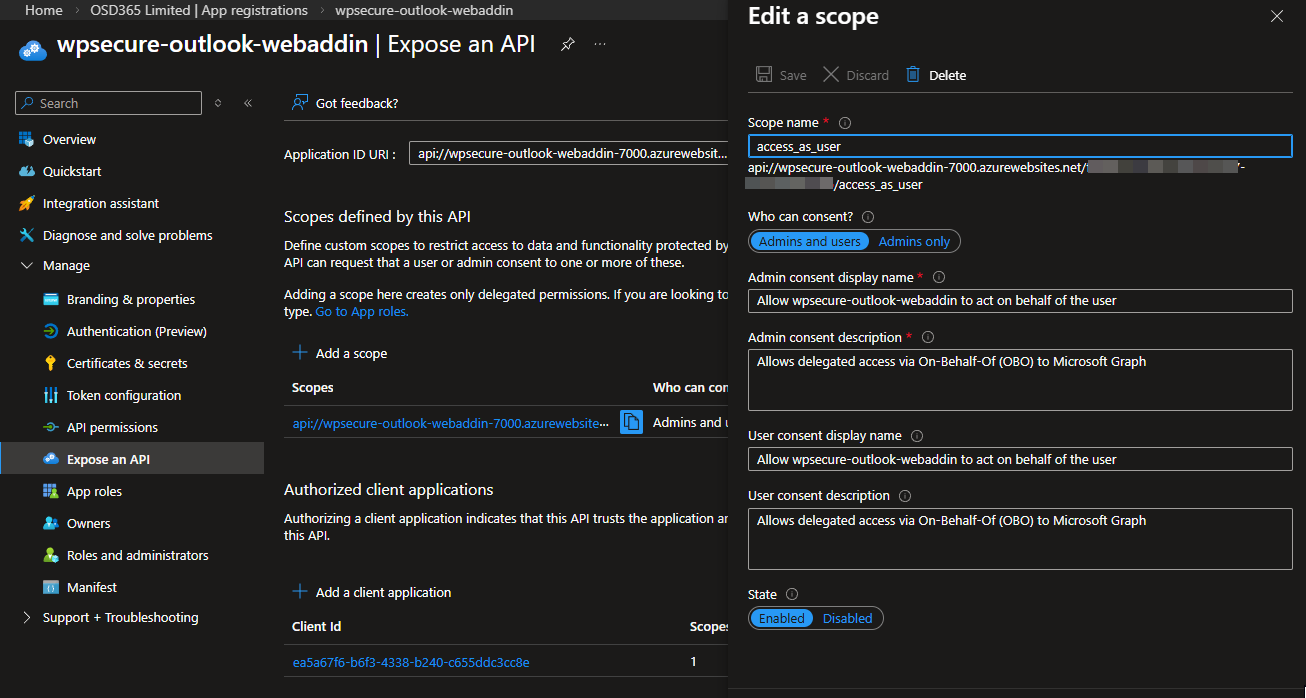
On the same screen, click Add a scope, enter access_as_user as the Scope name, and set Who can consent? to Admins and users. The image below will guide you through this process.
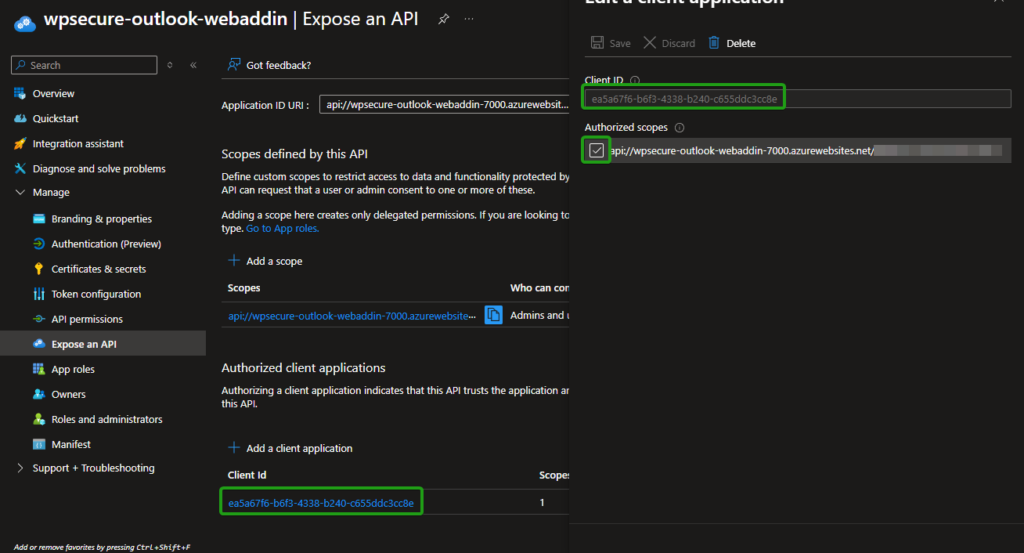
On the same page, under Authorized client applications, click Add a client application. Use the value shown below, which represents all authorized Microsoft Office applications. This should add ‘profile‘ and ‘openid‘ to the list of items that require organization-wide API permission granted by the administrator (discussed later).
ea5a67f6-b6f3-4338-b240-c655ddc3cc8e
Select API permissions from the left‑hand menu. Click Add a permission and choose Microsoft Graph.
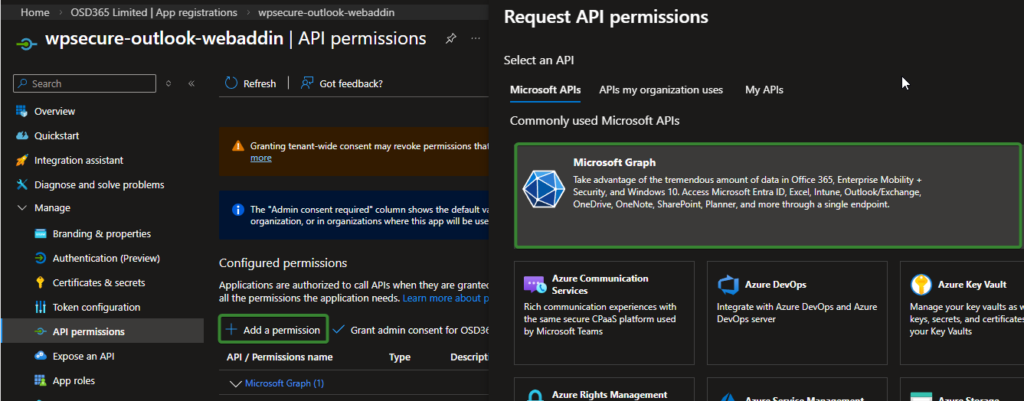
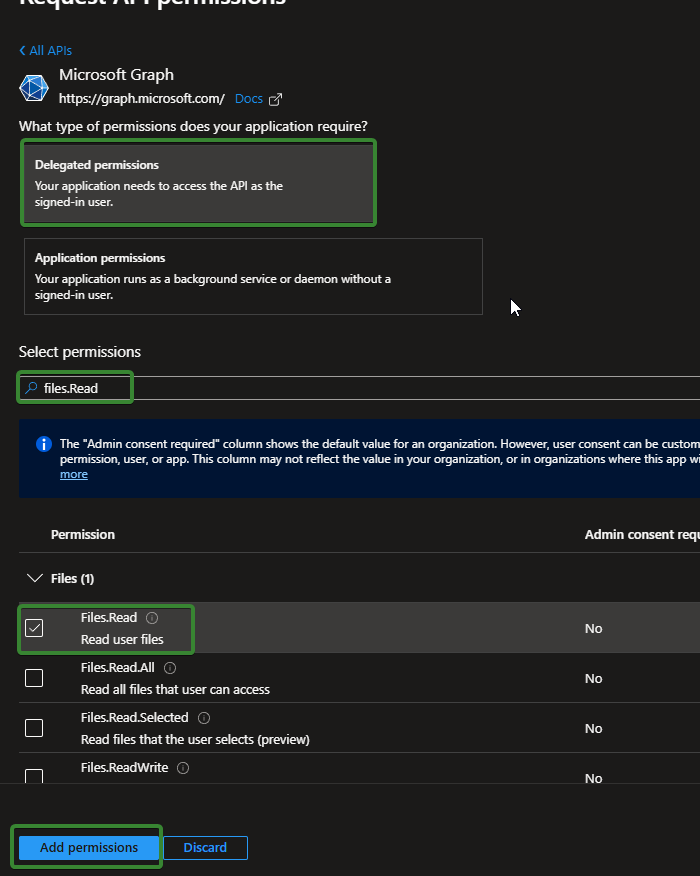
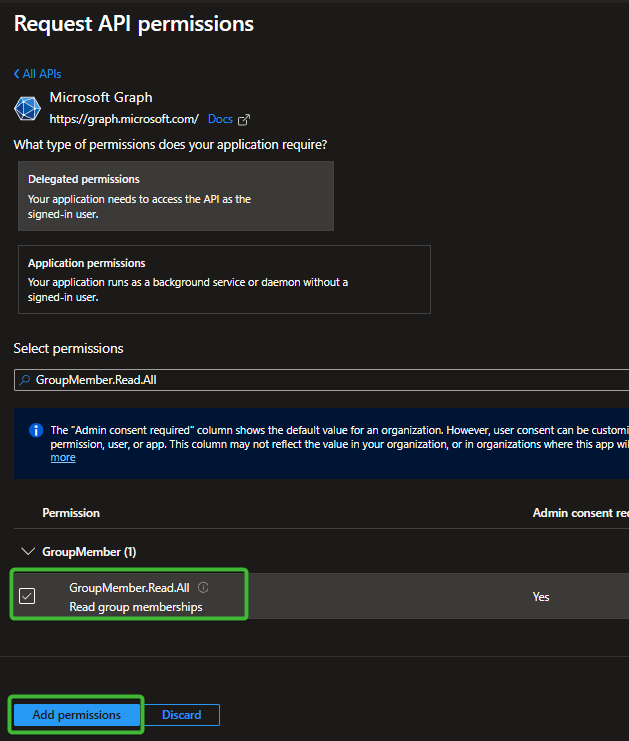
Choose Delegated permissions, then search for and select Files.Read, User.Read, and GroupMember.Read.All as shown in the images below.

!!!!! Finally, the most important step is to ‘Grant admin consent‘. After adding an admin consent, you should see five items in the list, as shown in the image below. If you do not, you have missed one or more of the above steps.

Before we go back to configuring Azure Web App (Part B), we should create a storage account and configure blob storage.
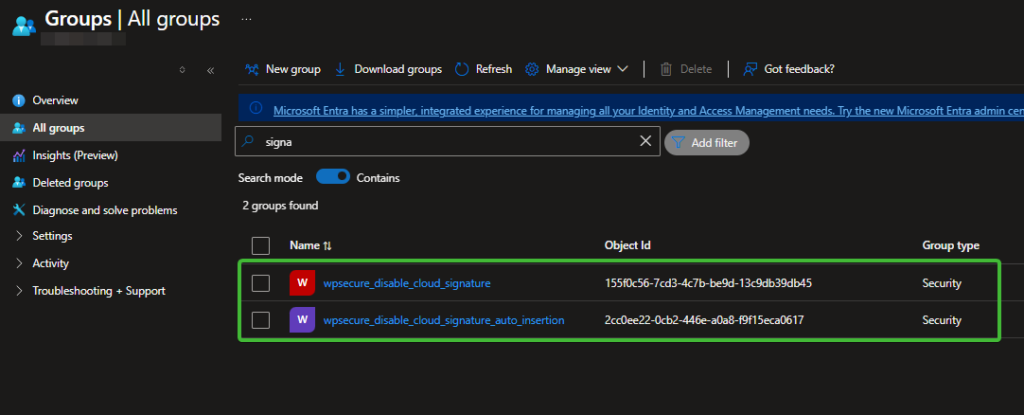
4. Create two EntraID groups
Create 2 EntraID groups. These groups serve to hold users who will be exempt from getting the signature or just automatically inserting the signature using the Outlook add-in.
- Your organization might have a collection of users for whom centralized signature management is not required. Prevent getting and setting any email signature in New Outlook or Outlook on the Web using the Signature Inserter Outlook add-in.
- Your organization might have a collection of users for whom centralized signature deployment is required, but not to insert them automatically into messages. Prevent the automatic insertion of the email signature in New Outlook or Outlook on the Web using the Signature Inserter Outlook add-in when the user composes a new message or replies to/forwards a message. The user can still insert a signature manually using the task pane (discussed later).
Create those groups in EntraID, name them whatever you want, and make sure you write the OBJECT ID of each group into a notepad file for future reference. [OBJECT ID and not the name of the group]
5. Set up Azure Blob Storage
Creating a storage account is quite easy. If you already have storage set up, you can use it, but we recommend setting up a separate storage account for the Outlook Web Add-in.
Go to: https://portal.azure.com. Click Create.
Fill in the Basics tab:
- Subscription: Select your subscription.
- Resource group: Choose an existing one or click Create new.
- Storage account name:
Must be globally unique, lowercase, e.g.,wpsecurestorage01. - Region: Pick the same or the closest region to the Azure Web App.
- Performance: Standard (default).
- Redundancy: Choose what you need (e.g., LRS is common).
You can go through the wizard, but for the purposes of this article, we will click Review + create.

Navigate to Your Storage Account once deployment completes. Now, you will be inside the storage account overview page.
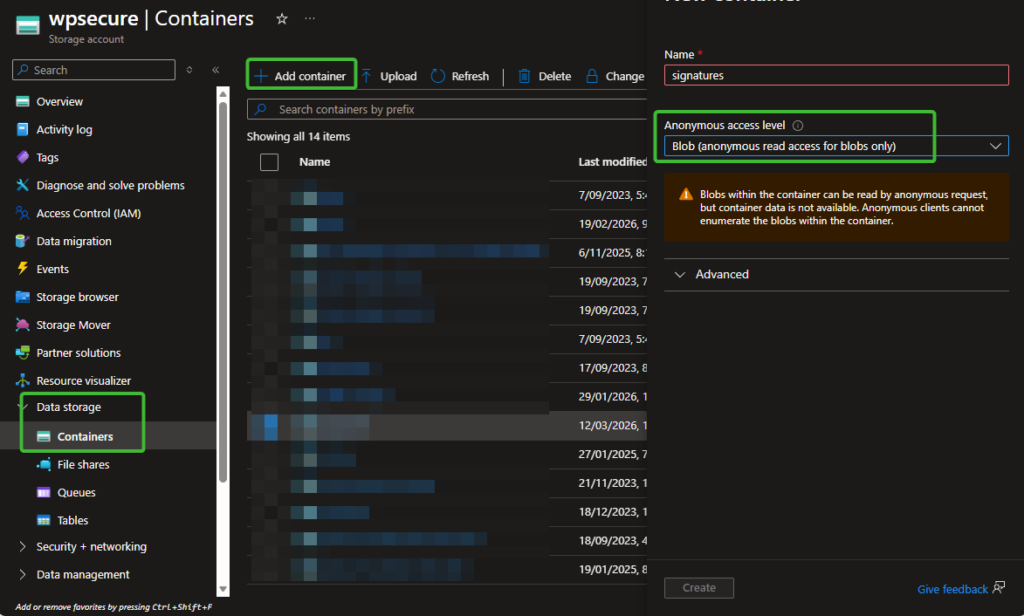
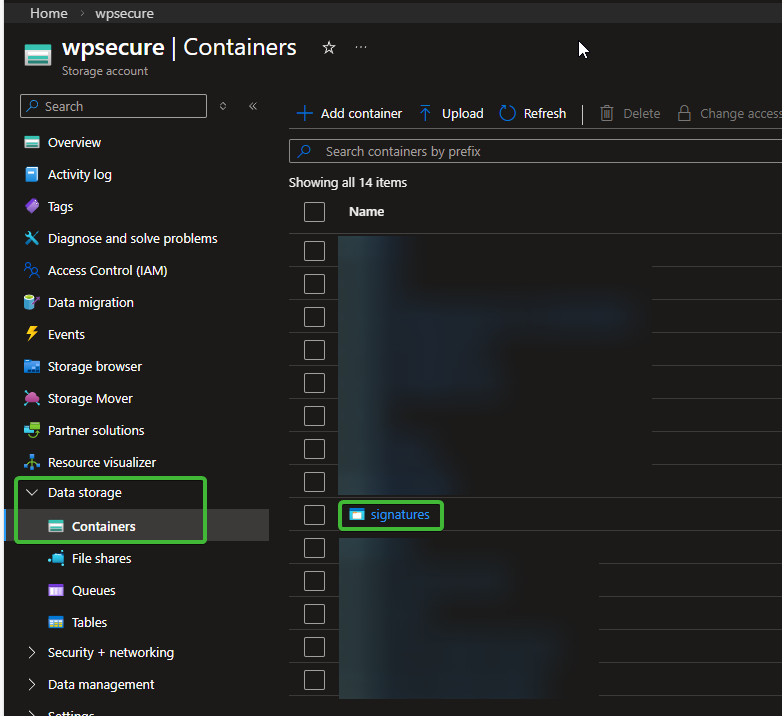
In the left navigation panel, select Containers under Data Storage and create a container.
- Name:
signatures - Public access level:
Select Blob (anonymous read access for blobs only)
Be sure to copy the container name and paste it into the Notepad file for future use.
Click Create.
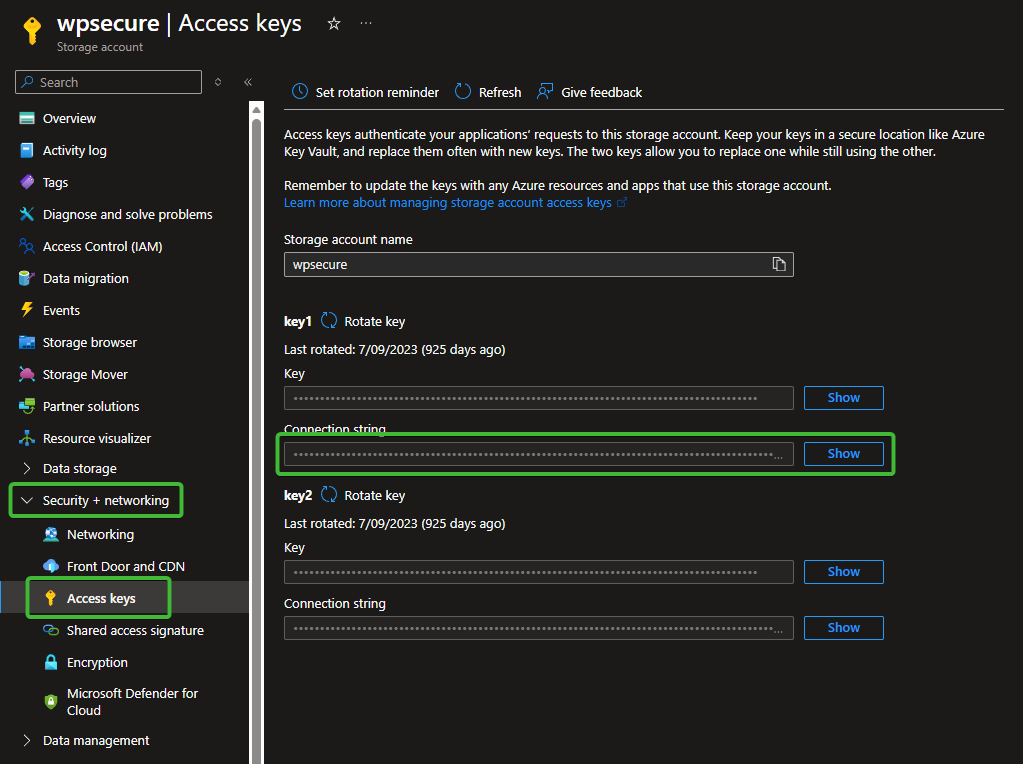
In the left menu, open “Security + Networking” and “Access Keys,” then copy the connection string.
Be sure to copy the connection string value and temporarily save it in your Notepad file. Once the setup process is complete, delete the Notepad file to prevent unauthorized access to sensitive information.
Let’s go back to configuring Azure Web App (Part B).
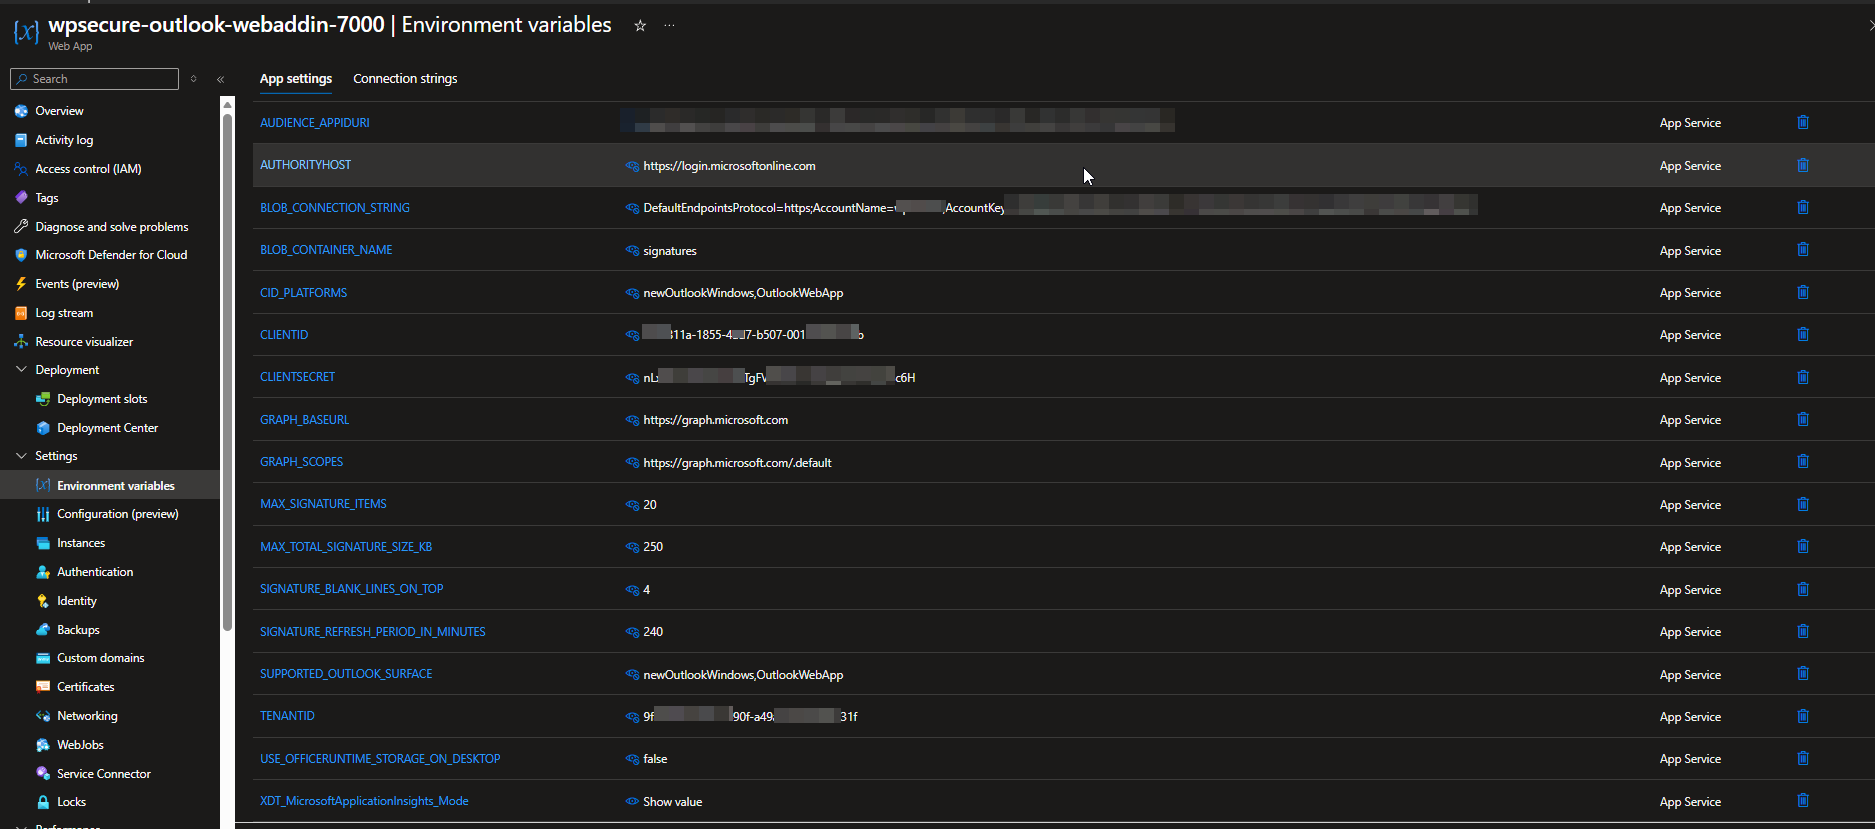
6. Set Azure Web App environment variables (Part B)
Open the Azure Web App and navigate to Settings → Environment variables. Enter the following values, most of which you previously saved in your Notepad file.
Important: After entering the values, make sure you save the settings. Saving will restart the Azure Web App, which is expected.
| Variable | Description |
|---|---|
| CLIENTID | Retrieve this value from your notepad file. It was saved as Application (Client) ID. |
| TENANTID | Retrieve this value from your notepad file. It was saved as Directory (Tenant) ID. |
| AUDIENCE_APPIDURI | Retrieve this value from your notepad file. It was saved as Application ID URI. |
| CLIENTSECRET |
Retrieve this value from your notepad file. It was saved as Secret. Security: Treat this value as a password. Do not share it with unauthorised parties or commit it to source control.
|
| AUTHORITYHOST |
Select the value that corresponds to your Azure environment.
|
| GRAPH_BASEURL |
Select the value that corresponds to your Azure environment.
|
| GRAPH_SCOPES |
Select the value that corresponds to your Azure environment.
|
| BLOB_CONNECTION_STRING | Retrieve this value from your notepad file. It was saved as Blob Connection String. |
| BLOB_CONTAINER_NAME | Retrieve this value from your notepad file. It was saved as Blob Container Name. |
| CID_PLATFORMS |
Enter the following CSV value: A comma-separated list of Outlook surface identifiers that should receive signature images as CID inline attachments. When CID is enabled, images are embedded directly into the message body, ensuring they are visible to recipients even when reading emails offline. We recommend enabling CID if it works reliably in your environment. If images do not render correctly, remove the affected platform from this list. Leave this field empty to disable CID on all surfaces. |
| MAX_SIGNATURE_ITEMS |
Recommended value: 100. Sets the maximum number of signature items the system will process per set. If not specified, the system defaults to 100. |
| MAX_TOTAL_SIGNATURE_SIZE_KB |
Recommended value: 150. Sets the maximum combined size in kilobytes of a signature's HTML file and its associated image folder. Signatures exceeding this limit will not be delivered to the client. The system enforces a hard cap of 250 KB regardless of the value entered here. If not specified, the system defaults to 150. |
| SIGNATURE_BLANK_LINES_ON_TOP |
Recommended value: 4. Sets the number of blank lines inserted above the signature when it is injected into the compose window. Accepted range is 0 to 10. If not specified, the system defaults to 0. |
| SIGNATURE_REFRESH_PERIOD_IN_MINUTES |
Recommended value: 240. Sets the time-to-live in minutes for the client-side signature cache. Once the cache expires, the add-in will fetch a fresh copy of the signature on the next compose event. If not specified, the system defaults to 240 minutes (4 hours). |
| SUPPORTED_OUTLOOK_SURFACE |
Enter the following CSV value: A comma-separated list of Outlook surface identifiers permitted to receive signatures. Requests from surfaces not included in this list will be denied. Currently supported: Currently unsupported: |
| USE_OFFICERUNTIME_STORAGE_ON_DESKTOP |
Set this value to false. Controls whether OfficeRuntime.Storage is used as the primary cache store on Outlook desktop clients. OfficeRuntime.Storage is not yet available across all Outlook clients — |
| SIGNATURES_DISABLED |
Recommended value: false. Set to true to immediately disable signature delivery for all users across the entire organisation. When disabled, the add-in will stop inserting signatures and the user's local cache will be cleared on the next bootstrap cycle. This is a global kill switch. To disable signatures for specific users or groups only, use |
| DISABLED_ENTRA_GROUP_ID |
Enter the Object ID of the Entra ID (Azure AD) security group whose members should have signature delivery disabled. Retrieve this value from your notepad file. Members of this group — including members of nested sub-groups — will have their signatures disabled. The check uses transitive group membership, so nested groups are fully supported. Leave this field empty to disable group-based restrictions entirely. Important: This feature requires the GroupMember.Read.All permission on your App Registration with admin consent granted. If this permission is not in place, the group check will fail silently and signatures will continue to be delivered. A reminder is logged to the Azure App Service log stream at startup if this value is configured.
|
| AUTOMATIC_SIGNATURE_INSERTION_DISABLED |
Recommended value: false. Set to true to disable automatic signature insertion for all users across the entire organisation. When disabled, signatures will not be inserted automatically when a compose window opens. The signature cache and task pane remain fully functional — users can still insert signatures manually using the Insert Signature button in the task pane. This is a global setting. To disable automatic insertion for specific users or groups only, use |
| AUTOMATIC_SIGNATURE_INSERTION_DISABLED_ENTRA_GROUP_ID |
Enter the Object ID of the Entra ID (Azure AD) security group whose members should have automatic signature insertion disabled. Retrieve this value from your notepad file. Members of this group — including members of nested sub-groups — will not receive automatic signature insertion on compose open. The check uses transitive group membership, so nested groups are fully supported. The signature cache and task pane remain fully functional for affected users — they can still insert signatures manually using the Insert Signature button in the task pane. Leave this field empty to disable group-based restrictions entirely. Important: This feature requires the GroupMember.Read.All permission on your App Registration with admin consent granted. If this permission is not in place, the group check will fail silently and automatic insertion will continue as normal. A reminder is logged to the Azure App Service log stream at startup if this value is configured.
|
7. Uploading the backend files to Azure Web App
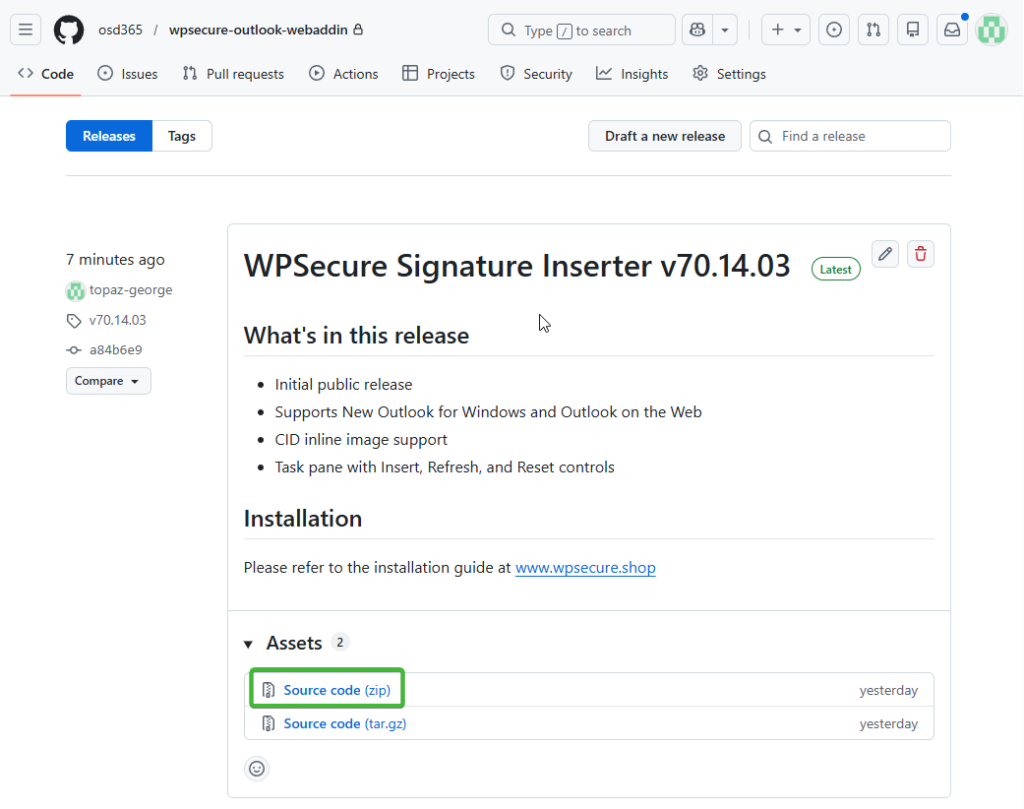
Click here to open the GitHub repository ==> https://github.com/osd365/wpsecure-outlook-webaddin/releases/. Always use the latest release.
After unzipping the folder containing the WPSecure Signature Inserter add‑in files, the contents will appear as shown in the image below.
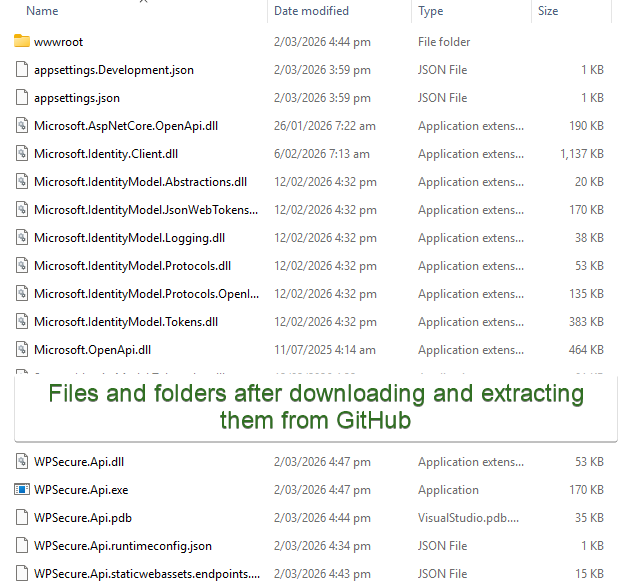
Change into the directory and open the folder named wwwroot. Inside this folder, you will find two files that must be opened and edited: config.json and wpsecure.manifest.xml.
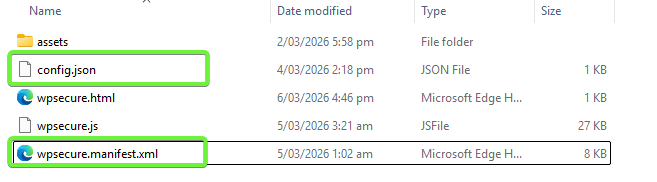
Open the config.json file and replace the URL in the template with the Default Domain value you previously copied into your Notepad file.
Pay special attention to the https value. You will paste your Default Domain immediately after,”https://” with no trailing slashes required. Example below.
					{
  "BACKEND_BASE_URL": "https://your-web-app-domain.azurewebsites.net"
}
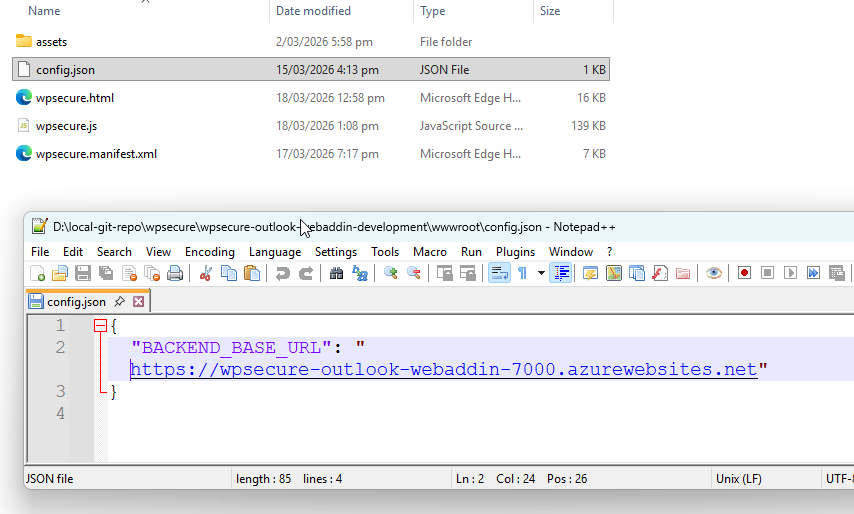
You should still have the Default Domain value (without the https:// prefix) available in your memory. If not, copy it again from your Notepad file. The Default Domain you copied will look similar to the example below:
wpsecure-outlook-webaddin-7000.azurewebsites.net
Open the wpsecure.manifest.xml file located inside the wwwroot folder. Find and replace all instances of the placeholder value shown below with the Default Domain value from your Notepad file.
your-web-app-domain.azurewebsites.net
Replace the placeholder value above with your Default Domain. There will be 20 occurrences to update, so using Replace All is recommended. Just to emphasise: use the Default Domain without the https:// prefix. Pay close attention to any leading or trailing spaces when performing the find‑and‑replace operation to ensure all replacements are clean and accurate.
After completing the bulk replacement, search the file again to confirm that no instances of the placeholder string remain.
There is one additional replacement required. Reopen the wpsecure.manifest.xml file and scroll to the bottom. Locate the section that looks similar to the code snippet shown below.
					<WebApplicationInfo>
				<Id>f9de811a-1855-4ad7-b618-1126d6d87b8c</Id>
				<Resource>api://your-web-app-domain.azurewebsites.net/f9de811a-1855-4ad7-b618-1126d6d87b8c</Resource>
				<Scopes>
					<Scope>openid</Scope>
					<Scope>profile</Scope>
				</Scopes>
			</WebApplicationInfo>
Replace the string between the opening and closing <ID> tags with the Application (Client) ID you copied into your Notepad file.
Next, replace the string between the opening and closing <Resource> tags with the Application ID URI from your Notepad file. Ensure that the value you paste includes no trailing slashes (/). Also verify that the Application ID URI ends with your Application (Client) ID, and that the final segment matches it exactly.
After making these replacements, the <WebApplicationInfo> section will look similar to the example shown below:
					<WebApplicationInfo>
				<Id>f9de811a-1855-4ad7-b618-1126d6d87b8c</Id>
				<Resource>api://wpsecure-outlook-webaddin-7000.azurewebsites.net/f9de811a-1855-4ad7-b618-1126d6d87b8c</Resource>
				<Scopes>
					<Scope>openid</Scope>
					<Scope>profile</Scope>
				</Scopes>
			</WebApplicationInfo>
Now move back up to the parent folder, where you will see a structure similar to the file and folder layout shown below.
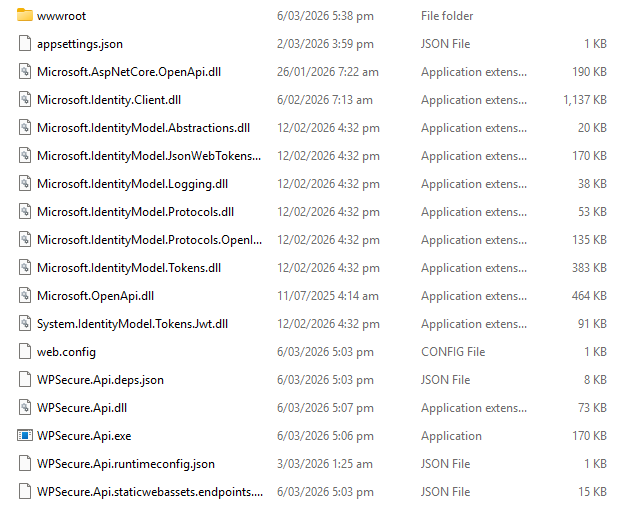
ZIP all of the files inside this folder into a single archive and name it wpsecure-outlook-webaddin.zip.
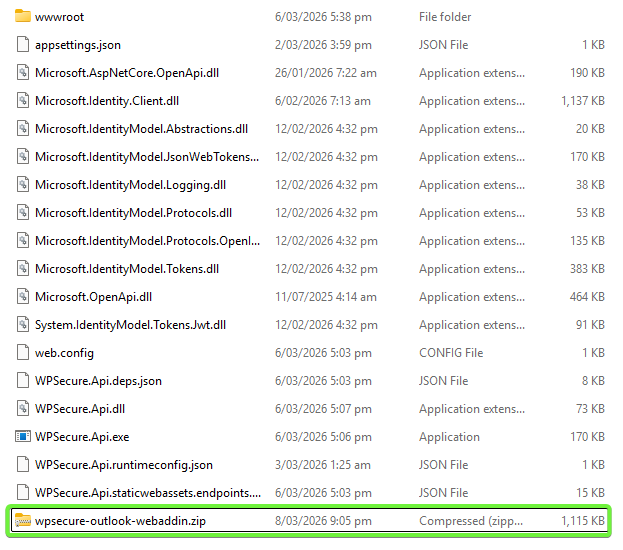
The wpsecure‑outlook‑webaddin.zip file can now be uploaded to your Azure Web App.
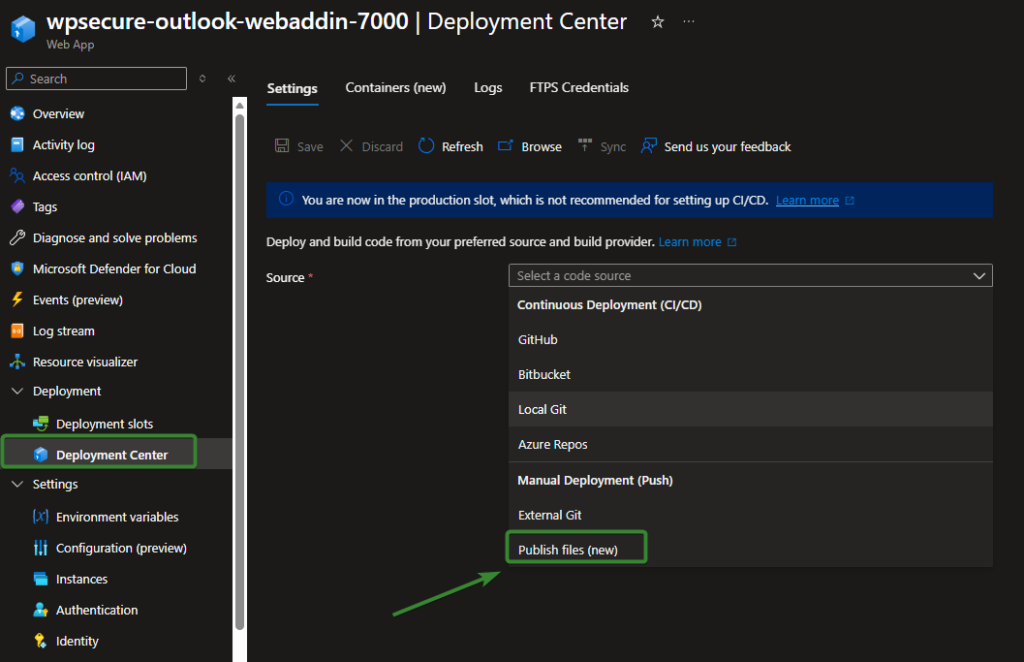
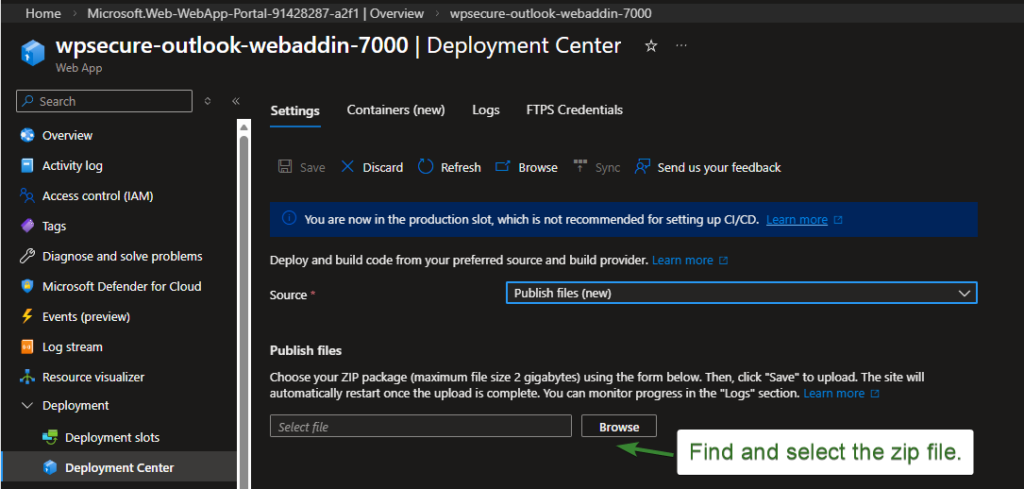
Open the Azure Web App and navigate to Deployments → Deployment Center. Under Source, select Public files (new), then click Browse and choose the ZIP file you just created. Click Save and wait for the upload and deployment process to complete.
Once the deployment finishes, open the Logs tab to verify that the upload and extraction were successful.
When the upload is complete, the Azure Web App will automatically restart. After deployment, every time a request is made to the Web App from New Outlook or Outlook on the Web, you can view incoming requests in real time through the Log Stream panel of your Azure Web App.
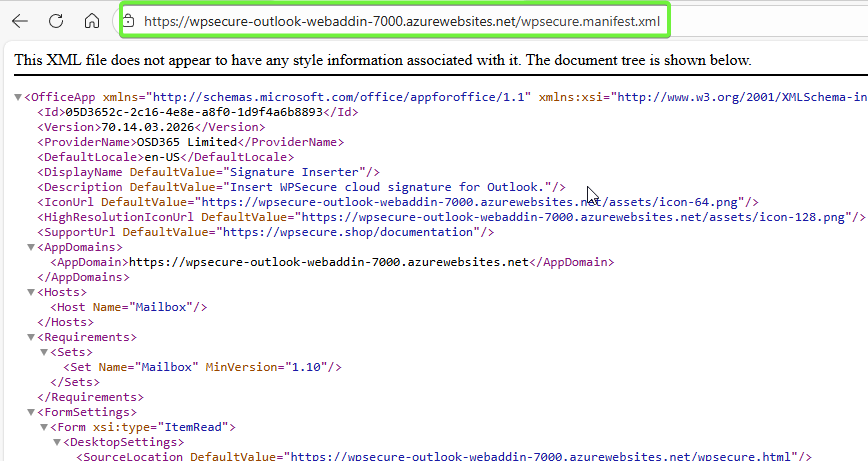
To confirm that the files have been uploaded correctly and that the manifest file is publicly accessible, open a browser and navigate to the full URL of your wpsecure.manifest.xml file. You should be able to load the file without authentication, confirming that the add‑in manifest is reachable by Outlook.
8. Test the Outlook web add-in by sideloading it to Outlook
Before you deploy the add-in to everyone within your organization, make sure it works for you. Everyone who tests the add-in should side-load it using the following link.
https://aka.ms/olksideload
You can either use the copy on your computer or use the URL to the addin file.
wpsecure.manifest.xml
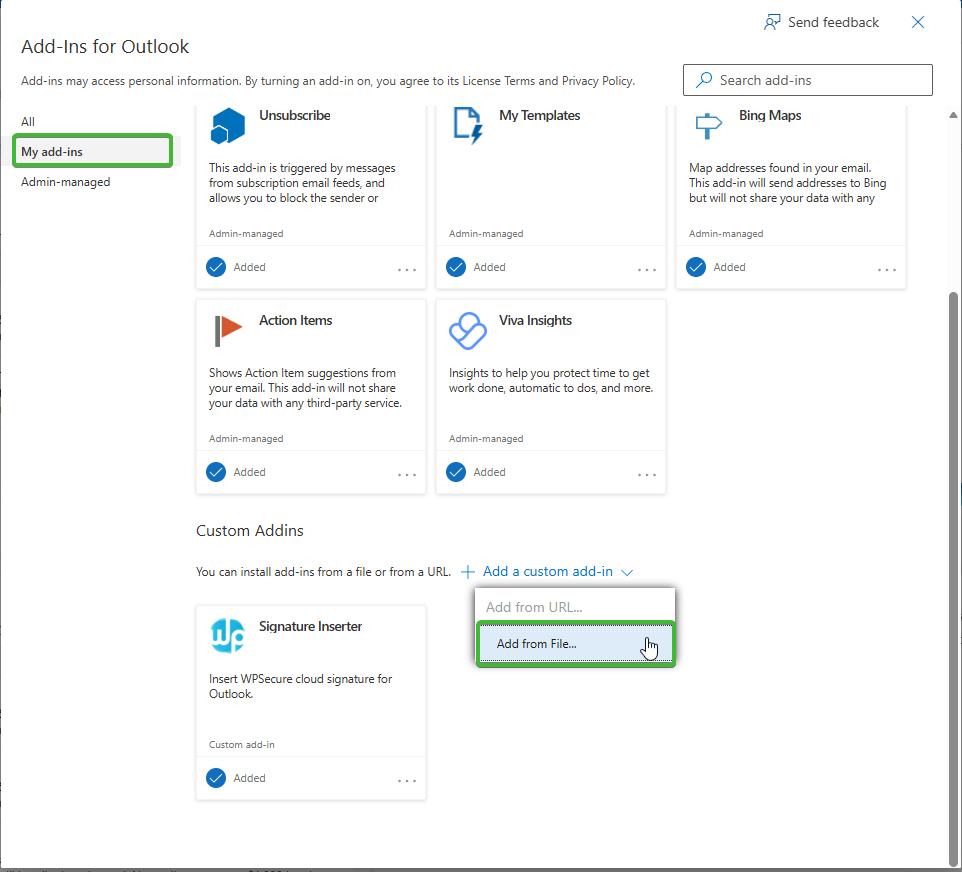
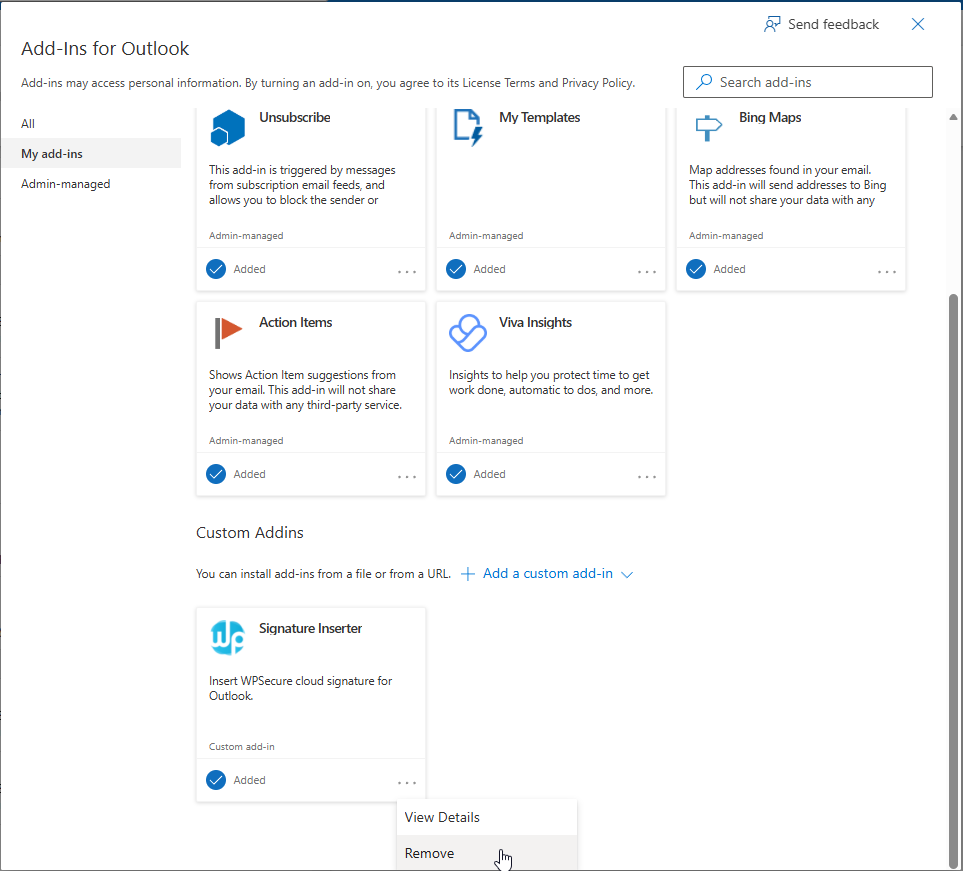
If the Outlook Web Add-in was inserted successfully, you should see the “Signature Inserter” appear in your Custom Addins list as seen in the image above. If Addin sideloading fails, it means your manifest has an issue that needs to be fixed.
The Office Add-in manifest can be validated using the Microsoft Office Add-in validator via the npx command. This does not require any global installation.
Ensure the following are installed on your machine before proceeding:
- Node.js (version 16 or later) — download from https://nodejs.org
- npm (included with Node.js)
npx office-addin-manifest validate wpsecure.manifest.xml
The manifest that we supplied via GitHub is fully tested and validated. If you have made any changes outside the process documented above, we recommend rolling back those changes or using a fresh copy from GitHub and making the replacements again.
After the installation is complete, close your browser and open either New Outlook or Outlook on the Web.
When you compose a new message, the signature will be automatically inserted into the message body.
During a fresh Outlook session, the signature insertion for the first compose action may take a few additional seconds. You may begin typing your message immediately—the signature will be added automatically shortly thereafter. This brief delay is due to Outlook initializing the compose window, not to the signature insertion process itself.
The appropriate signature will be inserted based on the message context and format (New Message vs. Reply/Forward).
| File | Description |
|---|---|
| wpsecure_cloud_new.htm | Inserted as the signature for New messages composed in HTM format for Outlook New and Outlook on the Web. |
| wpsecure_cloud_new.txt | Inserted as the signature for New messages composed in TXT format for Outlook New and Outlook on the Web. |
| wpsecure_cloud_reply.htm | Inserted as the signature for Reply messages composed in HTM format for Outlook New and Outlook on the Web. |
| wpsecure_cloud_reply.txt | Inserted as the signature for Reply messages composed in TXT format for Outlook New and Outlook on the Web. |
Also, verify if you see the button as shown in the image below.
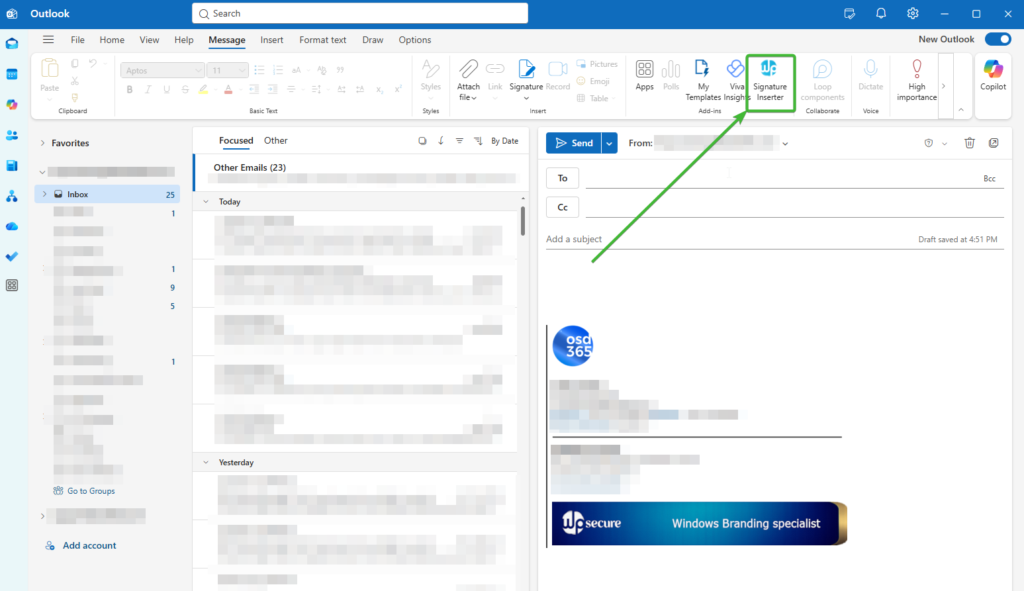
If the button is not directly visible in the ribbon, look under Apps.
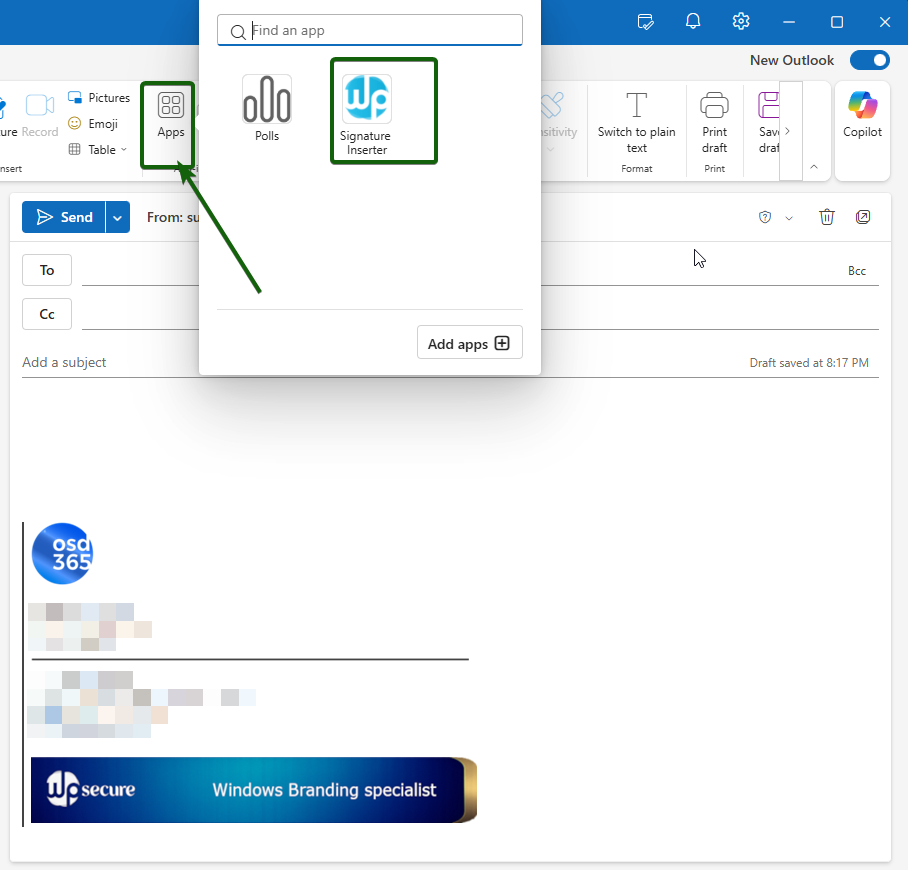
The Signature Inserter Add-in
The WPSecure Signature Inserter Add-in for New Outlook and Outlook on the Web automatically inserts the correct email signature the moment a user opens a compose window — for both new messages and replies or forwards. No user action is required. When the compose window opens, the add-in silently retrieves the user’s personalised signature from the local cache and inserts it into the message body, ready to send.
Each user receives a signature that has been individually personalised by the WPSecure Signature Engine using their own attributes — name, title, department, phone number, and any other fields configured in the branding package. The signature is kept current automatically, refreshing from OneDrive in the background every four hours or whenever a change is detected.
First-Use Behaviour
When the add-in is deployed to users for the first time, signature delivery operates on a warm-up basis. On the very first compose event after deployment, the add-in initiates a background request to the Azure Web App to fetch and cache the user’s signature. This process happens silently and does not interrupt the user’s workflow. However, because the signature is being downloaded for the first time, it may not be available for insertion in that initial compose session.
In practice, users will typically see their signature appear automatically from the second or third compose event onwards — once the background fetch has completed and the signature has been written to the local cache. Administrators should communicate this to end users during rollout so that the absence of a signature in the first one or two compose windows is understood as expected first-use behaviour and not reported as a fault.
Once the local cache is populated, signature delivery is seamless and automatic on every subsequent compose event. The cache is maintained and refreshed silently in the background without any user involvement.
Administrators have full control over automatic insertion behaviour. It can be disabled organisation-wide or targeted at specific user groups through Entra ID security groups — for example, for users who manage their own signatures or who do not require centralised signature deployment. When automatic insertion is disabled for a user, their task pane remains fully functional so they can still insert their signature manually at any time.
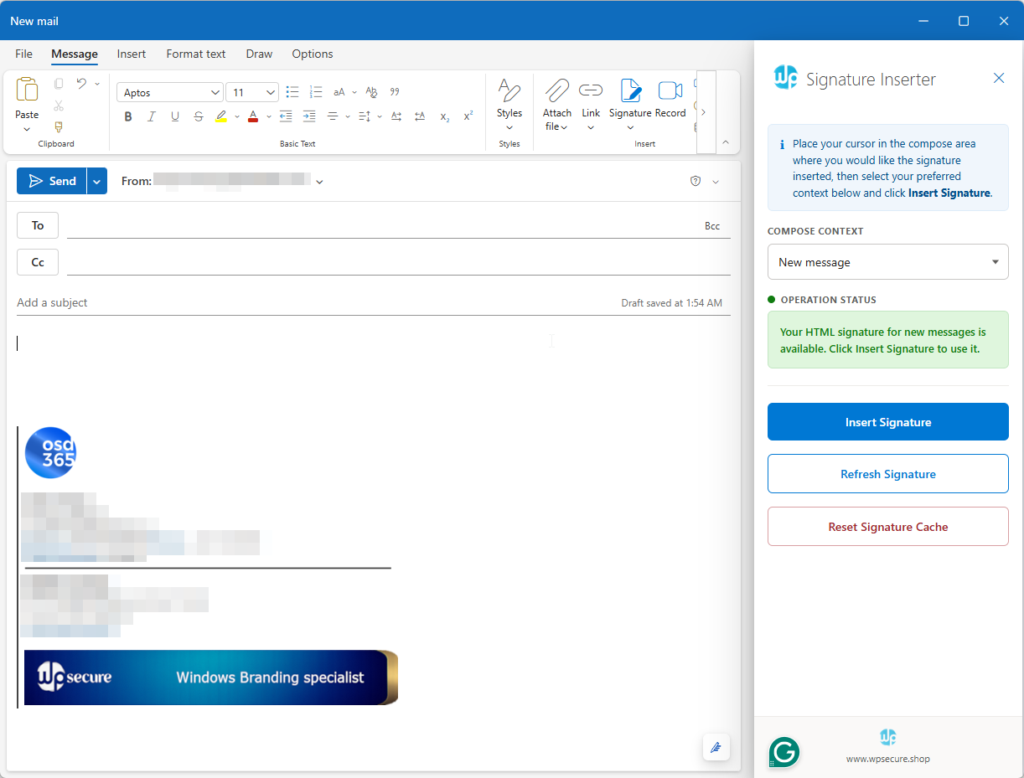
The Task Pane
The task pane is the user-facing control panel of the add-in. It opens on the right-hand side of the compose window by clicking the Signature Inserter button in the ribbon and gives users direct control over their signature when needed.
At the top of the task pane, an information panel guides the user to place their cursor at the position in the email body where they would like the signature inserted. Insertion of the signature, the type/context of the signature, where the signature is inserted, and how many times its inserted is up the user.
The Compose Context dropdown lets the user select between a new message or a reply or forward, updating the status and available signature accordingly. The Operation Status indicator confirms in real time whether a signature is available, has been inserted, or requires attention.
Three action buttons give users full control. Insert Signature places the signature at the cursor position in the compose window — it can be inserted multiple times and at any point in the email body. Refresh Signature fetches the latest version directly from the server without waiting for the automatic refresh interval, useful when a signature has just been updated centrally. Reset Signature Cache clears the locally stored signature and forces a clean fetch from the server, primarily used as a troubleshooting step when signatures are not behaving as expected.
9. Deploying the Outlook Web Add-in to every one
After testing the Outlook Web Add-in and its functionality. Uninstall the Web Add-in that was side-loaded.
https://aka.ms/olksideload
Open Outlook again and check if the add-in has been removed.
https://admin.cloud.microsoft/?#/Settings/IntegratedApps
Now, in the Microsoft 365 admin center, click on Settings/Integrated apps. Click “Upload Custom App“.

Either upload your local copy or upload the online version of the manifest file below.
wpsecure.manifest.xml
Validate and follow the prompts to deploy it to yourself, a group, or to everyone in your organization.
The deployment usually takes between 24 hours and 72 hours to propagate. But make sure the sideloaded version of the Outlook Web Add-in is removed from Outlook before the Admin Center deployment via Integrated Apps.
That’s it, folks. The below addendum is a good optional read.
Validation Powershell script
Once you have completed all setup steps, run the verification script below to confirm your deployment is configured correctly. The script connects to your Azure subscription and Microsoft Entra ID and checks every component automatically — producing a colour-coded pass/fail report in under two minutes.
What the script checks
The script verifies the following across your Azure environment in a single run:
- All required PowerShell modules are installed
- Azure Web App — exists, running, .NET 10 runtime, HTTPS enforced, Application Insights enabled
- All 20 environment variables — presence, format, and value consistency
- Azure Blob Storage — connection string valid, container exists, write access confirmed
- Entra ID App Registration — Application ID URI, access_as_user scope, Microsoft Office authorized client, client secret expiry
- All 5 API permissions have organisation-wide admin consent
- CLIENTID, TENANTID, and AUDIENCE_APPIDURI are consistent with each other and with the App Registration
- Both Entra ID security groups exist and are the correct group type
- Deployed files — wpsecure.html, wpsecure.manifest.xml, and config.json are reachable
- Manifest file contains exactly 20 occurrences of your Web App domain
- config.json BACKEND_BASE_URL matches your Web App domain
Requirements
- Windows PowerShell 5.1 or later
- The following PowerShell modules installed: Az.Websites, Az.Storage, Microsoft.Graph.Applications, Microsoft.Graph.Groups
- An Azure administrator account with Reader access to the subscription and Application.Read.All and Group.Read.All permissions in Microsoft Graph
- MFA is fully supported — the script uses browser-based authentication for both Azure and Microsoft Graph
How to install the required modules
If you do not have the required modules installed, run the following in PowerShell as Administrator.
Install-Module Az -Scope CurrentUser -Force
Install-Module Microsoft.Graph -Scope CurrentUser -Force
How to run the script
- Download the script and save it to a folder on your computer, for example C:\temp\Test-WPSecureSetup.ps1
- Open PowerShell
- Run the following command: C:\temp\Test-WPSecureSetup.ps1
- When prompted, enter your Web App domain — for example: wpsecure-outlook-webaddin-7000.azurewebsites.net
- A browser window will open for you to sign in to Azure with MFA. Complete the sign-in and return to PowerShell.
- If you have more than one Azure subscription, the script will display a numbered list — enter the number corresponding to the subscription where your Web App is deployed.
- A second browser window will open for Microsoft Graph. Complete the sign-in.
- The script will run all checks and display a final summary showing the number of checks passed, failed, and any warnings.
Interpreting the results
A fully configured deployment will show all checks as PASS with zero failures and zero warnings. If any check fails, the output includes a description of the issue and where in the Azure Portal to resolve it. Address each failure and re-run the script to confirm.
					<#
.SYNOPSIS
    WPSecure Signature Inserter — Setup Verification Script
.DESCRIPTION
    Verifies that all components of the WPSecure Outlook Web Add-in are correctly
    configured. Checks the Azure Web App, App Registration, Blob Storage, and
    Entra ID groups. Produces a colour-coded pass/fail report.
.NOTES
    Legal entity : OSD365 Limited
    Product      : WPSecure Signature Inserter
    Website      : https://www.wpsecure.shop
    Requires     : Az, Microsoft.Graph PowerShell modules
#>


$ErrorActionPreference = 'Stop'

# ─────────────────────────────────────────────────────────────────────────────
# COLOUR HELPERS
# ─────────────────────────────────────────────────────────────────────────────
function Write-Pass   { param([string]$msg) Write-Host "  [PASS] $msg" -ForegroundColor Green  }
function Write-Fail   { param([string]$msg) Write-Host "  [FAIL] $msg" -ForegroundColor Red    }
function Write-Warn   { param([string]$msg) Write-Host "  [WARN] $msg" -ForegroundColor Yellow }
function Write-Info   { param([string]$msg) Write-Host "  [INFO] $msg" -ForegroundColor Cyan   }
function Write-Header { param([string]$msg) Write-Host "`n$msg" -ForegroundColor White         }
function Write-Sep    { Write-Host ("─" * 72) -ForegroundColor DarkGray }

$script:PassCount = 0
$script:FailCount = 0
$script:WarnCount = 0

function Add-Pass { $script:PassCount++; Write-Pass @args }
function Add-Fail { $script:FailCount++; Write-Fail @args }
function Add-Warn { $script:WarnCount++; Write-Warn @args }

# ─────────────────────────────────────────────────────────────────────────────
# BANNER
# ─────────────────────────────────────────────────────────────────────────────
Clear-Host
Write-Host ""
Write-Host "  ╔══════════════════════════════════════════════════════════════════╗" -ForegroundColor Cyan
Write-Host "  ║        WPSecure Signature Inserter — Setup Verification         ║" -ForegroundColor Cyan
Write-Host "  ║        OSD365 Limited  |  www.wpsecure.shop                     ║" -ForegroundColor Cyan
Write-Host "  ╚══════════════════════════════════════════════════════════════════╝" -ForegroundColor Cyan
Write-Host ""

# ─────────────────────────────────────────────────────────────────────────────
# COLLECT INPUT
# ─────────────────────────────────────────────────────────────────────────────
Write-Host "  Enter the domain of your WPSecure Azure Web App." -ForegroundColor White
Write-Host "  Example: wpsecure-outlook-webaddin-7000.azurewebsites.net" -ForegroundColor DarkGray
Write-Host ""
$inputDomain = (Read-Host "  Web App Domain").Trim().TrimEnd('/').ToLower()

# Strip https:// if the user included it anyway
$inputDomain = $inputDomain -replace '^https?://', ''

if ([string]::IsNullOrWhiteSpace($inputDomain)) {
    Write-Host "`n  [ERROR] No domain entered." -ForegroundColor Red
    exit 1
}

# Build the full URL and derive the Web App name
$rawUrl     = "https://$inputDomain"
$webAppName = $inputDomain.Split('.')[0]

Write-Host ""
Write-Info "Web App name detected: $webAppName"
Write-Sep

# ─────────────────────────────────────────────────────────────────────────────
# MODULE CHECK
# ─────────────────────────────────────────────────────────────────────────────
Write-Header "[ 0 ] Checking required PowerShell modules"
Write-Sep

foreach ($mod in @('Az.Websites', 'Az.Storage', 'Microsoft.Graph.Applications', 'Microsoft.Graph.Groups')) {
    if (Get-Module -ListAvailable -Name $mod) {
        Add-Pass "Module available: $mod"
    } else {
        Add-Fail "Module not found: $mod  (Install-Module $mod)"
    }
}

# ─────────────────────────────────────────────────────────────────────────────
# AZURE CONNECTION
# ─────────────────────────────────────────────────────────────────────────────
Write-Header "[ 1 ] Connecting to Azure"
Write-Sep

try {
    Write-Info "A browser window will open for you to sign in to Azure."
    Write-Info "Please complete the sign-in including any MFA prompts."
    Write-Host ""
    Clear-AzContext -Force -ErrorAction SilentlyContinue | Out-Null
    Connect-AzAccount -ErrorAction Stop | Out-Null
    $azCtx = Get-AzContext -ErrorAction Stop

    if (-not $azCtx -or [string]::IsNullOrEmpty($azCtx.Account)) {
        Add-Fail "Sign-in succeeded but no context was returned. Please try again."
        exit 1
    }

    Add-Pass "Signed in as: $($azCtx.Account.Id)"

    # List all accessible subscriptions and let the user choose if more than one
    $allSubs = Get-AzSubscription -ErrorAction Stop | Sort-Object Name
    if ($allSubs.Count -eq 1) {
        $chosenSub = $allSubs[0]
        Write-Info "One subscription found — auto-selected: $($chosenSub.Name)"
    } else {
        Write-Host ""
        Write-Host "  Multiple subscriptions found. Please choose one:" -ForegroundColor White
        Write-Host ""
        for ($i = 0; $i -lt $allSubs.Count; $i++) {
            Write-Host ("  [{0}] {1}  ({2})" -f ($i + 1), $allSubs[$i].Name, $allSubs[$i].Id) -ForegroundColor Cyan
        }
        Write-Host ""
        $subChoice = Read-Host "  Enter number"
        $subIndex  = [int]$subChoice - 1
        if ($subIndex -lt 0 -or $subIndex -ge $allSubs.Count) {
            Add-Fail "Invalid selection: $subChoice"
            exit 1
        }
        $chosenSub = $allSubs[$subIndex]
    }

    Set-AzContext -SubscriptionId $chosenSub.Id -TenantId $azCtx.Tenant.Id -ErrorAction Stop | Out-Null
    $azCtx = Get-AzContext
    Add-Pass "Subscription: $($azCtx.Subscription.Name) ($($azCtx.Subscription.Id))"
} catch {
    Add-Fail "Could not connect to Azure: $_"
    exit 1
}

# ─────────────────────────────────────────────────────────────────────────────
# FIND WEB APP
# ─────────────────────────────────────────────────────────────────────────────
Write-Header "[ 2 ] Locating Azure Web App: $webAppName"
Write-Sep

$webApp = $null
$resourceGroup = $null

# List all Web Apps in the subscription and find by name
Write-Info "Listing all Web Apps in subscription: $((Get-AzContext).Subscription.Name)..."
try {
    $subId = (Get-AzContext).Subscription.Id
    $allWebApps = Get-AzWebApp -DefaultProfile (Get-AzContext) -ErrorAction Stop
    $webApp = $allWebApps | Where-Object { $_.Name -eq $webAppName } | Select-Object -First 1
} catch {
    # Fallback: try Get-AzResource to locate it
    Write-Info "Falling back to Get-AzResource..."
    try {
        $res = Get-AzResource -ResourceType "Microsoft.Web/sites" -ErrorAction Stop | Where-Object { $_.Name -eq $webAppName } | Select-Object -First 1
        if ($res) {
            $webApp = Get-AzWebApp -ResourceGroupName $res.ResourceGroupName -Name $res.Name -ErrorAction Stop
            $allWebApps = @($webApp)
        }
    } catch {
        Add-Fail "Could not list Web Apps: $_"
        exit 1
    }
}

if (-not $webApp) {
    Add-Fail "Web App '$webAppName' not found in subscription: $((Get-AzContext).Subscription.Name)"
    Add-Fail "Verify the URL is correct and your account has Reader access to the subscription."
    Write-Info "Web Apps found in this subscription:"
    $allWebApps | ForEach-Object { Write-Info "  - $($_.Name)  [$($_.ResourceGroup)]" }
    exit 1
}

$resourceGroup = $webApp.ResourceGroup
Add-Pass "Web App found: $webAppName"
Add-Pass "Resource group: $resourceGroup"
Add-Pass "Subscription: $((Get-AzContext).Subscription.Name)"

# Reload with full config (Get-AzWebApp list doesn't always include SiteConfig)
try {
    $webApp = Get-AzWebApp -ResourceGroupName $resourceGroup -Name $webAppName -ErrorAction Stop
} catch {
    Add-Warn "Could not reload full Web App config: $_"
}

# State
if ($webApp.State -eq 'Running') {
    Add-Pass "Web App state: Running"
} else {
    Add-Fail "Web App state: $($webApp.State) — expected Running"
}

# Runtime (.NET 10)
$runtime = $webApp.SiteConfig.LinuxFxVersion
if ([string]::IsNullOrEmpty($runtime)) { $runtime = $webApp.SiteConfig.WindowsFxVersion }
if ([string]::IsNullOrEmpty($runtime)) { $runtime = "" }
if ($runtime -match "DOTNET.*10" -or $runtime -match "10\.") {
    Add-Pass "Runtime stack: $runtime"
} else {
    if ([string]::IsNullOrEmpty($runtime)) {
        Add-Warn "Runtime stack: could not determine — verify .NET 10 (LTS) is configured in Azure Portal"
    } else {
        Add-Fail "Runtime stack: $runtime — expected .NET 10 (LTS)"
    }
}

# HTTPS only
if ($webApp.HttpsOnly) {
    Add-Pass "HTTPS Only: enabled"
} else {
    Add-Warn "HTTPS Only: not enforced — recommended to enable in Azure Portal → Configuration → General settings"
}

# Application Insights
$aiKey = $webApp.SiteConfig.AppSettings | Where-Object { $_.Name -eq 'APPINSIGHTS_INSTRUMENTATIONKEY' -or $_.Name -eq 'APPLICATIONINSIGHTS_CONNECTION_STRING' }
if ($aiKey) {
    Add-Pass "Application Insights: configured"
} else {
    Add-Warn "Application Insights: not detected — enable via Azure Portal for log stream monitoring"
}

# ─────────────────────────────────────────────────────────────────────────────
# ENVIRONMENT VARIABLES
# ─────────────────────────────────────────────────────────────────────────────
Write-Header "[ 3 ] Verifying Environment Variables"
Write-Sep

# Get all app settings
$appSettings = @{}
try {
    $slot = Get-AzWebAppSlot -ResourceGroupName $resourceGroup -Name $webAppName -Slot production -ErrorAction SilentlyContinue
    if ($slot -and $slot.SiteConfig -and $slot.SiteConfig.AppSettings) {
        $rawSettings = $slot.SiteConfig.AppSettings
    } else {
        $rawSettings = $webApp.SiteConfig.AppSettings
    }
    foreach ($s in $rawSettings) { $appSettings[$s.Name] = $s.Value }
} catch {
    # Fallback
    foreach ($s in $webApp.SiteConfig.AppSettings) { $appSettings[$s.Name] = $s.Value }
}

# Required ENV vars
$required = @('CLIENTID','TENANTID','AUDIENCE_APPIDURI','CLIENTSECRET','BLOB_CONNECTION_STRING','BLOB_CONTAINER_NAME','SUPPORTED_OUTLOOK_SURFACE')
foreach ($key in $required) {
    if ($appSettings.ContainsKey($key) -and -not [string]::IsNullOrWhiteSpace($appSettings[$key])) {
        # Mask secrets in output
        if ($key -in @('CLIENTSECRET','BLOB_CONNECTION_STRING')) {
            Add-Pass "ENV var present: $key = [value masked]"
        } else {
            Add-Pass "ENV var present: $key = $($appSettings[$key])"
        }
    } else {
        Add-Fail "ENV var missing or empty: $key"
    }
}

# Optional ENV vars — warn if missing
$optional = @(
    'AUTHORITYHOST','GRAPH_BASEURL','GRAPH_SCOPES','CID_PLATFORMS',
    'MAX_SIGNATURE_ITEMS','MAX_TOTAL_SIGNATURE_SIZE_KB','SIGNATURE_BLANK_LINES_ON_TOP',
    'SIGNATURE_REFRESH_PERIOD_IN_MINUTES','USE_OFFICERUNTIME_STORAGE_ON_DESKTOP',
    'SIGNATURES_DISABLED','DISABLED_ENTRA_GROUP_ID',
    'AUTOMATIC_SIGNATURE_INSERTION_DISABLED','AUTOMATIC_SIGNATURE_INSERTION_DISABLED_ENTRA_GROUP_ID'
)
foreach ($key in $optional) {
    if ($appSettings.ContainsKey($key) -and -not [string]::IsNullOrWhiteSpace($appSettings[$key])) {
        Add-Pass "ENV var present (optional): $key = $($appSettings[$key])"
    } else {
        Add-Warn "ENV var not set (optional): $key"
    }
}

# Extract values for later checks
$clientId      = $appSettings['CLIENTID']
$tenantId      = $appSettings['TENANTID']
$audienceUri   = $appSettings['AUDIENCE_APPIDURI']
$blobConnStr   = $appSettings['BLOB_CONNECTION_STRING']
$blobContainer = $appSettings['BLOB_CONTAINER_NAME']
$disabledGrpId = $appSettings['DISABLED_ENTRA_GROUP_ID']
$autoInsGrpId  = $appSettings['AUTOMATIC_SIGNATURE_INSERTION_DISABLED_ENTRA_GROUP_ID']

# Format validation
if ($clientId -and [System.Guid]::TryParse($clientId, [ref][System.Guid]::Empty)) {
    Add-Pass "CLIENTID is a valid GUID"
} elseif ($clientId) {
    Add-Fail "CLIENTID does not appear to be a valid GUID: $clientId"
}

if ($tenantId -and [System.Guid]::TryParse($tenantId, [ref][System.Guid]::Empty)) {
    Add-Pass "TENANTID is a valid GUID"
} elseif ($tenantId) {
    Add-Fail "TENANTID does not appear to be a valid GUID: $tenantId"
}

# AUDIENCE_APPIDURI format: api://<domain>/<guid>
if ($audienceUri) {
    if ($audienceUri -match "^api://[^/]+/[0-9a-fA-F\-]{36}$") {
        Add-Pass "AUDIENCE_APPIDURI format valid: $audienceUri"
    } else {
        Add-Fail "AUDIENCE_APPIDURI format unexpected: $audienceUri — expected api://<domain>/<client-id>"
    }
    # Domain portion should match the Web App URL
    if ($audienceUri -match [regex]::Escape($uri.Host)) {
        Add-Pass "AUDIENCE_APPIDURI domain matches Web App URL"
    } else {
        Add-Warn "AUDIENCE_APPIDURI domain does not match Web App URL — verify this is intentional"
    }
}

# SUPPORTED_OUTLOOK_SURFACE value validation
$validSurfaces   = @('newOutlookWindows', 'OutlookWebApp')
$invalidSurfaces = @('classicWin32', 'classicMac', 'newOutlookMac', 'OutlookIOS', 'OutlookAndroid')
$surfaceEnvVal   = $appSettings['SUPPORTED_OUTLOOK_SURFACE']

if (-not [string]::IsNullOrWhiteSpace($surfaceEnvVal)) {
    $surfaceList = $surfaceEnvVal -split ',' | ForEach-Object { $_.Trim() } | Where-Object { $_ -ne '' }
    $surfaceOk   = $true

    foreach ($s in $surfaceList) {
        if ($validSurfaces -contains $s) {
            Add-Pass "SUPPORTED_OUTLOOK_SURFACE: '$s' is a supported surface"
        } elseif ($invalidSurfaces -contains $s) {
            Add-Fail "SUPPORTED_OUTLOOK_SURFACE: '$s' is listed as unsupported in the documentation — remove it"
            $surfaceOk = $false
        } else {
            Add-Fail "SUPPORTED_OUTLOOK_SURFACE: '$s' is not a recognised surface identifier — check for typos (values are case-sensitive)"
            $surfaceOk = $false
        }
    }

    if ($surfaceOk -and $surfaceList.Count -gt 0) {
        Add-Pass "SUPPORTED_OUTLOOK_SURFACE: all $($surfaceList.Count) surface(s) are valid"
    }
}

# ─────────────────────────────────────────────────────────────────────────────
# BLOB STORAGE
# ─────────────────────────────────────────────────────────────────────────────
Write-Header "[ 4 ] Verifying Azure Blob Storage"
Write-Sep

if ($blobConnStr -and $blobContainer) {
    try {
        $storageCtx = New-AzStorageContext -ConnectionString $blobConnStr -ErrorAction Stop
        Add-Pass "Blob Storage: connection string is valid"

        # Check container exists
        $container = Get-AzStorageContainer -Name $blobContainer -Context $storageCtx -ErrorAction SilentlyContinue
        if ($container) {
            Add-Pass "Blob container exists: $blobContainer"
        } else {
            Add-Fail "Blob container not found: $blobContainer"
        }

        # Write probe — upload a temp file and delete it
        $probeName = "__wpsecure_verify_probe__"
        $probeTempFile = [System.IO.Path]::GetTempFileName()
        try {
            [System.IO.File]::WriteAllText($probeTempFile, "wpsecure-probe")
            Set-AzStorageBlobContent -Container $blobContainer -Blob $probeName -File $probeTempFile -Context $storageCtx -Force -ErrorAction Stop | Out-Null
            Remove-AzStorageBlob -Container $blobContainer -Blob $probeName -Context $storageCtx -Force -ErrorAction Stop
            Add-Pass "Blob Storage write probe: upload and delete succeeded"
        } catch {
            Add-Fail "Blob Storage write probe failed: $_ — check storage account permissions"
        } finally {
            if (Test-Path $probeTempFile) { Remove-Item $probeTempFile -Force -ErrorAction SilentlyContinue }
        }
    } catch {
        Add-Fail "Blob Storage: could not connect with provided connection string — $_"
    }
} else {
    Add-Warn "Blob Storage: skipped — BLOB_CONNECTION_STRING or BLOB_CONTAINER_NAME not set"
}

# ─────────────────────────────────────────────────────────────────────────────
# MICROSOFT GRAPH CONNECTION
# ─────────────────────────────────────────────────────────────────────────────
Write-Header "[ 5 ] Connecting to Microsoft Graph"
Write-Sep

try {
    Write-Info "A browser window will open for you to sign in to Microsoft Graph."
    Write-Info "Please complete the sign-in including any MFA prompts."
    Write-Host ""
    Connect-MgGraph -TenantId $tenantId -Scopes "Application.Read.All","Group.Read.All" -NoWelcome -ErrorAction Stop | Out-Null
    $mgCtx = Get-MgContext -ErrorAction Stop
    Add-Pass "Connected to Microsoft Graph as: $($mgCtx.Account)"
} catch {
    Add-Fail "Could not connect to Microsoft Graph: $_"
    Add-Warn "Skipping App Registration and Entra group checks."
    $mgCtx = $null
}

# ─────────────────────────────────────────────────────────────────────────────
# APP REGISTRATION
# ─────────────────────────────────────────────────────────────────────────────
if ($mgCtx -and $clientId) {
    Write-Header "[ 6 ] Verifying Entra ID App Registration"
    Write-Sep

    $app = $null
    try {
        $app = Get-MgApplication -Filter "appId eq '$clientId'" -ErrorAction Stop
    } catch {
        Add-Fail "Could not query App Registration: $_"
    }

    if ($app) {
        Add-Pass "App Registration found: $($app.DisplayName)"

        # Application ID URI
        if ($app.IdentifierUris -contains $audienceUri) {
            Add-Pass "Application ID URI matches AUDIENCE_APPIDURI"
        } else {
            Add-Fail "Application ID URI not found in App Registration — expected: $audienceUri  Found: $($app.IdentifierUris -join ', ')"
        }

        # Cross-check: CLIENTID in ENV must match the appId on the App Registration
        if ($app.AppId -eq $clientId) {
            Add-Pass "CLIENTID in ENV vars matches App Registration appId"
        } else {
            Add-Fail "CLIENTID mismatch — ENV var: '$clientId'  App Registration appId: '$($app.AppId)'"
        }

        # Cross-check: AUDIENCE_APPIDURI must end with the CLIENTID as the path segment
        if ($audienceUri -and $audienceUri.EndsWith("/$clientId")) {
            Add-Pass "AUDIENCE_APPIDURI path segment matches CLIENTID"
        } elseif ($audienceUri) {
            Add-Fail "AUDIENCE_APPIDURI path segment does not match CLIENTID — expected URI to end with '/$clientId'"
        }

        # Cross-check: TENANTID in ENV must match the connected tenant
        if ($mgCtx.TenantId -eq $tenantId) {
            Add-Pass "TENANTID in ENV vars matches connected tenant"
        } else {
            Add-Fail "TENANTID mismatch — ENV var: '$tenantId'  Connected Graph tenant: '$($mgCtx.TenantId)'"
        }

        # access_as_user scope
        $scope = $app.Api.Oauth2PermissionScopes | Where-Object { $_.Value -eq 'access_as_user' }
        if ($scope) {
            Add-Pass "API scope 'access_as_user' exists"
            if ($scope.IsEnabled) { Add-Pass "Scope 'access_as_user' is enabled" }
            else { Add-Fail "Scope 'access_as_user' is disabled" }
        } else {
            Add-Fail "API scope 'access_as_user' not found — required under Expose an API"
        }

        # Authorized client application — Microsoft Office (ea5a67f6-b6f3-4338-b240-c655ddc3cc8e)
        $officeClientId = 'ea5a67f6-b6f3-4338-b240-c655ddc3cc8e'
        $authClient = $app.Api.PreAuthorizedApplications | Where-Object { $_.AppId -eq $officeClientId }
        if ($authClient) {
            Add-Pass "Authorized client application registered: $officeClientId (Microsoft Office)"
        } else {
            Add-Fail "Authorized client application not found: $officeClientId — required under Expose an API → Authorized client applications"
        }

        # Client secret — exists, expiry check, and at least one must be active
        $secrets = $app.PasswordCredentials
        if ($secrets -and $secrets.Count -gt 0) {
            Add-Pass "Client secret(s) exist: $($secrets.Count) found"
            $activeSecrets  = 0
            $expiredSecrets = 0
            foreach ($secret in $secrets) {
                $daysLeft = ($secret.EndDateTime - (Get-Date)).Days
                if ($daysLeft -lt 0) {
                    Add-Fail "Client secret '$($secret.DisplayName)' has EXPIRED ($([Math]::Abs($daysLeft)) days ago) — create a new secret and update CLIENTSECRET in the Web App ENV vars"
                    $expiredSecrets++
                } elseif ($daysLeft -lt 30) {
                    Add-Warn "Client secret '$($secret.DisplayName)' expires in $daysLeft days — renew soon and update CLIENTSECRET in the Web App ENV vars"
                    $activeSecrets++
                } else {
                    Add-Pass "Client secret '$($secret.DisplayName)' — valid for $daysLeft days"
                    $activeSecrets++
                }
            }
            # At least one active secret must exist for the Web App to authenticate
            if ($activeSecrets -eq 0) {
                Add-Fail "All client secrets have expired — the Web App cannot authenticate. Create a new secret in Entra ID and update CLIENTSECRET in the Web App ENV vars immediately."
            } else {
                Add-Pass "$activeSecrets active client secret(s) — Web App can authenticate"
            }
        } else {
            Add-Fail "No client secrets found on App Registration — create one and add the value to CLIENTSECRET in the Web App ENV vars"
        }

        # API permissions + admin consent (via service principal)
        # Admin consent = ConsentType of 'AllPrincipals' on the OAuth2 grant.
        # User consent = ConsentType of 'Principal' — not sufficient for production.
        # All 5 permissions must be present and have AllPrincipals consent.
        try {
            $sp = Get-MgServicePrincipal -Filter "appId eq '$clientId'" -ErrorAction Stop
            $grants = Get-MgServicePrincipalOauth2PermissionGrant -ServicePrincipalId $sp.Id -ErrorAction SilentlyContinue

            # Build a lookup: scope name -> ConsentType for every granted scope
            $consentMap = @{}
            foreach ($grant in $grants) {
                $scopeNames = $grant.Scope -split '\s+' | Where-Object { $_ -ne '' }
                foreach ($scope in $scopeNames) {
                    # AllPrincipals wins over Principal if the same scope appears in multiple grants
                    if (-not $consentMap.ContainsKey($scope) -or $grant.ConsentType -eq 'AllPrincipals') {
                        $consentMap[$scope] = $grant.ConsentType
                    }
                }
            }

            # The 5 permissions that must all have admin consent (AllPrincipals)
            $requiredPerms = @('openid', 'profile', 'User.Read', 'Files.Read', 'GroupMember.Read.All')

            foreach ($perm in $requiredPerms) {
                if ($consentMap.ContainsKey($perm)) {
                    if ($consentMap[$perm] -eq 'AllPrincipals') {
                        Add-Pass "Admin consent granted: $perm"
                    } else {
                        Add-Fail "Permission '$perm' exists but has USER consent only — admin consent required. Go to Azure Portal → App Registration → API permissions → Grant admin consent."
                    }
                } else {
                    Add-Fail "Permission '$perm' not found in grants — add it and grant admin consent in Azure Portal → App Registration → API permissions."
                }
            }

            # Summary
            $adminConsentedCount = ($requiredPerms | Where-Object { $consentMap[$_] -eq 'AllPrincipals' }).Count
            if ($adminConsentedCount -eq $requiredPerms.Count) {
                Add-Pass "All $($requiredPerms.Count) permissions have admin consent (AllPrincipals) — correct"
            } else {
                Add-Fail "$adminConsentedCount of $($requiredPerms.Count) permissions have admin consent — $($requiredPerms.Count - $adminConsentedCount) missing"
            }

        } catch {
            Add-Warn "Could not verify API permission grants: $_ — check manually in Azure Portal"
        }

    } else {
        Add-Fail "App Registration with appId '$clientId' not found in tenant"
    }
}

# ─────────────────────────────────────────────────────────────────────────────
# ENTRA ID GROUPS
# ─────────────────────────────────────────────────────────────────────────────
if ($mgCtx) {
    Write-Header "[ 7 ] Verifying Entra ID Groups"
    Write-Sep

    foreach ($pair in @(
        @{ Id = $disabledGrpId;  Label = "Signature disable group (DISABLED_ENTRA_GROUP_ID)" },
        @{ Id = $autoInsGrpId;   Label = "Auto-insert disable group (AUTOMATIC_SIGNATURE_INSERTION_DISABLED_ENTRA_GROUP_ID)" }
    )) {
        $grpId    = $pair.Id
        $grpLabel = $pair.Label

        if ([string]::IsNullOrWhiteSpace($grpId)) {
            Add-Warn "$grpLabel not configured — optional, skip if not required"
            continue
        }

        if (-not [System.Guid]::TryParse($grpId, [ref][System.Guid]::Empty)) {
            Add-Fail "$grpLabel — value is not a valid GUID: $grpId"
            continue
        }

        try {
            $grp = Get-MgGroup -GroupId $grpId -ErrorAction Stop
            Add-Pass "$grpLabel found: $($grp.DisplayName)"

            # Must be a Security group, not Microsoft 365
            if ($grp.SecurityEnabled -eq $true -and $grp.MailEnabled -eq $false) {
                Add-Pass "$grpLabel is a Security group (correct type)"
            } elseif ($grp.SecurityEnabled -eq $true -and $grp.MailEnabled -eq $true) {
                Add-Warn "$grpLabel is a mail-enabled Security group — transitive membership check will work but consider a standard Security group"
            } else {
                Add-Fail "$grpLabel is a Microsoft 365 group — must be a Security group for GroupMember.Read.All transitive check to work"
            }
        } catch {
            Add-Fail "$grpLabel — group with Object ID '$grpId' not found in tenant"
        }
    }
}

# ─────────────────────────────────────────────────────────────────────────────
# WEB APP ENDPOINT SMOKE TEST
# ─────────────────────────────────────────────────────────────────────────────
Write-Header "[ 8 ] Web App Reachability Check"
Write-Sep

# Check three known static files that must exist on a correctly deployed Web App
$probeTargets = @(
    @{ Path = "/wpsecure.html";         Label = "Add-in HTML (wpsecure.html)" },
    @{ Path = "/wpsecure.manifest.xml"; Label = "Manifest file (wpsecure.manifest.xml)" },
    @{ Path = "/config.json";           Label = "Config file (config.json)" }
)

$configJson = $null

foreach ($probe in $probeTargets) {
    $probeUrl = "$rawUrl$($probe.Path)"
    try {
        $resp = Invoke-WebRequest -Uri $probeUrl -Method Get -TimeoutSec 15 -UseBasicParsing -ErrorAction Stop
        Add-Pass "$($probe.Label) — reachable (HTTP $($resp.StatusCode))"

        # Parse config.json for further validation
        if ($probe.Path -eq "/config.json") {
            try {
                $configJson = $resp.Content | ConvertFrom-Json
            } catch {
                Add-Warn "config.json — could not parse JSON content: $_"
            }
        }

        # Parse manifest.xml and count domain occurrences
        if ($probe.Path -eq "/wpsecure.manifest.xml") {
            $manifestContent = $resp.Content
            $occurrences = ([regex]::Matches($manifestContent, [regex]::Escape($inputDomain))).Count
            if ($occurrences -eq 20) {
                Add-Pass "Manifest file — domain '$inputDomain' found exactly 20 times (correct)"
            } elseif ($occurrences -gt 0) {
                Add-Fail "Manifest file — domain '$inputDomain' found $occurrences times — expected 20. Re-run find and replace in wpsecure.manifest.xml."
            } else {
                Add-Fail "Manifest file — domain '$inputDomain' not found. The manifest may not have been updated from the template placeholder."
            }
        }

    } catch {
        if ($_.Exception.Response) {
            $statusCode = [int]$_.Exception.Response.StatusCode
            if ($statusCode -eq 404) {
                Add-Fail "$($probe.Label) — HTTP 404 Not Found. File may not have been deployed to the Web App."
            } elseif ($statusCode -eq 503) {
                Add-Fail "$($probe.Label) — HTTP 503 Service Unavailable. Web App may be stopped or starting."
            } else {
                Add-Warn "$($probe.Label) — HTTP $statusCode"
            }
        } else {
            Add-Fail "$($probe.Label) — not reachable: $_"
        }
    }
}

# Validate config.json BACKEND_BASE_URL
if ($configJson) {
    $backendUrl = $configJson.BACKEND_BASE_URL
    if ([string]::IsNullOrWhiteSpace($backendUrl)) {
        Add-Fail "config.json — BACKEND_BASE_URL is empty"
    } elseif ($backendUrl -eq $rawUrl -or $backendUrl -eq "$rawUrl/") {
        Add-Pass "config.json — BACKEND_BASE_URL is correct: $backendUrl"
    } elseif ($backendUrl -match [regex]::Escape($inputDomain)) {
        Add-Pass "config.json — BACKEND_BASE_URL contains the correct domain: $backendUrl"
    } else {
        Add-Fail "config.json — BACKEND_BASE_URL mismatch. Found: '$backendUrl'  Expected domain: '$inputDomain'"
    }
} elseif ($configJson -eq $null) {
    Add-Warn "config.json — could not validate BACKEND_BASE_URL (file not retrieved or not parseable)"
}

# ─────────────────────────────────────────────────────────────────────────────
# FINAL REPORT
# ─────────────────────────────────────────────────────────────────────────────
Write-Host ""
Write-Sep
Write-Host ""
Write-Host "  VERIFICATION COMPLETE" -ForegroundColor White
Write-Host ""
Write-Host "  $($script:PassCount) passed    $($script:FailCount) failed    $($script:WarnCount) warnings" -ForegroundColor White
Write-Host ""

if ($script:FailCount -eq 0 -and $script:WarnCount -eq 0) {
    Write-Host "  ✅  All checks passed. Your WPSecure setup looks good." -ForegroundColor Green
} elseif ($script:FailCount -eq 0) {
    Write-Host "  ⚠️  No failures but $($script:WarnCount) warnings. Review warnings above." -ForegroundColor Yellow
} else {
    Write-Host "  ❌  $($script:FailCount) check(s) failed. Review failures above before going live." -ForegroundColor Red
}

Write-Host ""
Write-Host "  Documentation : https://wpsecure.shop/documentation" -ForegroundColor DarkGray
Write-Host "  Support       : https://wpsecure.shop/contact" -ForegroundColor DarkGray
Write-Host ""
Write-Sep
That’s it, folks. The addendum below is a good optional read.
Addendum: How to troubleshoot?
This guide is written for administrators who have already deployed the branding packages and the Outlook Web Addin and are investigating why signatures are not appearing, behaving unexpectedly, or need to be disabled. No coding knowledge is required.
Understanding the basic flow makes troubleshooting much easier. Here is what happens from the moment a user opens Outlook:
There are two places you can inspect what WPSecure is doing. Use both together for the fastest diagnosis.
The console is built into every browser and New Outlook. It shows exactly what WPSecure Signature Inserter Addin is doing on the user's device in real time. You do not need any special tools — it is always there.
How to open console in Outlook on the Web (OWA) and New Outlook:
The log stream shows what your Azure Web App server is doing — every signature request, every success, every error. It is the definitive record of server-side activity.
How to open the log stream:
Every time a user opens a compose window or clicks Insert Signature, the Outlook Add-in writes a diagnostic report to the browser console. It looks like this:
When expanded, you will see a table with four columns:
| Column | What it means |
|---|---|
| Status | The current state of the signature for each message type. See the status reference below. |
| Content | What is stored in the local cache — the size of the signature or the type of sentinel stored. |
| Last Fetched | How long ago the cache entry was last written. |
| Next Bootstrap | When the add-in will next attempt to contact the server for a fresh copy. |
Below the table, you will see a Key-by-key summary — plain English sentences explaining exactly what is happening for each signature type and what to expect next.
The log stream shows a continuous feed of activity from your server. Here are the most important log entries and what they mean.
A healthy bootstrap looks like this in the log stream:
bootstrap: html-rewrite-ok path=...wpsecure_cloud_new.htm platform=newOutlookWindows images=1
bootstrap: summary updated=2 nochange=2 notavailable=0 toolarge=0 error=0
================================================================================
WPSECURE LICENSING NOTICE: THIS SIGNATURE DELIVERY EVENT REQUIRES AN ACTIVE...
================================================================================
bootstrap: settings ttl=240 orsDesktop=False blankLines=0
bootstrap: summary updated=1 nochange=1 notavailable=2 toolarge=0 error=0
🔵 "Automatic signature insertion is disabled organisation-wide by policy" — the ENV var is set to true for the entire organisation.
🔴 "Automatic signature insertion is disabled for this account by your administrator" — this specific user is in the disabled group.
Understanding when the Outlook Add-in refreshes signatures helps set the right expectations when users report delays.
| Situation | When will it update? | How to speed it up |
|---|---|---|
| Signature file updated in OneDrive | Within 4 hours (next cache refresh) | User clicks Refresh Signature in task pane |
| New user, no cache yet | Within minutes of first Outlook open | Nothing needed — happens automatically |
| OneDrive file temporarily missing | System retries at 5m, 10m, 20m, 40m, then every 4h | Restore the OneDrive file — picked up on next retry |
| User disabled via Entra group | Within 4 hours or next Refresh click | User clicks Refresh Signature in task pane |
| User re-enabled after disable | Within 4 hours automatically | User clicks Refresh Signature in task pane |
| Signature deleted from OneDrive | Old signature used until TTL expires (up to 4h), then no signature | Restore OneDrive file or use Reset Signature Cache |
These are the settings that control the Outlook Add-in's behaviour. They are configured in the Azure App Service under Configuration → Application Settings.
| Variable | What it controls | Default |
|---|---|---|
| SIGNATURES_DISABLED | Set to true to disable signatures for all users immediately | false |
| DISABLED_ENTRA_GROUP_ID | Object ID of an Entra ID group — members of this group will not receive signatures | Not set |
| SIGNATURE_REFRESH_PERIOD_IN_MINUTES | How often clients refresh their cached signature | 240 (4 hours) |
| MAX_TOTAL_SIGNATURE_SIZE_KB | Maximum size of signature + images combined | 150 KB |
| SUPPORTED_OUTLOOK_SURFACE | Which Outlook clients are allowed to receive signatures | newOutlookWindows,OutlookWebApp |
| CID_PLATFORMS | Which platforms receive images as inline attachments (recommended for New Outlook) | newOutlookWindows |
| AUTOMATIC_SIGNATURE_INSERTION_DISABLED | Set to true to disable automatic signature insertion for all users. The task pane Insert button remains functional. | false |
| AUTOMATIC_SIGNATURE_INSERTION_DISABLED_ENTRA_GROUP_ID | Object ID of an Entra ID group — members will not receive automatic signature insertion. Task pane Insert button remains functional. Requires GroupMember.Read.All permission with admin consent. | Not set |
Addendum: Azure usage estimation
One of the most common questions we receive from organisations evaluating WPSecure is: what impact will this have on our Azure infrastructure?
The answer is — less than you might expect.
WPSecure is engineered for efficiency. Signatures are cached client-side and only refreshed when necessary, meaning your Azure App Service, Microsoft Graph API, and Blob Storage resources are used sparingly and predictably. There are no background polling loops, no unnecessary round trips, and no data leaving your Microsoft 365 tenant.
This document provides a detailed breakdown of expected Azure resource usage across every deployment scenario — HTTPS image delivery, CID inline attachments, and mixed environments — for an organisation of 10,000 devices at the default 4-hour refresh interval. Each scenario includes both working hours and worst-case 24/7 projections, so you can plan your infrastructure with confidence regardless of how your organisation operates.
Whether you are sizing an Azure App Service plan, estimating Microsoft Graph API call volume, or forecasting Blob Storage transaction costs — everything you need is here.
These figures are estimates. Actual usage will vary based on the number of active devices, user behaviour, network conditions, and the proportion of devices on each Outlook surface. Microsoft Graph API throttling limits should be reviewed against the figures in this document before deploying at scale.
The following values are fixed across all scenarios in this document.
| Parameter | Value |
|---|---|
| Total Devices | 10,000 |
| Signature Refresh Period | 240 minutes (4 hours) |
| Microsoft Graph API Calls per Bootstrap | 5 (1 × /me + 4 × fan-out file fetches) |
| Working Days per Month | 22 |
| HTTPS Blob Cache-Control | public, max-age=31536000 (1-year browser cache) |
| Assumed Daily Device Churn (HTTPS ongoing) | ~2% (new devices / cleared browser cache) |
Understanding when blob reads occur is important for cost estimation. The behaviour differs significantly between HTTPS mode and CID mode.
| Mode | How Images are Delivered | Blob Storage Reads |
|---|---|---|
| HTTPS | Server rewrites image src attributes to Azure Blob HTTPS URLs. The client browser fetches images directly from blob storage. | High on Day 1 (cold cache). Near zero ongoing — browser caches images for 1 year. |
| CID | Server downloads images from OneDrive, encodes them as Base64, and sends them inside the bootstrap response payload. | Zero. Clients never read from blob storage in CID mode. |
| Mixed | CID on supported platforms (e.g. newOutlookWindows). HTTPS on all others (e.g. OutlookWebApp). | Proportional to the HTTPS device share only. CID devices contribute zero blob reads. |
All signature images are served as Azure Blob HTTPS URLs. Devices are active for 8 hours per day. This represents a standard office environment.
| Metric | Per Day | Per Month (22 working days) |
|---|---|---|
| Bootstrap Requests | 20,000 | 440,000 |
| Microsoft Graph API Calls | 100,000 | 2,200,000 |
| Azure Blob Reads (Day 1) | 30,000 | N/A — first day only |
| Azure Blob Reads (Ongoing) | 600 | 13,200 |
The table below shows how usage scales with different numbers of images per signature.
| Images per Signature | Bootstrap Req/Day | Graph Calls/Day | Blob Reads Day 1 | Blob Reads/Day (Ongoing) |
|---|---|---|---|---|
| 1 | 20,000 | 100,000 | 10,000 | 200 |
| 3 | 20,000 | 100,000 | 30,000 | 600 |
| 5 | 20,000 | 100,000 | 50,000 | 1,000 |
| 10 | 20,000 | 100,000 | 100,000 | 2,000 |
All signature images are served as Azure Blob HTTPS URLs. Devices are active around the clock. This represents a worst-case scenario for global organisations spanning multiple time zones.
| Metric | Per Day | Per Month (22 working days) |
|---|---|---|
| Bootstrap Requests | 60,000 | 1,320,000 |
| Microsoft Graph API Calls | 300,000 | 6,600,000 |
| Azure Blob Reads (Day 1) | 30,000 | N/A — first day only |
| Azure Blob Reads (Ongoing) | 600 | 13,200 |
| Images per Signature | Bootstrap Req/Day | Graph Calls/Day | Blob Reads Day 1 | Blob Reads/Day (Ongoing) |
|---|---|---|---|---|
| 1 | 60,000 | 300,000 | 10,000 | 200 |
| 3 | 60,000 | 300,000 | 30,000 | 600 |
| 5 | 60,000 | 300,000 | 50,000 | 1,000 |
| 10 | 60,000 | 300,000 | 100,000 | 2,000 |
All signature images are embedded as Base64 CID inline attachments within the bootstrap response. No blob reads occur. This is the recommended mode for supported platforms.
| Metric | Per Day | Per Month (22 working days) |
|---|---|---|
| Bootstrap Requests | 20,000 | 440,000 |
| Microsoft Graph API Calls | 100,000 | 2,200,000 |
| Azure Blob Reads (Day 1) | 0 | N/A |
| Azure Blob Reads (Ongoing) | 0 | 0 |
In CID mode, blob reads are zero regardless of image count. However, bootstrap payload size increases with each image, which may affect response times on slower connections.
| Images per Signature | Bootstrap Req/Day | Graph Calls/Day | Blob Reads Day 1 | Blob Reads/Day (Ongoing) |
|---|---|---|---|---|
| 1 | 20,000 | 100,000 | 0 | 0 |
| 3 | 20,000 | 100,000 | 0 | 0 |
| 5 | 20,000 | 100,000 | 0 | 0 |
| 10 | 20,000 | 100,000 | 0 | 0 |
CID mode, all devices active around the clock. Maximum bootstrap and Graph API load, zero blob reads.
| Metric | Per Day | Per Month (22 working days) |
|---|---|---|
| Bootstrap Requests | 60,000 | 1,320,000 |
| Microsoft Graph API Calls | 300,000 | 6,600,000 |
| Azure Blob Reads (Day 1) | 0 | N/A |
| Azure Blob Reads (Ongoing) | 0 | 0 |
| Images per Signature | Bootstrap Req/Day | Graph Calls/Day | Blob Reads Day 1 | Blob Reads/Day (Ongoing) |
|---|---|---|---|---|
| 1 | 60,000 | 300,000 | 0 | 0 |
| 3 | 60,000 | 300,000 | 0 | 0 |
| 5 | 60,000 | 300,000 | 0 | 0 |
| 10 | 60,000 | 300,000 | 0 | 0 |
A split environment where approximately 50% of devices use CID mode (newOutlookWindows) and 50% use HTTPS mode (OutlookWebApp). This reflects a typical production deployment where both Outlook clients are active.
| Metric | Per Day | Per Month (22 working days) |
|---|---|---|
| Bootstrap Requests | 20,000 | 440,000 |
| Microsoft Graph API Calls | 100,000 | 2,200,000 |
| Azure Blob Reads (Day 1) | 15,000 | N/A — first day only |
| Azure Blob Reads (Ongoing) | 300 | 6,600 |
| Images per Signature | Bootstrap Req/Day | Graph Calls/Day | Blob Reads Day 1 | Blob Reads/Day (Ongoing) |
|---|---|---|---|---|
| 1 | 20,000 | 100,000 | 5,000 | 100 |
| 3 | 20,000 | 100,000 | 15,000 | 300 |
| 5 | 20,000 | 100,000 | 25,000 | 500 |
| 10 | 20,000 | 100,000 | 50,000 | 1,000 |
Mixed CID/HTTPS environment, all devices active around the clock. Worst case for a mixed deployment.
| Metric | Per Day | Per Month (22 working days) |
|---|---|---|
| Bootstrap Requests | 60,000 | 1,320,000 |
| Microsoft Graph API Calls | 300,000 | 6,600,000 |
| Azure Blob Reads (Day 1) | 15,000 | N/A — first day only |
| Azure Blob Reads (Ongoing) | 300 | 6,600 |
| Images per Signature | Bootstrap Req/Day | Graph Calls/Day | Blob Reads Day 1 | Blob Reads/Day (Ongoing) |
|---|---|---|---|---|
| 1 | 60,000 | 300,000 | 5,000 | 100 |
| 3 | 60,000 | 300,000 | 15,000 | 300 |
| 5 | 60,000 | 300,000 | 25,000 | 500 |
| 10 | 60,000 | 300,000 | 50,000 | 1,000 |
The table below compares all six scenarios at 3 images per signature — the most common real-world configuration.
| Scenario | Bootstrap Req/Day | Graph Calls/Day | Blob Reads Day 1 | Blob Reads/Day (Ongoing) |
|---|---|---|---|---|
| 1. HTTPS — Working Hours (8hr) | 20,000 | 100,000 | 30,000 | 600 |
| 2. HTTPS — 24/7 | 60,000 | 300,000 | 30,000 | 600 |
| 3. CID — Working Hours (8hr) | 20,000 | 100,000 | 0 | 0 |
| 4. CID — 24/7 | 60,000 | 300,000 | 0 | 0 |
| 5. Mixed — Working Hours (8hr) | 20,000 | 100,000 | 15,000 | 300 |
| 6. Mixed — 24/7 | 60,000 | 300,000 | 15,000 | 300 |