Table of Contents
Summary
Keeping our commitment to simplicity, this guide offers clear, easy-to-follow instructions for installing and using the Windows Personalization Packager. The most effective way to familiarize yourself with the product is through hands-on experience. We invite you to try it out by clicking the button in the top right corner of your screen.
WPSecure Personalization Packager boasts a simplistic design with only 8 action buttons. Create powerful deployment packages with ease—it's as simple as 1, 2, and 3.
Are you not a big fan of reading technical documentation? The following article provides a functional, hands-on approach to creating and deploying WPSecure Personalization Packages using Microsoft Intune or Microsoft Endpoint Configuration Manager.
But, If you prefer to read our classic documentation, stay on this page.
Glossary
Packaging tool | Creates deployment packages that contain desktop backgrounds, lock screen images, Outlook signatures, Teams background images, and Screensavers that can be easily deployed to on-premises and Cloud-connected Windows devices. |
Package | This is created using the Packaging Tool and is then deployed using software deployment utilities such as Microsoft Endpoint Configuration Manager (SCCM/MECM), Intune or similar tools. See deployment instructions below. |
Licence | Device licence costs just 1 US dollar / Device / Year. Each device licence allows you to install 5 Packages per device. |
Campaign manager | This tool generates the campaign file that dictates the start and end dates and the priority of packages. The Campaign file is optional and is deployed by using software deployment tools like Microsoft Endpoint Configuration Manager (SCCM/MECM), Microsoft Intune or similar tools. |
Campaign file | This file is created using the Campaign Manager. It can be deployed using Microsoft Endpoint Configuration Manager (SCCM/MECM), Microsoft Intune, or other deployment tools. The Package with the highest version is picked in the absence of the Campaign file. See deployment instructions below. |
Prerequisites
The Personalization packages created by the Packager and the Packager have the following prerequisites.
WPSecure Windows Personalization packages are only certified for use with physical devices such as Desktops, Laptops, and Tablets, where users are not logged in concurrently (simultaneously). |
Operating System: Windows 10 20H2 or later, or a Microsoft-supported version of Windows 11 Professional or Enterprise. |
| .NET Framework: Version 4.8 or later. |
| Processor: 1 gigahertz (GHz) or faster with 2 or more cores on a compatible 64-bit processor core (The packages work on x86 devices but are not supported). |
Memory: 4 GB RAM or greater. 8 GB or more is preferred. |
Storage: 64 GB or larger storage device. |
| Functional WMI and .NET Framework. |
No local or global policies prevent changing Desktop backgrounds, Lockscreen images, Outlook signatures, or Screensavers in the user context. |
| All necessary exceptions for AppLocker and other security products that may impede the seamless operation of WPSecure must be configured appropriately. |
Outlook signature deployment is compatible with Microsoft 365 Outlook Client (Outlook Classic). Beginning with version 55.1.2.4, default signatures for Outlook (Web and New) can be configured through an integration with Azure Function App and Exchange Online. |
| The system must not have any faulty drivers, mainly those related to display, storage, or the processor. |
Log location
The Personalization Packager records its progress, failures, and exceptions in the below log file.
%temp%\wpsecure-packager.log
The Personalization package installer which runs as the SYSTEM user or as an elevated Administrator records its progress, failures, and exceptions in the below log file.
%SystemDrive%\Windows\Temp\wpsecure-install.log
The Personalization package uninstaller which runs as the SYSTEM user or as an elevated Administrator records its progress, failures, and exceptions in the below log file.
%SystemDrive%\Windows\Temp\wpsecure-uninstall.log
Following are the log files pertaining to loading, brokering, events, and selection of the Personalization packages.
					%temp%\wpsecure-xx.xx.xxxx.xxxx.log
%temp%\wpsecureloader.log
%temp%\wpsecurebr.log
Group Policies, Local Policies and Intune CSP objects
The WPSecure Personalization Engine operates on the principle of least privilege to ensure system security. As such, most of its functions are executed within the standard user context, without requiring administrative privileges.
To maintain proper functionality, it is essential that system policies do not restrict user-level changes to the following elements:
- Desktop background
- Lockscreen image
- Outlook signature
- Microsoft Teams background
- Screensaver
Policies that block changes to these items from the user’s context will interfere with the engine’s ability to apply personalization settings effectively. When unauthorized changes occur, WPSecure will automatically reset the affected items during specific system events to maintain consistency and compliance.
This section will guide you through the following steps.
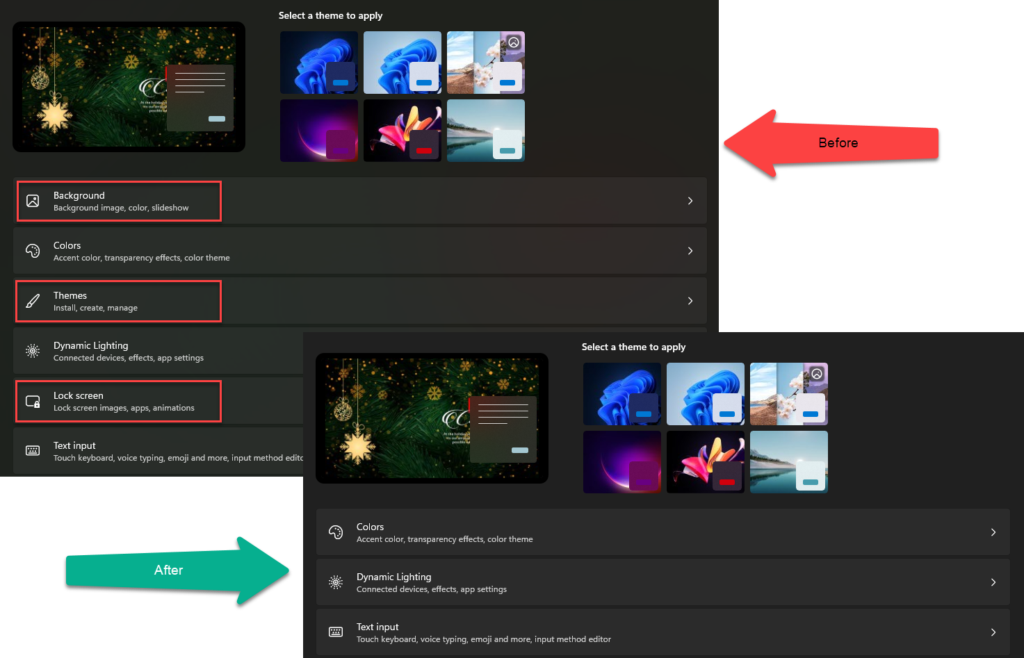
- Hide the Settings pages corresponding to Desktop backgrounds, Themes, and the Lockscreen. Doing so will prevent most users from changing those settings.
- Remove Group Policies or similar Microsoft Intune CSP policies that prevent changing Desktop backgrounds, Themes, Lockscreen images, Outlook signatures, Teams backgrounds, and Screensavers.
Hide Desktop background, Lockscreen & Themes settings panels
To configure the equivalent setting in Group Policy, follow these steps:
Open the Group Policy Management Console.
- Navigate to the Policy:
- In the left pane, go to User Configuration > Administrative Templates > Control Panel.
- Configure the Setting:
- In the right pane, double-click on Settings Page Visibility.
- Select Enabled.
- Click on the Show button next to the Options box.
- In the Value column, type
"Hide:personalization-background;lockscreen;themes".
- Apply and Save:
- Click OK to save the settings.
- Close the Group Policy Management Console.
To configure the equivalent setting in Microsoft Intune, follow these steps. Open the Microsoft Intune admin center.
- Create a Device Configuration Profile:
- Navigate to Devices > Configuration profiles > Create profile.
- Select Platform as Windows 10 and later.
- For Profile type, choose Settings catalog.
- Configure the Settings:
- In the Basics tab, provide a Name and Description for the profile.
- Click Next to go to Configuration settings.
- Click Add settings.
- In the Settings picker, search for Settings Page Visibility.
- Select Settings Page Visibility and click Select.
- Set the Policy:
- Enable the policy and in the Value column, type
"Hide:personalization-background;lockscreen;themes".
- Enable the policy and in the Value column, type
- Assign the Profile:
- Click Next to go to Assignments.
- Select the groups or devices to which you want to apply this policy.
- Click Next and then Create.
Remove AD Group Policies relating to Desktop backgrounds
Local and global policies that prevent end-users from changing desktop backgrounds and themes will conflict with the WPSecure desktop background processing engine. We recommend removing these policies and hiding the corresponding Windows Control Panel items or panels (Please read the section above).
Note: The WPSecure engine gets initiated by events created and managed by the device administrators but runs in the context of a standard user.
Below are two policies that will prevent the WPSecure engine from changing the desktop background in the User Context. It is recommended that you either remove or not configure them.
Prevent Changing Desktop Background: This Group Policy can be found under User Configuration\Administrative Templates\Control Panel\Personalization. If this policy is enabled, the WPSecure engine will be prevented from changing the desktop background from within the User’s Context.
Desktop Wallpaper: This Group Policy can be found under User Configuration\Administrative Templates\Desktop\Desktop. If enabled, this policy will specify the desktop wallpaper and prevent the proper functioning of the WPSecure desktop background engine. We recommend setting all settings on the below page to “Not Configured“
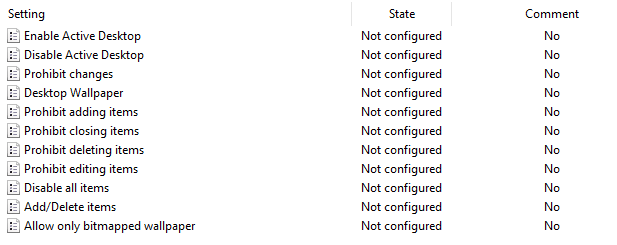
The below table is a Window Registry representation of the above Group policies. Make sure none of the values displayed in the table below are set.
| Registry Path | Value Name | Incorrect Setting |
|---|---|---|
| HKEY_LOCAL_MACHINE\Software\Microsoft\Windows\CurrentVersion\Policies\ActiveDesktop | NoChangingWallPaper | 1 |
| HKEY_CURRENT_USER\Software\Microsoft\Windows\CurrentVersion\Policies\System | Wallpaper | Exist |
| HKEY_LOCAL_MACHINE\Software\Microsoft\Windows\CurrentVersion\Policies\System | Wallpaper | Exist |
| HKEY_CURRENT_USER\Software\Microsoft\Windows\CurrentVersion\Policies\System | WallpaperStyle | 1 or 2 |
| HKEY_LOCAL_MACHINE\Software\Microsoft\Windows\CurrentVersion\Policies\System | WallpaperStyle | 1 or 2 |
HKEY_CURRENT_USER\Software\Microsoft\Windows\CurrentVersion\Policies\ActiveDesktop | NoChangingWallPaper | 1 |
The best test is to change the desktop wallpaper image manually. If you can, your system will be ready to handle desktop wallpaper changes using WPSecure packages.
After resolving all policy conflicts, including but not limited to those mentioned above, you may hide the Windows panels and menus associated with changing desktop backgrounds and themes. To clarify, the objective is to hide the controls for changing desktop backgrounds and themes rather than limiting access to these features.
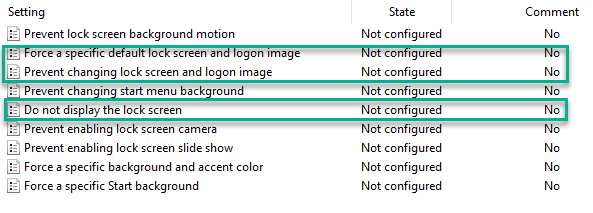
Remove AD Group Policies relating to Lockscreen images
The WPSecure Personalization Engine will manage the Lock Screen image. Remove other policies that govern these settings and set them to ‘Not Configured‘.
- Open AD Group Policy editor.
- Navigate to Computer Configuration\Administrative Templates\Control Panel\Personalization.
Remove AD Group Policies relating to Screensavers
The WPSecure Personalization Engine will manage Screensavers. Remove other policies that govern these settings and set them to ‘Not Configured‘.
- Open AD Group Policy editor
- Navigate to User Configuration / Policies / Administrative Templates / Control Panel / Personalization
- Double-click the policy named “Force specific screen saver“.
- Set the policy to “Not Configured“.
Remove AD Group Policies relating to Outlook Signatures
The WPSecure Personalization Engine will manage Outlook Signatures. Remove other policies that govern these settings and set them to ‘Not Configured‘.
- Open AD Group Policy editor.
- Navigate to User Configuration / Administrative Templates / Microsoft Outlook / Outlook Options / Mail Format.
- Double-click on the “Do not allow signatures for e-mail messages” setting.
- Choose “Not Configured”
Personalization Packager installation
Note: The WPSecure Personalization Packager requires the Microsoft Win32 Content Prep Tool to convert the Personalization Packages into a Win32 app that can be deployed using Microsoft Intune. Due to Microsoft’s license restrictions, we can not distribute the Microsoft Win32 Content Prep Tool with our product. Click here to read about it and download the Microsoft Win32 Content Prep Tool.
Download for free, save locally, and make the IntuneWinAppUtil.exe file available during the first run of the WPSecure Personalization Packager.
The Personalization Packager is available for download by clicking on the button located in the top right corner of this page. The download consists of a compressed ZIP file that contains a Microsoft Installer (MSI) file, accompanied by a Digital Signature issued by Sectigo, a reputable computer security service based in Roseland, New Jersey. To ensure the authenticity and safety of the installer, it is important to only download it from this website and not from any other source.
To install an MSI file on a Windows computer, you must first ensure that you are signed in as an administrator. Once you have located the MSI file, simply double-click it to run the installer and start the installation wizard. Follow the prompts to complete the installation process. Alternatively, you can use the Command Prompt or PowerShell to install an MSI file by using the command
msiexec /i [location of MSI file]
The MSI installs the following applications.
- The Packager
- The Campaign Manager.

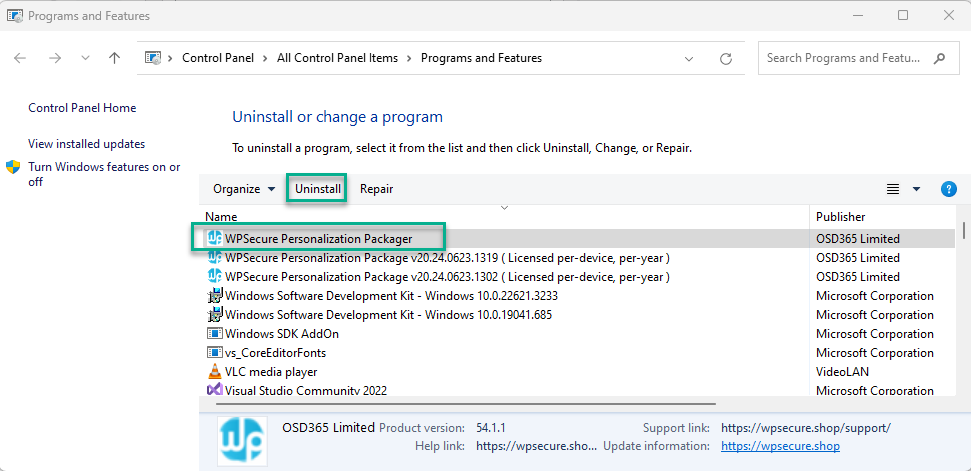
Uninstall Personalization Packager
To uninstall the Packager, open ‘Windows Programs and Features,’ select ‘WPSecure Personalization Packager,’ and click ‘Uninstall.’
Personalization items
The Personalization Packager allows you to bundle your personalization elements, such as Desktop backgrounds, lock screen images, Outlook signatures, and screensavers, into a deployment package that can be easily deployed to locally networked and Cloud-connected devices.
The Personalization Packager creates self-contained personalization deployment packages that are deployed to Windows 10 and 11 devices.
Note: The Personalization deployment packages are x86-based assemblies that can run on both 64-bit and 32-bit (not supported) architectures. However, the Personalization Packager itself can only install and run on 64-bit machines.
The Personalization Packager accepts 5 types of personalization items.
- Desktop backgrounds.
- Lock screen images.
- Teams background images.
- Microsoft Outlook signature for ‘New’ messages.
- Microsoft Outlook signature for ‘Reply’ messages.
- Microsoft Outlook signature for ‘Web’ messages.
- A Video screensaver.
Desktop backgrounds
Remove Group Policies or similar Microsoft Intune CSP policies that prevent changing Desktop backgrounds. For information on how to rather hide these options, please read the content under the heading “Set up your environment.”
This module assigns unique desktop background images to each screen, ensuring that the image’s structure and message are preserved. For instance, a landscape-oriented computer monitor will be assigned a landscape background image, while a portrait-oriented monitor will be assigned a portrait background image. This ensures that the message remains clear.
If an image with the exact width and height of the screen is available, it will be assigned to that screen. If not, the desktop background engine will select an image with the same aspect ratio from a list of available images. If no such image is available, the engine will choose an image with the same orientation. If no such image is available, the engine will select the closest fitting image to the screen’s dimensions.
The module can also recalibrate and assign appropriately sized images in response to changes in screen resolution, orientation, or the addition of another screen, thereby preventing distortion or cropping. This feature enables laptop users to seamlessly transition between desks without manually resetting their wallpaper when connecting to different external monitors, thereby saving time and effort.
Each image’s file size must not exceed 10 MB, and we recommend keeping the total size of the personalization package under 500 MB. Ensure the image PPI (Pixels Per Inch) is set to 72 PPI.
You can set a personalization package as a 'Pending Reboot' reminder package, displaying a 'Pending Reboot' message on Desktop backgrounds. For additional details, refer to the extra settings section below.
Lock screen images
Remove Group Policies or similar Microsoft Intune CSP policies that prevent changing Lock screen images. For information on how to rather hide these options, please read the content under the heading “Set up your environment.”
You can include multiple lock screen images in the package for Screens with landscape and portrait orientations. Keep the file size as small as possible without compromising the quality of the image. The maximum file size cannot exceed 25 MB.
The lock screen is applied to the device’s primary display. Depending on image availability, a portrait image will be assigned to a screen-oriented portrait, and a landscape image will be assigned to a screen set as landscape.
You can set a personalization package as a 'Pending Reboot' reminder package, displaying a 'Pending Reboot' message on Lockscreen images. For additional details, refer to the extra settings section below.
Note: Since the release of WPSecure Packager version 54.1.5.3, you can import multiple lockscreen images for different screen aspect ratios.
Teams background images
You can include multiple Teams background images in the package. Each imported image should be 1920 pixels wide and 1080 pixels high.
Keep the file size as small as possible without compromising the quality of the image. The maximum file size cannot exceed 25 MB.
Microsoft Outlook signatures
Remove Group Policies or similar Microsoft Intune CSP policies that prevent changing Outlook Signatures. Please read the content under the heading “Set up your environment.”
If you prefer to learn by reading a step-by-step, illustrative document, click here to read an article about creating an Outlook Signature template and deploying the WPSecure Personalization Package using Microsoft Intune. But we recommend returning to this page to grasp the product function fully.
There are three types of Microsoft Outlook signatures: a ‘New message’ signature, a ‘Reply message’ signature, and a ‘Web message’ signature. The total file size of each Outlook signature and its assets cannot exceed 10 MB, and we recommend keeping the number of characters for HTM files below 25,000 for New/Reply signatures and 8000 for web signatures.
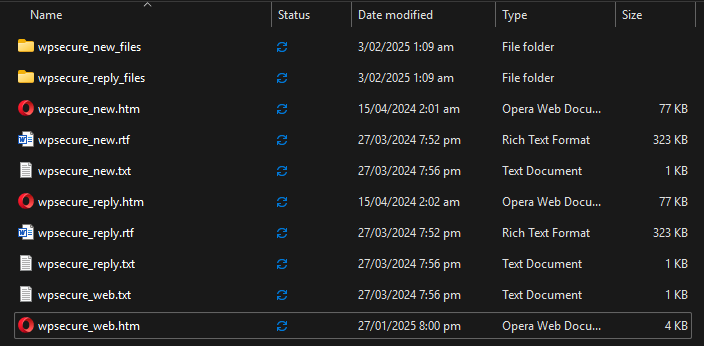
New message signature: A new message signature is used when composing a new Microsoft Outlook message. It should include a ‘wpsecure_new.htm’ HTML file and optionally include a ‘wpsecure_new.txt’ file, a ‘wpsecure_new.rtf’ file, and an optional ‘wpsecure_new_files’ directory that contains resource files like images, CSS, etc.
Reply message signature: A reply message signature is used when replying to an email message. It should include a ‘wpsecure_reply.htm’ HTML file and optionally include a ‘wpsecure_reply.txt’ file, a ‘wpsecure_reply.rtf’ file, and an optional ‘wpsecure_reply_files’ directory that contains resource files like images, CSS, etc.
Web message signature: (From version 55.1.2.4) A web message signature is used by ‘Outlook On The Web/Outlook New.’ It should include a ‘wpsecure_web.htm’ HTML file and optionally include a ‘wpsecure_web.txt’ file. All image references should use URL (https) sources. Local image references cannot be used.
Use placeholders like {{az_displayname}}, {{az_mobilephone}}, or {{az_jobtitle}} in the ‘wpsecure_new.htm’,‘wpsecure_new.rtf’, ‘wpsecure_new.txt’, ‘wpsecure_reply.htm’, ‘wpsecure_reply.rtf’, and ‘wpsecure_reply.txt’ files to automatically load user-specific data at runtime.
Important note: If your Outlook signature templates have placeholders and multiple user-attribute values corresponding to the placeholders are not available, the signature will not be displayed.
The WPSecure Outlook signature engine replaces the placeholders with the information in the registry corresponding to each placeholder. For example, the following registry entry will replace the placeholder {{az_surname}}.
Key path | HKEY_CURRENT_USER\Software\Microsoft\Office\Outlook\wpsecure\signature |
Sub key | Billy.George@mycompany.email |
Name | az_surname |
Value | George |
Type | REG_SZ |
You can add custom attributes to the below location directly. However, for most standard use cases, the 2 automated approaches below will make this process easy and seamless.

If your organization uses Azure AD (Entra ID), there are two ways to programmatically set the values for the Microsoft Outlook signature placeholders. All of them require some background work to be done in the Entra ID Portal.
User self-service | Uses Microsoft Graph to get user attributes from Azure. Entra ID App registration info - Read part A. |
Organization wide silent sync | Allow Administrators to download placeholder data for Outlook signatures on behalf of the Users using Microsoft Graph. Entra ID App registration info - Read part B |
If legacy Active Directory Services are used, User attributes will automatically synchronize (If your environment is setup correctly).
Attributes synchronized from Azure have a prefix of ‘az_‘. Example: ‘az_attributename‘,
and the attributes synchronized from Active Directory Services have an ‘ad_‘ prefix. Example: ‘ad_attributename‘.
Using custom automation, You can manually create your placeholders or sync them from other sources. Example: ‘my_custom_attribute‘.
The following table outlines the supported attributes for Azure and Active Directory Services.
Active Directory | Azure (Entra) | Description |
|---|---|---|
| ad_telephonenumber | az_businessphones1 | Phone number associated with the user. |
| ad_l | az_city | City where the user is located. |
| ad_company | az_companyname | Name of the user’s company or organization. |
| ad_c | az_country | Country code or name where the user resides. |
| ad_department | az_department | Department or team within the organization. |
| ad_displayname | az_displayname | User’s display name (usually first and last name). |
| ad_employeeid | az_employeeid | Unique identifier for the employee. |
| ad_facsimiletelephonenumber | az_faxnumber | Fax number associated with the user. |
| ad_givenname | az_givenname | User’s first name. |
| ad_title | az_jobtitle | Job title or position within the organization. |
| ad_mail | az_mail | Email address of the user. |
| ad_mailnickname | az_mailnickname | Unique nickname for the user’s email address. |
| ad_mobile | az_mobilephone | Mobile phone number of the user. |
| ad_office | az_officelocation | Physical office location or workspace. |
| ad_postalcode | az_postalcode | Postal code or ZIP code of the user’s address. |
| ad_st | az_state | State or region where the user resides. |
| ad_streetaddress | az_streetaddress | Street address of the user. |
| ad_sn | az_surname | User’s last name or surname. |
| ad_userprincipalname | az_userprincipalname | Principal name used for authentication (usually the email address). |
ad_interests1 | az_interests1 | User Interests. You can use this to pass custom values. |
Microsoft Outlook Web/New Signature
If your organization uses ‘Outlook Web‘ or ‘New Outlook,’ you must add the Outlook Signature Web template to the Package.
You will also need to set up an Azure Function App to facilitate the sync of the Web signature template to Exchange Online.
There are two ways to set Outlook Web/Outlook New signatures. Click the links below to open pages that will walk you through the setup process.
Windows video screensaver
Remove Group Policies or similar Microsoft Intune CSP policies that prevent changing Screensavers. Please read the content under the heading “Set up your environment.”
Ensure that the “Turn My Screen Off After” setting under System > Power is configured to a duration longer than the ScreenSaver activation time. This setting is typically managed via Active Directory Group Policy or through SCCM Power Settings within Collection Settings. If not configured correctly, the display may turn off before the ScreenSaver has a chance to activate.
The file size of the screensaver video file must be at most 50 MB. Import a video with the .MP4 file extension. WPSecure utilizes MP4 files, also known as MPEG-4 video files, for Screensaver.
Ensure that the videos used are of high resolution and quality. This will help to create a visually appealing and professional-looking screensaver.
You can set a personalization package as a 'Pending Reboot' reminder package, displaying a 'Pending Reboot' message on the video Screensaver. For additional details, refer to the extra settings section below.
The Personalization Packager does not control Screensaver settings like ‘Wait‘ or ‘On resume, display logon screen.‘ Set these values using Global or Local Policies. Ensure there are no Policies preventing users from changing the Screensaver is being applied.

Using the Personalization packager
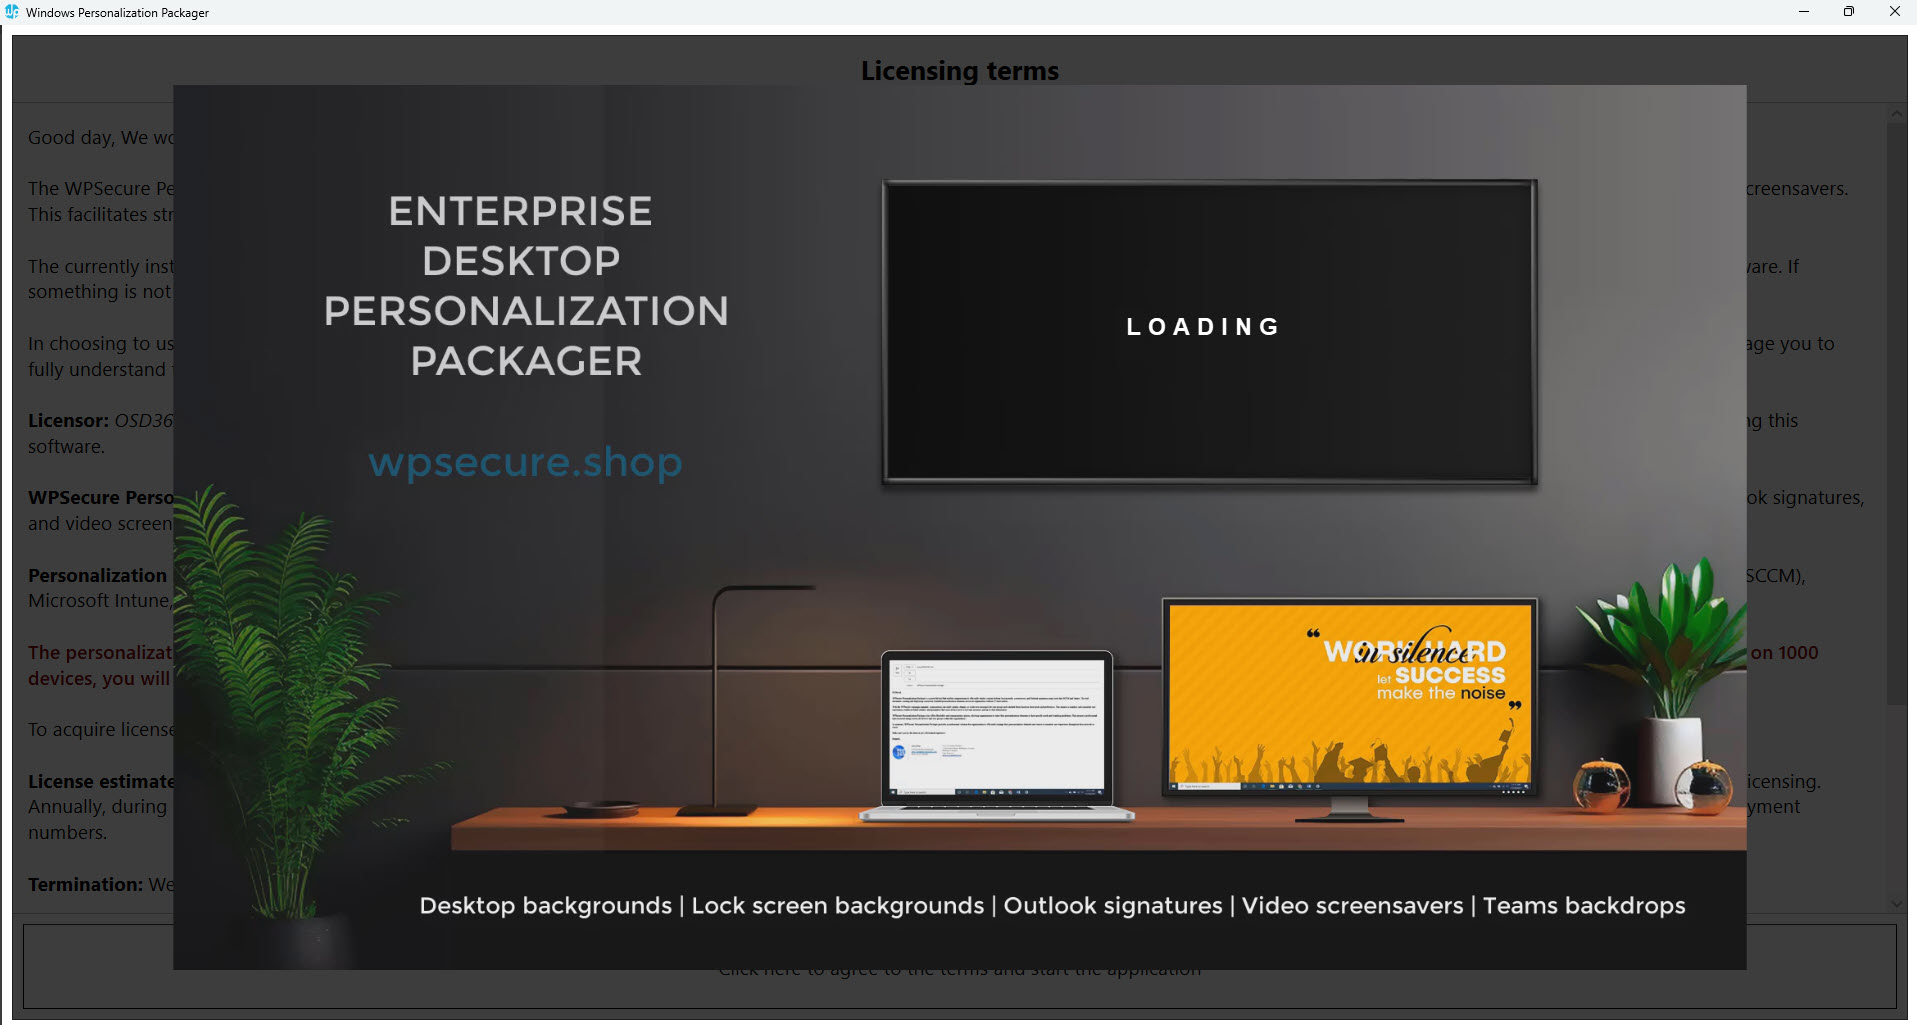
You can launch the Personalization Packager from the start menu. Upon opening the application, you will be presented with the ‘Terms of Use and Service’ page. Please take a moment to review it.
Note: The WPSecure Personalization Packager requires the Microsoft Win32 Content Prep Tool to convert the Personalization Packages into a Win32 app that can be deployed using Microsoft Intune. Due to Microsoft’s license restrictions, we can not distribute the Microsoft Win32 Content Prep Tool with our product. Click here to read about it and download the Microsoft Win32 Content Prep Tool.
Download for free, save locally, and make the IntuneWinAppUtil.exe file available during the first run of the WPSecure Personalization Packager.
When launching the WPSecure Personalization Packager for the first time after installing, reinstalling, or upgrading, you will see the following screen, which will guide you through the process, wherein you include the Microsoft Win32 Content Prep Tool.
If you haven’t done so already, click the download link to download the Microsoft Win32 Content Prep Tool. Then, copy and paste the IntuneWinAppUtil.exe into the correct location.

%ProgramFiles%\WPSecure Personalization Packager
The file will get copied to the above location. Restart the WPSecure Personalization Packager. If the IntuneWinAppUtil.exe is there, you will not see the above message.

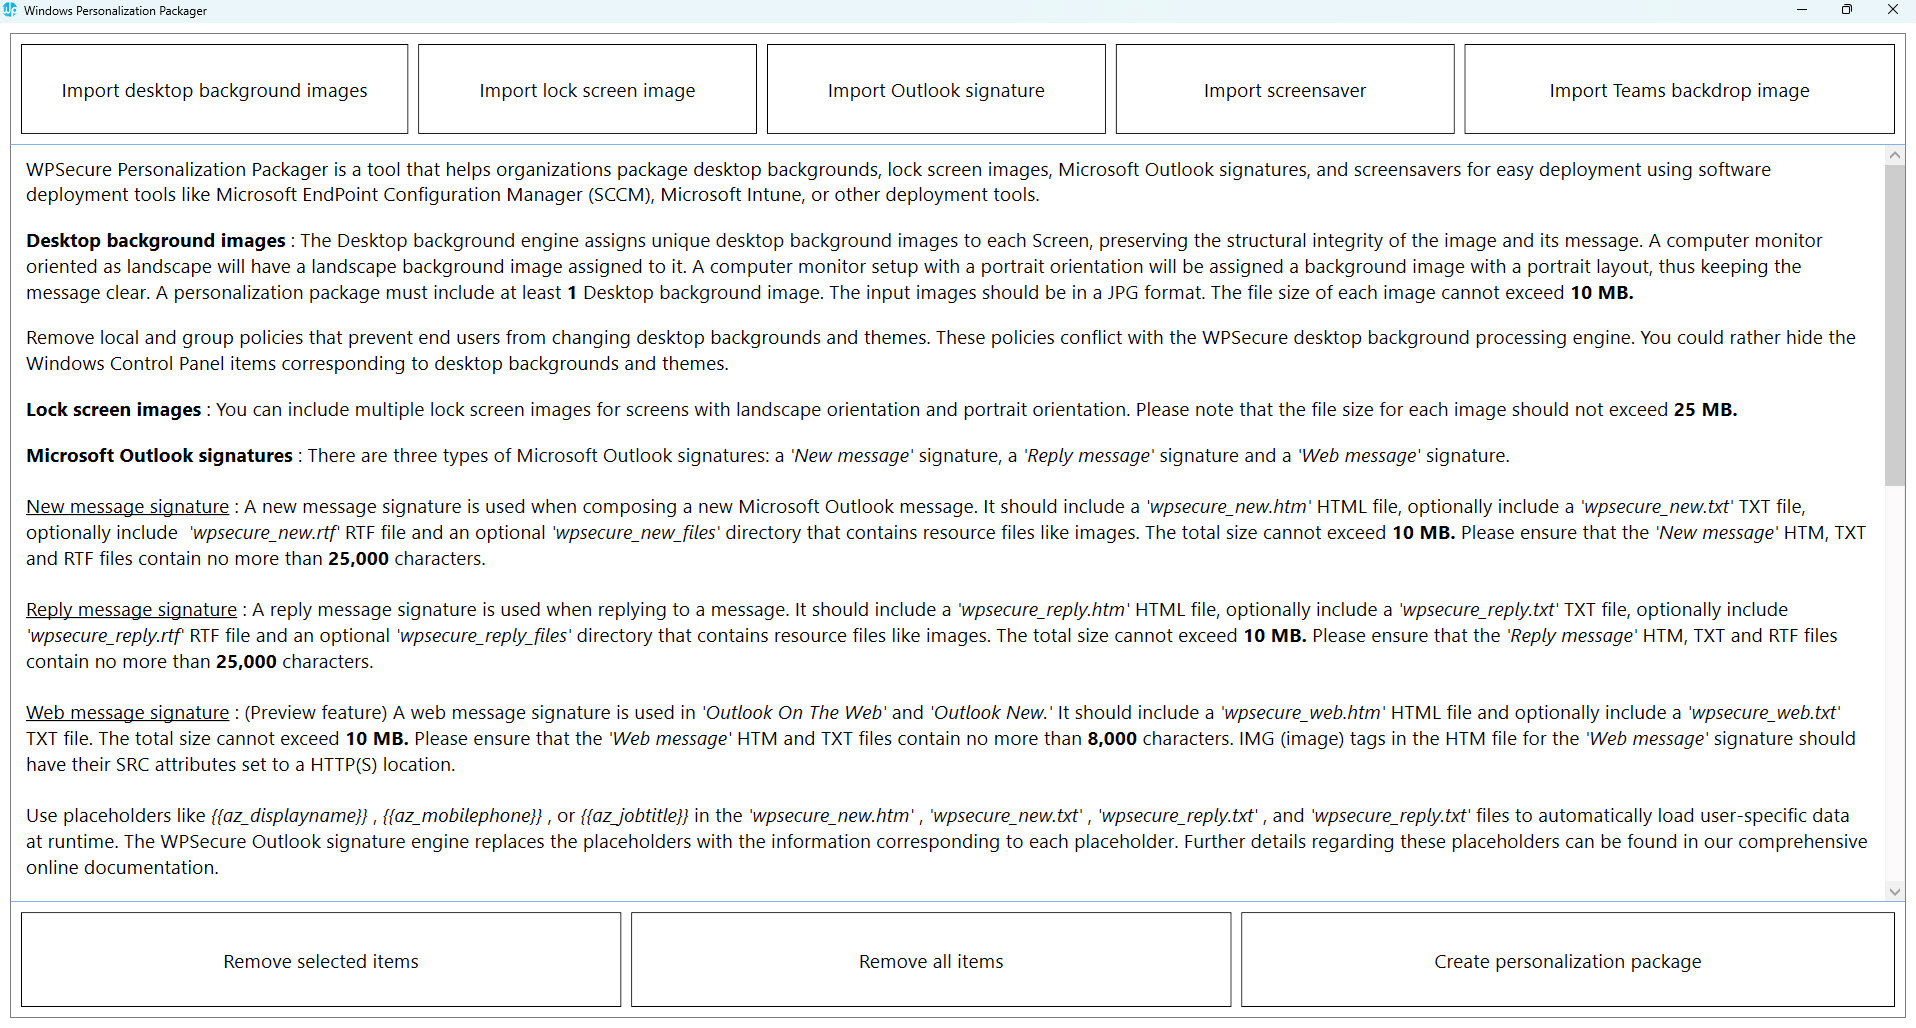
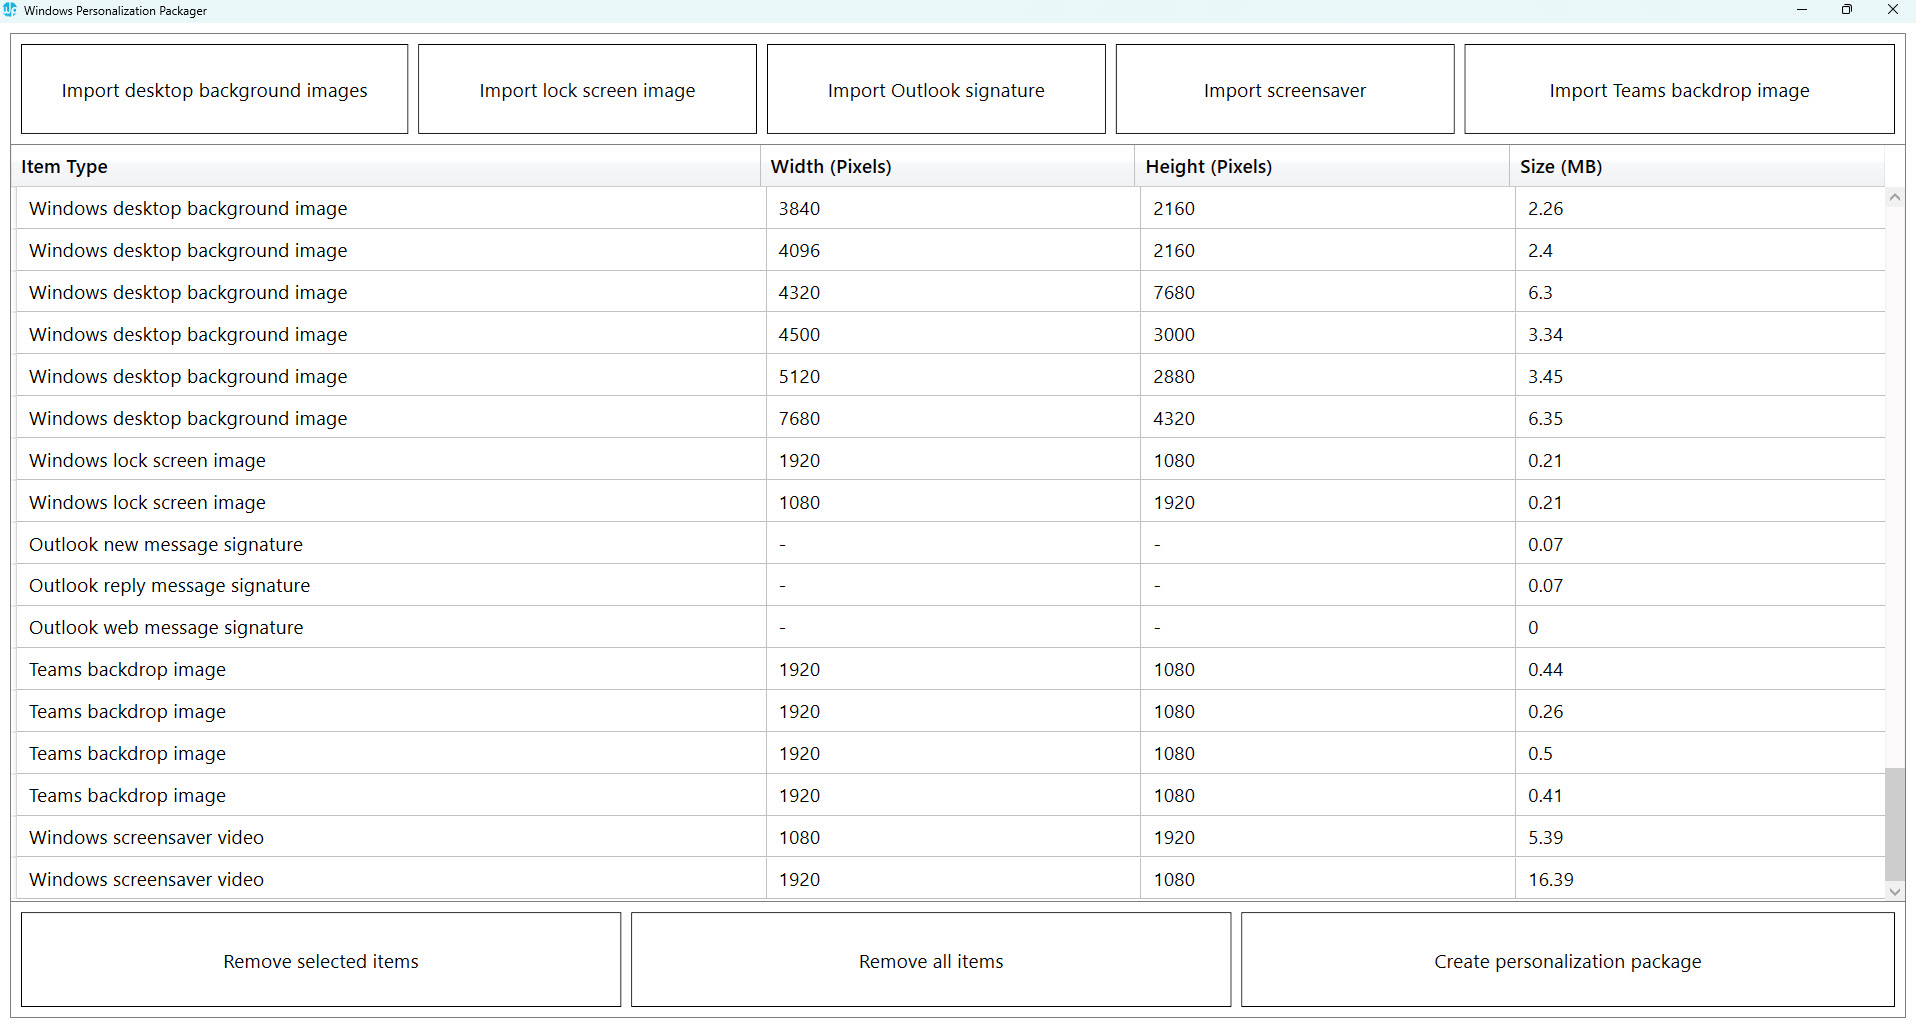
Listed below are the actions triggered by each button on this page.
Import desktop background images: To import multiple images in JPG format, click on this button. A file explorer window will open, allowing you to select a folder containing the images you want to import. Please note that the packager only allows up to 90 desktop background images of varying dimensions and orientations. Each image should not exceed 10 MB, and the Image Width and Height cannot be a decimal/fraction. If any of these conditions are not met, the import process may fail.
Import lock screen image: You can import multiple lock screen images for screens with landscape orientations and portrait orientations. The file size of each image should not exceed 25 MB.
Import Outlook signature: Import a Microsoft Outlook signature HTM file.
Import screensaver: Import a video file in MP4 file format.
Import Teams backdrop image: You can import multiple Teams background images. Each imported image should be 1920 pixels wide and 1080 pixels high, and the file size of each image should not exceed 25 MB.
Remove selected items: Select an item from the list to remove it.
Remove all items: Click this button to remove all items in the list. This can be useful when you want to clear out all existing items before uploading new ones, or if you want to start fresh with a new personalization package.
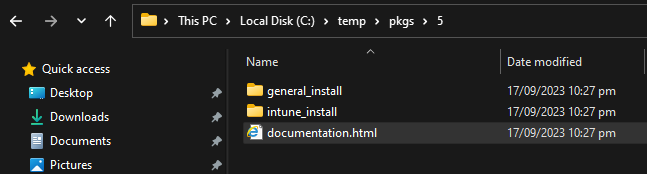
Create personalization package: Use this button to export the personalization package to a folder. A personalization package is a collection of all the settings and files you have imported or created for your desktop backgrounds, Outlook signatures, and screensavers. The selected destination folder has to be empty. The personalization package creation process creates two folders: general_install and intune_install.
The general_install folder contains installation files for deployment via enterprise software management tools like Microsoft Endpoint Configuration Manager (SCCM). Run the ‘wpsecure-install.exe’ to install the personalization package. More details regarding the enterprise installation and uninstallation process are in the ‘documentation.html’ file.
The intune_install folder contains the ‘wpsecure-install.intunewin’ file to be uploaded to the Microsoft Endpoint Device Management portal (Intune). The command-line for this is identical to the general install.
The process also creates a ‘documentation.html’ file that provides all the information required to deploy the personalization package, like package version, install command line, uninstall command line, and detection methods.
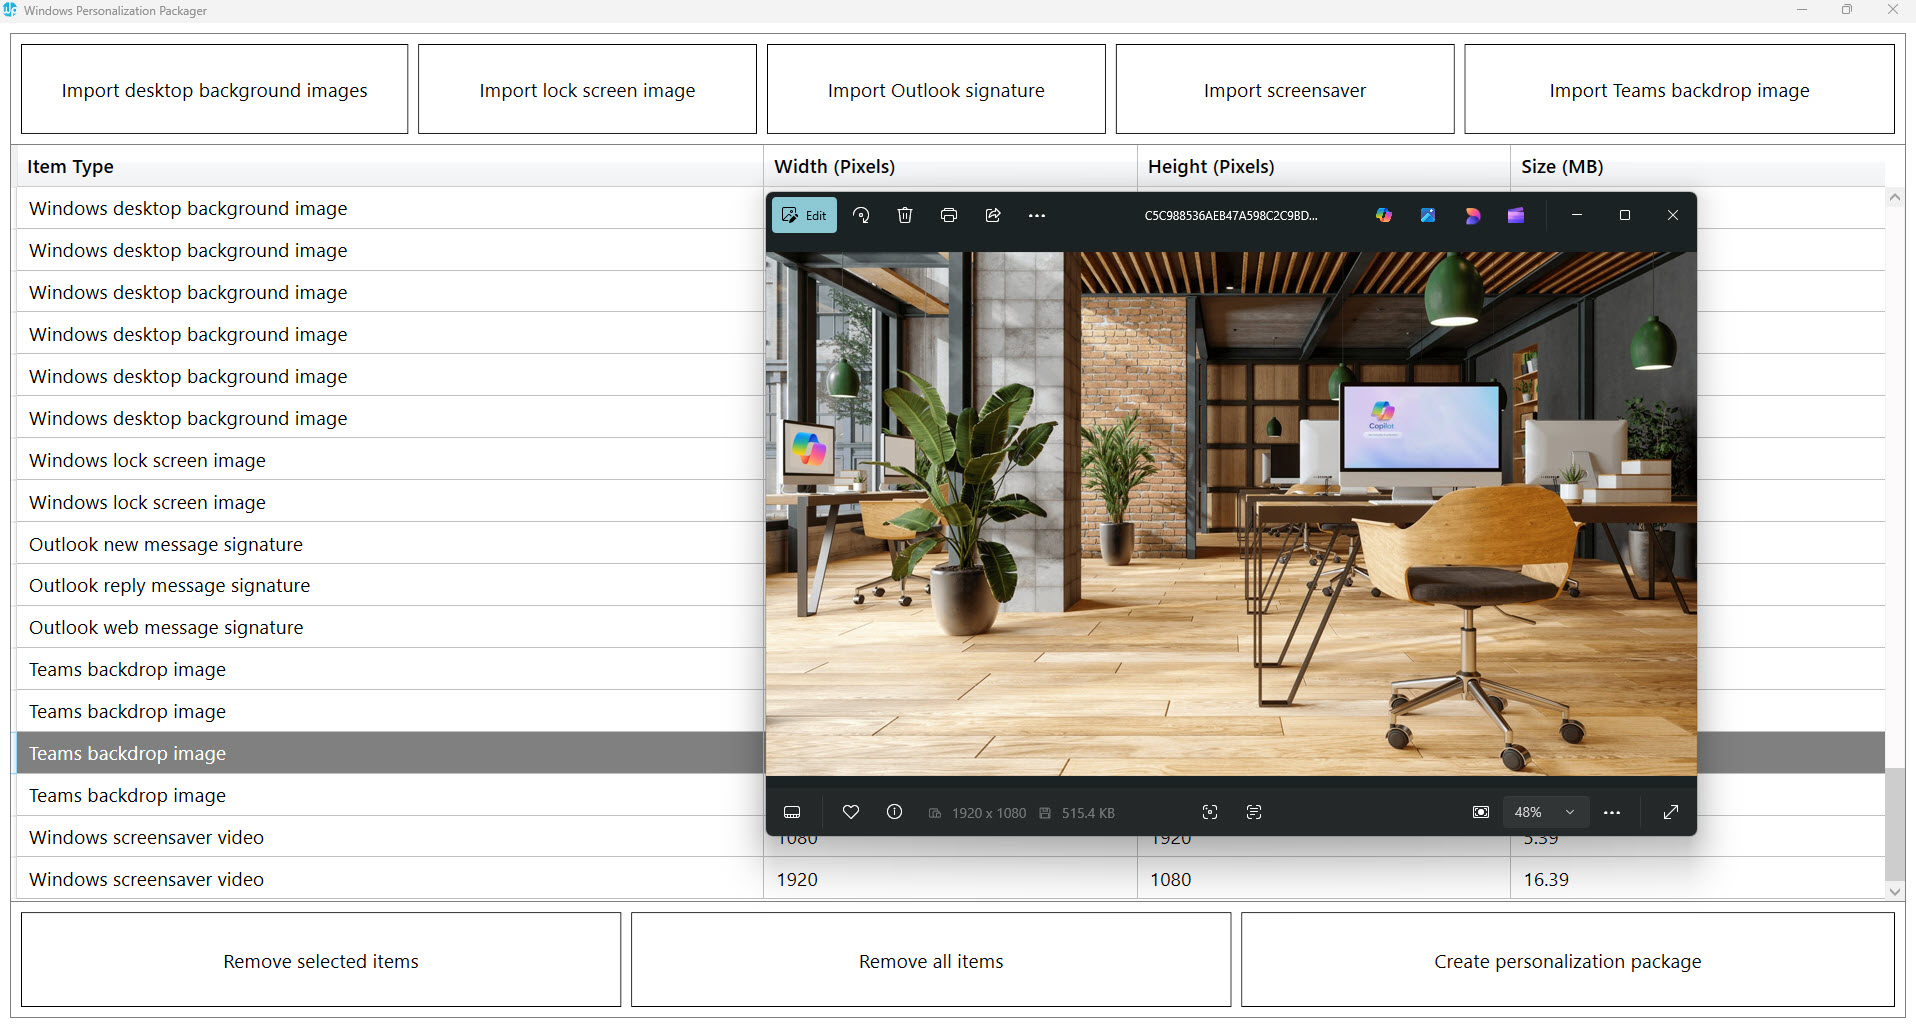
The image below displays the Packager interface when one or more personalization items have been loaded. To preview the content, click on each item.
Note: Please refrain from altering the items while in preview mode. Doing so will result in a fatal error and cause the process to fail.
If one or more items should fail import, the following screen will report the failed item. You can understand the problem better by looking at the log file in the following location.
%temp%\wpsecure-packager.log

The personalization package creation process creates two folders: general_install and intune_install.
The general_install folder contains installation files for deployment via enterprise software management tools like Microsoft Endpoint Configuration Manager (SCCM). Run the ‘wpsecure-install.exe’ to install the personalization package. More details regarding the enterprise installation and uninstallation process are in the ‘documentation.html’ file.
The intune_install folder contains the ‘wpsecure-install.intunewin’ file to be uploaded to the Microsoft Endpoint Device Management portal (Intune). The command line for this is identical to the general install.

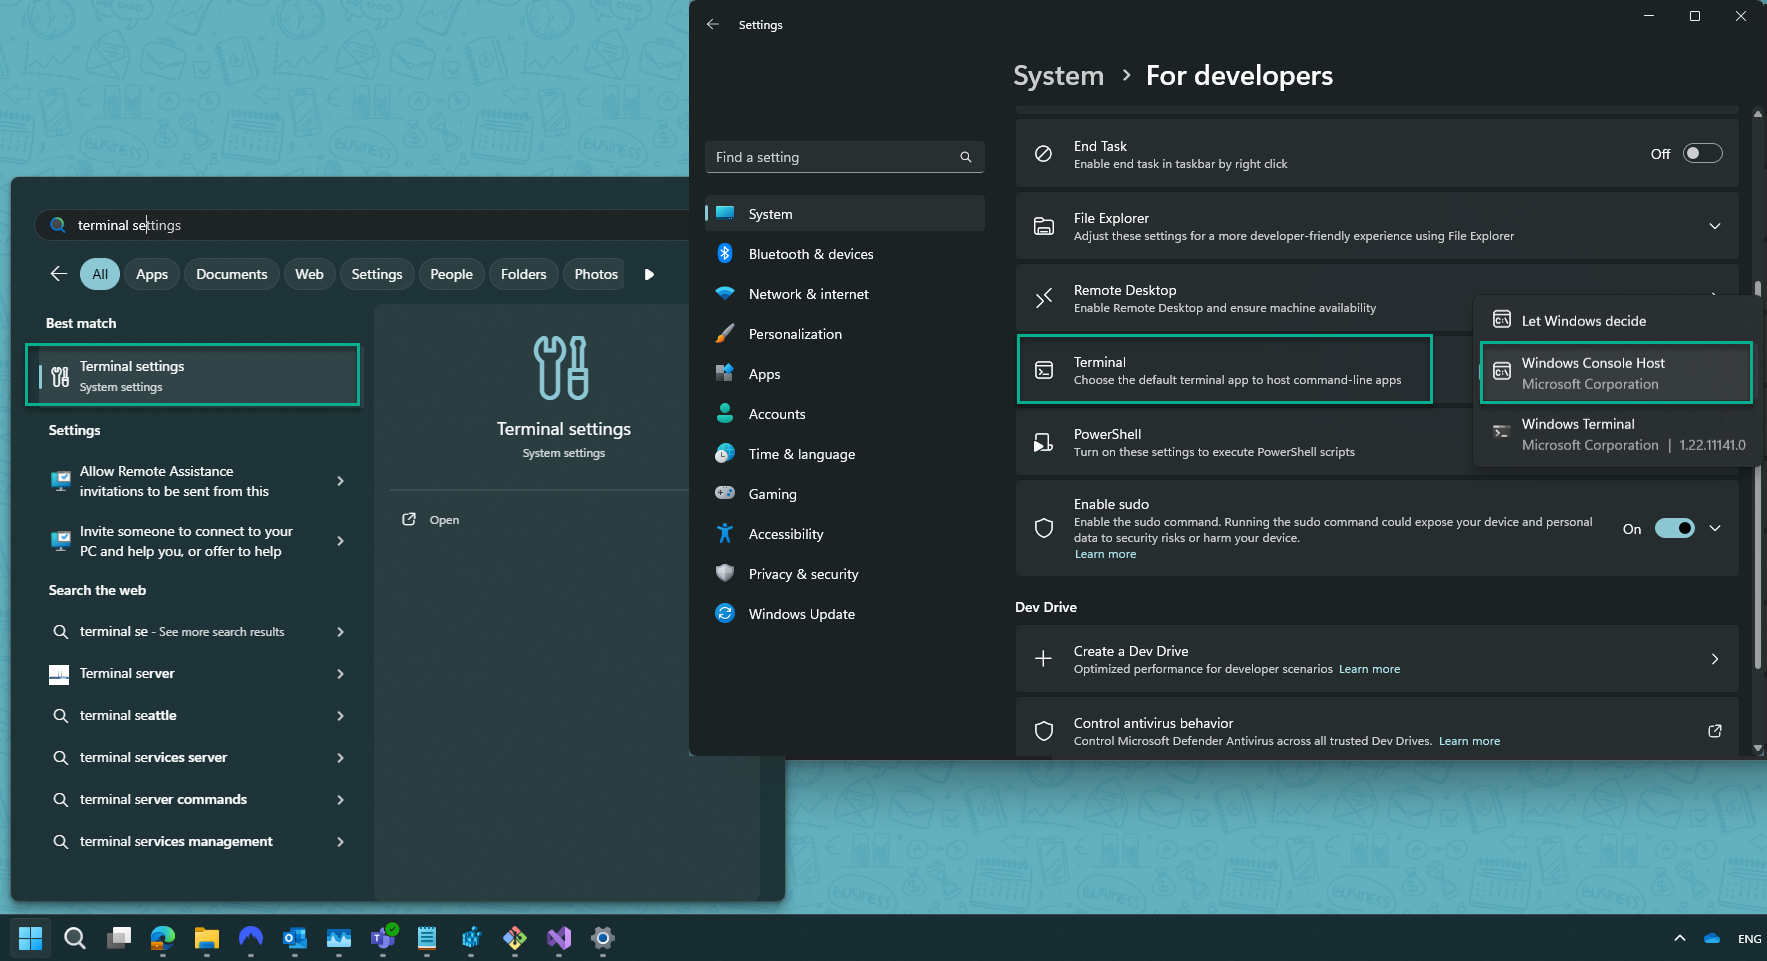
Suppose the process fails to create an Intune Package. Open “Terminal Settings” and set “Windows Console Host” as the default terminal viewer. Most Users will not experience this issue, but we’ve had reports of 2 Users experiencing a failure to create an Intune Package. The WPSecure Personalization Packager has sophisticated subroutines to identify and remediate such scenarios, but it’s good to know about a workaround if an issue exists.
Personalization package installation
A personalization package is a collection of all the settings and files you have imported, such as desktop backgrounds, lock screen images, Outlook signatures, and screensavers. The personalization package creation process creates two folders: general_install and intune_install.
The general_install folder contains installation files for deployment via enterprise software management tools like Microsoft Endpoint Configuration Manager (SCCM). Run the ‘wpsecure-install.exe’ to install the personalization package. More details regarding the enterprise installation and uninstallation process are in the ‘documentation.html’ file.
The intune_install folder contains the ‘wpsecure-install.intunewin’ file to be uploaded to the Microsoft Endpoint Device Management portal (Intune). The command line for this is identical to the general install.
The process also creates a ‘documentation.html’ file that provides all the information required to deploy the personalization package, such as the package version, the install and uninstall command lines, and detection methods.
Install command line
The install command line is the same for deployment via Microsoft Endpoint Configuration Manager, Intune, or other deployment tools.
The general install package is in the ‘general_install‘ folder of the Personalization package output directory.
The install package for Microsoft Intune is in the ‘intune_install‘ folder of the Personalization package output directory.
Use the switch ‘-silent‘ to install the package silently.
wpsecure-install.exe
wpsecure-install.exe -silent
Install detection
Use the following file paths to detect if the Personalization package is installed on the target device.
For x86 Systems
'C:\Program Files\wpsecure\packages\20.24.0421.1758\wpsecure.exe'
For x64 Systems
'C:\Program Files (x86)\wpsecure\packages\20.24.0421.1758\wpsecure.exe'
In this example, ‘C:\‘ is the drive containing the ‘Program Files’ directory and ‘20.24.0421.1758‘ is the Personalization package version. Also, note that every single file in the above folder is crucial to the proper functioning of the Personalization package. Avoid moving, adding, or changing files outside the Personalization Packager before or after deployment.
Uninstall command line
The uninstall command line is the same for deployment via Microsoft Endpoint Configuration Manager, Intune, or other deployment tools.
The general uninstall package is in the ‘general_install’ folder of the Personalization package output directory.
The uninstall package for Microsoft Intune is in the ‘intune_install’ folder of the Personalization package output directory.
The Personalization package can also be uninstalled from the Control Panel’s Programs and Features section.
wpsecure-uninstall.exe
The above command line will uninstall the version corresponding to this package.
wpsecure-uninstall.exe -silent
The above command line will silently uninstall the version corresponding to this package.
wpsecure-uninstall.exe -all
The above command line will uninstall all Personalization packages.
wpsecure-uninstall.exe -all -silent
The above command line will silently uninstall all Personalization packages
wpsecure-uninstall.exe 20.24.0421.1758
The above command line will uninstall the Personalization package version “20.24.0421.1758”.
wpsecure-uninstall.exe 20.24.0421.1758 -silent
The above command line will silently uninstall the Personalization package version “20.24.0421.1758”.
The Campaign Manager
This tool creates a campaign file. The campaign file gets mass deployed to devices. The file name of the campaign file is ‘wpsecure.campaigns’. The file contains information regarding each personalization package’s start date, end date, and priority. Click the add new campaign button below to add a new campaign and the remove selected items button to remove one or more campaigns. You can open the Campaign Manager from the Windows start menu. A successful sign-in will land you on the following Screen.

Click on the add new campaign button to create a new campaign. Alternatively, click on Import an existing campaign file to open campaigns saved into a previously saved campaigns file.

Campaign number: Assign a positive numeric value. While this does not have technical value, this value is used to maintain uniqueness.
Package version: This is the version corresponding to the Personalization package. You’ll find the value in the ‘documentation.html‘ file of the Package installer.
Start and End dates: When the campaign will start and end.
Campaign Priority: This numeric value plays a crucial role in conflict resolution. In scenarios where two Personalization packages share the same schedule, and the WPSecure personalization engine encounters a conflict, the Priority value determines which Personalization package takes precedence.
Group number: Assign a collection of Users the same ‘Group number’ and target specific Personalization Packages to them based on a schedule. The group number can be assigned to a User using the command below. This command has to be run in the User context.
wpsecure-set.exe -groupid 1475
Click the buttons below to either import an existing campaign file or generate a new campaign file. The file name of the campaign file is ‘wpsecure.campaigns’.

The window after adding a campaign or importing an existing campaign file will look similar to the below window.

The campaign generation process creates two folders: general_install and intune_install. The general_install folder contains installation files for deployment via enterprise software management tools like Microsoft Endpoint Configuration Manager (SCCM). Run the ‘wpsecurecc.exe’ file to copy the campaign file to the correct location.
The intune_install folder contains the ‘wpsecurecc.intunewin’ file that can be uploaded to the Microsoft Endpoint Device Management portal (Intune). The command line for this is identical to the general install.
The process also creates a ‘documentation.html’ file that provides all the information required to deploy the campaign file, like install command line, uninstall command line, and detection methods. Save this file for future reference regarding the personalization Package versions, start dates, end dates, and priority.
Once the campaign file has been deployed to Windows 10 and 11 devices, the Personalization Packages corresponding to the best-fitting campaign listed in the campaign file will be triggered.
Campaign file installation
The install command line is the same for deployment via Microsoft Endpoint Configuration Manager, Intune, or other deployment tools.
The general campaign install package is in the ‘general_install‘ folder of the Campaign package output directory.
The campaign install package for Microsoft Intune is in the ‘intune_install‘ folder of the Campaign package output directory.

Install command line
Campaign file installation always runs in silent mode. Use the below command line to install the campaign file.
wpsecurecc.exe
Install detection
Use the following Windows Registry key/value pair to detect if the campaign is installed on the target device.
Key path | HKEY_LOCAL_MACHINE\SOFTWARE\wpsecure |
Name | wpsecurecampaignversion |
Value | 20.23.0918.1728 |
The campaign version number will be referenced in the ‘documentation.html‘ file generated during the “campaign file deployment package” creation process.
Uninstall command line
The uninstall command line is the same for deployment via Microsoft Endpoint Configuration Manager, Intune, or other deployment tools.
The general campaign uninstall package is in the ‘general_install‘ folder of the Campaign package output directory.
The campaign uninstall package for Microsoft Intune is in the ‘intune_install‘ folder of the Campaign package output directory.
wpsecurecc.exe -remove
Using the Beacon feature
Use WPSecure Beacon to gather essential logon information, such as login time, boot time, and Geolocation, for Windows 10 and 11 devices. WPSecure Beacon operates seamlessly in the background, authenticated by certificates, to collect data describing the device usage’s who, where, and when. The link below is a guide that will walk you through setting up an Azure Function with a PowerShell Core runtime stack to periodically collect and publish this data to a SharePoint Online list. While the focus is on SharePoint Online, the PowerShell function can be easily adapted to direct the data to other datastores like MSSQL, MySQL, or Dataverse, providing flexibility to meet your specific needs.
Running Startup and Login scripts
Computer startup PowerShell Script is a script that runs when the computer starts up, before any user logs in. The purpose of this script is to do the following
- Set system-wide configurations (e.g., network settings, services)
- Install or update software
- Apply security settings
User login PowerShell script runs when a specific user logs into Windows. The purpose of this script is to do the following
- Set user-specific environment variables
- Map network drives or printers for that user
- Customize desktop settings
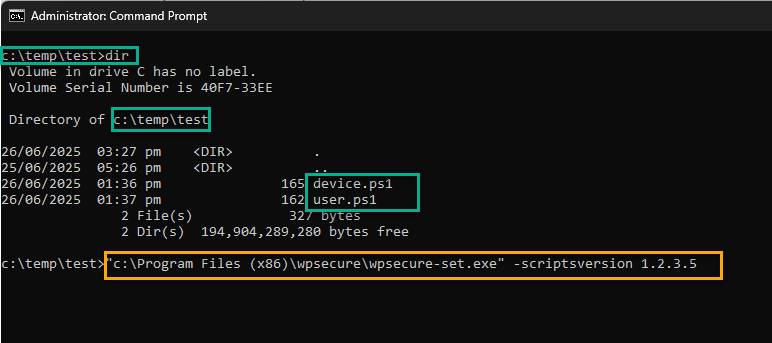
Create the following PowerShell scripts.
- device.ps1: Runs during computer startup. Contains system-wide configuration commands.
- user.ps1: Runs during user login. Contains user profile-specific actions.
Navigate to the directory containing the aforementioned PowerShell scripts. Run the following command as an administrator to copy the device startup and user login scripts to their appropriate locations.The -scriptversion parameter specifies the version of the scripts being deployed. This versioning is used to detect the presence or absence of these PowerShell files during organization-wide deployments.
"c:\Program Files (x86)\wpsecure\wpsecure-set.exe" -scriptsversion 1.2.3.5
Note:
- To ensure successful execution of the command, at least one Personalization Package must be installed on the device.
- Important!!! Do not copy or run the PowerShell scripts outside the prescribed process. Doing so will compromise the integrity of the script’s security validation mechanism.
Detect the successful deployment of these PowerShell scripts using the following registry setting.
Key path | HKEY_LOCAL_MACHINE\SOFTWARE\wpsecure |
Name | scriptsversion |
Value | 1.2.3.5 |
Run the below command as an administrator to remove the Powershell scripts.
"c:\Program Files (x86)\wpsecure\wpsecure-set.exe" -deletescripts
Package selection criteria
As you may know, each license allows you to install up to five personalization packages per device. So, what does the selection criteria look like?
- When the campaign file is not deployed (which is the most commonly used option), the package with the highest version number will be selected.
- The list of package versions referenced in the campaign file will take precedence.
- When a campaign file is not used, you can set a “default package version,” (see below for the command to set this) which will override the local version hierarchy.
- A picking order will be formulated based on the campaign file, default package version entry, and local version hierarchy.
- The WPSecure engine will select the first personalization package shortlisted based on the above criteria for each personalization element.
Desktop backgrounds. |
Lock screen images. |
Outlook signature for 'New' messages. |
Outlook signature for 'Reply' messages. |
Teams backgrounds |
Windows screensavers. |
You can create priorities, defaults, and catch-alls in multiple ways. This can be done using the combination of the Campaign file, setting default packages, and package version hierarchies, allowing for a tailored configuration.
Commands to apply extra settings
The executable is located in the WPSecure application directory. On 64-bit systems, this directory resides within Program Files (x86), while on 32-bit systems, it is found in the Program Files directory.
"c:\Program Files (x86)\wpsecure\wpsecure-set.exe" -dpv 20.24.0225.1230
Pending reboot messaging
Windows Operating System health is directly related to consistent device restart cycles. Use Desktop backgrounds, lock screen images, and Video screensavers to remind Users when a restart cycle is pending. Designate a personalization package as a ‘Pending Restart’ reminder package. Only the following modules can use this feature.
- Desktop backgrounds
- Lock Screen images
- Screensavers
Run the following command as an administrator or as a SYSTEM.
"c:\Program Files (x86)\wpsecure\wpsecure-set.exe" -prpv 20.24.0623.1319
You can detect this setting using the following registry location.
Key path | HKEY_LOCAL_MACHINE\SOFTWARE\wpsecure |
Name | wpsecurependingrebootdisplaypackageversion |
Type | REG_SZ |
Value | 20.24.0623.1319 |
Compliance and remediation scripts in Microsoft Intune or SCCM can help you set the above ‘pendingreboot‘ flag.
Your ‘detection’ script can look similar to the below Powershell script.
					if (!(Get-Module -ListAvailable -Name PendingReboot)) {
    #Install Nuget Provider.
    Install-PackageProvider -Name Nuget -Force
    #Install Nuget Pending Reboot Module.
    Install-Module -Name PendingReboot -Force
}
if (Get-Module -ListAvailable -Name PendingReboot -ErrorAction SilentlyContinue) {
    #Check pending reboot
    if((Test-PendingReboot -ErrorAction SilentlyContinue).IsRebootPending) {
        #Reboot is pending
        exit 1
    } else {
        #Reboot is not pending
        Remove-ItemProperty -Path HKLM:\SOFTWARE\WPSecure -Name pendingreboot -Force -ErrorAction SilentlyContinue
        exit 0
    }
} else {
    #Module was not installed or is not available. How would you like to handle this.
    #if exit value is 1 Pending Reboot flag will be set. If exit value is 0 Pending Reboot value will not be set.
    exit 0
}
Your ‘remediation’ script can look similar to the below Powershell script.
Set-ItemProperty -Path HKLM:\SOFTWARE\WPSecure -Name pendingreboot -Type DWord -Value 1 -Force -ErrorAction SilentlyContinue
Disable or enable the WPSecure management engine.
There may be instances where it is desirable to disable WPSecure without uninstalling the WPSecure Windows Personalization Packages. Run as administrator.
"c:\Program Files (x86)\wpsecure\wpsecure-set.exe" -disable
"c:\Program Files (x86)\wpsecure\wpsecure-set.exe" -enable
Run the following command as administrator to turn off only the background processing engine. Do this on devices where you want to permanently turn off the desktop background deployments using WPSecure. Default is enabled
"c:\Program Files (x86)\wpsecure\wpsecure-set.exe" -disablebg
"c:\Program Files (x86)\wpsecure\wpsecure-set.exe" -enablebg
Run the following command as administrator to turn off only the Outlook signature processing engine. Do this on devices where you want to permanently turn off the Outlook signature deployments using WPSecure. Default is enabled
"c:\Program Files (x86)\wpsecure\wpsecure-set.exe" -disablesig
"c:\Program Files (x86)\wpsecure\wpsecure-set.exe" -enablessig
Run the following command as administrator to turn off only the lock screen processing engine. Do this on devices where you want to permanently turn off the lock screen image deployments using WPSecure. Default is enabled
"c:\Program Files (x86)\wpsecure\wpsecure-set.exe" -disablels
"c:\Program Files (x86)\wpsecure\wpsecure-set.exe" -enablesls
Run the following command as an administrator to turn off only the Teams backdrop processing engine. Do this on devices where you want to permanently turn off the Teams background image deployments using WPSecure. The default is enabled
"c:\Program Files (x86)\wpsecure\wpsecure-set.exe" -disabletbg
"c:\Program Files (x86)\wpsecure\wpsecure-set.exe" -enabletbg
Run the following command as administrator to turn off only the Windows screensaver processing engine. Do this on devices where you want to permanently turn off the screensaver deployments using WPSecure. Default is enabled
"c:\Program Files (x86)\wpsecure\wpsecure-set.exe" -disabless
"c:\Program Files (x86)\wpsecure\wpsecure-set.exe" -enablesss
Campaign Group number
Assign a collection of Users with the same ‘Group number’ and target specific Personalization Packages to them based on a schedule. The group number can be assigned to a User using the command below.
This command has to be run in the User context.
"c:\Program Files (x86)\wpsecure\wpsecure-set.exe" -groupid 1475
Logging
When something goes wrong within a complex system like WPSecure, log files provide a detailed list of events that occurred before the malfunction. This information helps troubleshoot issues effectively. You can turn ON and OFF logging by using the following command. Run as administrator. Default is ON. ‘el‘ = Enable and ‘dl‘ = Disable.
"c:\Program Files (x86)\wpsecure\wpsecure-set.exe" -el
"c:\Program Files (x86)\wpsecure\wpsecure-set.exe" -dl
Real-time Loading
This value determines if WPSecure packages load immediately after installation or wait until the user locks/unlocks the screen. Run as administrator. Default is enabled. ‘eroi‘ = Enable and ‘droi‘ = Disable.
"c:\Program Files (x86)\wpsecure\wpsecure-set.exe" -eroi
"c:\Program Files (x86)\wpsecure\wpsecure-set.exe" -droi
Screensaver
It is not ideal for the Screensaver to run endlessly. So, by default, it will return to the lockscreen & turn off the display after a 60-minute run. This setting can be changed using the below command. In this example, the Screensaver will return to the lockscreen after a 120-minute run. Input is in minutes.
This has to be run as an administrator.
"c:\Program Files (x86)\wpsecure\wpsecure-set.exe" -ssrtls 120
AD Group Policy or Intune Configuration Service Provider usually sets the below value. But sometimes, the values have to be reinforced. This value pertains to the initiation of the Screensaver. How long after the device is idle should the Screensaver start? Make this value the same as other Providers who enforce the same setting. In the below example, the Screensaver timeout is set to 360 seconds or 6 minutes. Input is in seconds.
This command has to run in the User context.
"c:\Program Files (x86)\wpsecure\wpsecure-set.exe" -ssto 360
AD Group Policy or Intune Configuration Service Provider usually sets the below value. But sometimes, the values have to be reinforced. Show the login screen after Screensaver exits. ‘0‘ does not return to the login screen, and ‘1‘ returns to the login screen.
This command has to run in the User context.
"c:\Program Files (x86)\wpsecure\wpsecure-set.exe" -ssis 1
Outlook Signature
Azure AD users can automatically synchronize their account attributes (supported attributes are listed below) with the registry location mentioned above. Users can initiate the synchronization process by clicking on the StartMenu shortcut, created by running the below-specified executable and providing the necessary parameters. Click here to read more.
TenantID and ClientID values will be generated during the Azure app registration (Discussed above). The version is just your internal deployment identifier to be used if you were to deploy this using Software deployment tools like SCCM or Microsoft Intune.
Users can click on the shortcut to trigger the synchronization. The command below has to be run as administrator.
"c:\Program Files (x86)\wpsecure\wpsecure-set.exe" -source azure -tenantid 9fb4d4d6-7541-490f-a49a-111d3393731f -clientid 55eba948-6cdd-4b98-ad9b-7ff7b36138c6 -createsc -version 1.23.56.9
The above shortcut can be removed using the following command. The last personalization package that gets uninstalled from a device will also remove the shortcut. The command has to be issued as an administrator.
"c:\Program Files (x86)\wpsecure\wpsecure-set.exe" -smsssc
Running the below command in the logged-in user context can initiate an organization-wide Outlook signature placeholder sync. Click here to read more.
"c:\Program Files (x86)\wpsecure\wpsecure-set.exe" -source azure -tenantid 9fa4d436-7741-492f-a49a-001d3392731f -clientid 45eab948-6cdd-4b98-ad9b-7ff6b36038c4 -secret AzR8T2DKUe4.mKsugDLS8~ijvOr2XB9Tq45MxcT- -version 1.2.3.4
If your organization uses legacy Active Directory Services, run the command below in the User context. But, the WPSecure Outlook signature processing engine does this automatically.
"c:\Program Files (x86)\wpsecure\wpsecure-set.exe" -source ad
Run the command below as a standard user to remove the user’s Outlook signature data synced from Azure AD (Entra ID) or Active Directory. If you want to permanently uninstall WPSecure, run this command before uninstalling the last WPSecure Personalization package.
"c:\Program Files (x86)\wpsecure\wpsecure-set.exe" -sigdatadel
The WPSecure Outlook signature processing engine sets the default ‘New’ and ‘Reply’ message signatures. If the user changes the default signatures, the engine will replace them at the next login/unlock event. This setup allows users to add or use another signature during the current session.
Run the following command as administrator to prevent users from changing the defaults. The default setting is “enabled“.
Note:
- When disabled, only the primary Outlook account (Office license holder) will have the default Outlook signature set. Additional Mail profiles that the User might have will not have the default signatures set and will be unable to change the default from within the secondary Mail profile (But they can choose a signature).
- Also, the primary user must have the same UPN and Email attribute value for this option to work.
- Please ensure the User has Synced their “Outlook Signature Placeholder details” ==> Documented here.
- Lock and Unlock your device for the changes to take effect.
"c:\Program Files (x86)\wpsecure\wpsecure-set.exe" -dsigchange
Run the following command as administrator to allow users to change the defaults.
"c:\Program Files (x86)\wpsecure\wpsecure-set.exe" -esigchange
Outlook roaming signature files (HTM, TXT, and RTF) usually have the User’s Outlook account email address suffixed to the file’s name, such as ‘wpsecure_new (my.email@myorg.com).htm‘. However, in some hybrid environments, the suffix might be the User UPN (User Principal Name) instead of the User email address.
WPSecure Outlook signature processing engine makes every effort to identify the relevant suffix regardless of the Exchange server configuration. However, the setting below helps the process by directing the engine to use UPN or Email.
Industry experts recommend that User accounts in O365 environments use the same email and UPN. However, your organization might prefer different values. These settings might not be required, but if the Outlook default signatures are not correctly set because the User email is not the same as the User’s UPN, use the command below to force the use of either the UPN or the email. Run the command as an Administrator.
"c:\Program Files (x86)\wpsecure\wpsecure-set.exe" -osaeu 1
Run the above command as administrator to direct the engine to use the Users email address.
"c:\Program Files (x86)\wpsecure\wpsecure-set.exe" -osaeu 2
Run the above command as administrator to direct the engine to use the User’s UPN (User Principal Name).
"c:\Program Files (x86)\wpsecure\wpsecure-set.exe" -osaeu 0
Run the above command as administrator to delete the above setting.
The “Store my Outlook settings in the cloud” feature was introduced in Outlook Desktop for Microsoft 365 accounts with cloud mailboxes using the Monthly Enterprise Channel, Current Channel, or Semi-Annual Enterprise Channel (version 2108).
We recommend using this feature. The feature SYNC’s the Outlook signatures created by the WPSecure signature processing engine to the Cloud.
But if you want to turn off Outlook signature roaming, run the below command as a standard user.
"c:\Program Files (x86)\wpsecure\wpsecure-set.exe" -drstt
The above command disables Outlook signature roaming.
"c:\Program Files (x86)\wpsecure\wpsecure-set.exe" -erstt
The above command enables Outlook signature roaming. If you disabled it in the past, use the command to reenable it.
If Outlook signature roaming is enabled, the WPSecure Outlook signature processing engine will request an immediate SYNC of the signature. The command below will direct the engine not to request Outlook to SYNC immediately. If roaming is enabled, the Outlook client will still SYNC the signature on a schedule, just not immediately. The command will also disable the Outlook Web Plugin functionality currently under development.
To disable this option, run the following command as the administrator.
"c:\Program Files (x86)\wpsecure\wpsecure-set.exe" -dsigstc
Run the following command as administrator to enable the setting mentioned above.
"c:\Program Files (x86)\wpsecure\wpsecure-set.exe" -esigstc
Articles
The following articles provide a functional, hands-on approach to creating and deploying WPSecure Personalization Packages using Microsoft Intune or SCCM.
However, we recommend reading through the current documentation page to learn the details of the WPSecure Personalization Packager.
Deploy Windows Personalization packages using Microsoft Intune – Click here.
How Would NASA Manage Outlook Signatures, Desktop Backgrounds, Lock Screen Images, And Screensavers? – Click here.
Deploy Video Screensavers, Desktop Wallpapers, Outlook Email Signatures, And Lock Screen Images Using Microsoft Intune – A Global Coffee Shop Brand – Click here.
Create and deploy Outlook email signature from Microsoft Online Template Repo using Intune (linkedIn) – Click here.
Deploy Outlook email signature only using Microsoft Intune – Click here.
Deploy Windows Personalization packages using Microsoft SCCM – Click here.
Deploy Outlook email signature only using SCCM – Click here.
Set Windows Lock Screen images using Microsoft Intune – Click here.
Show ‘Pending Reboot’ messages with Personalization packages – Click here.
Deploy ‘Outlook New’ and ‘Outlook On The Web’ email signatures – Click here.