Deploy Microsoft Outlook Signature Using Microsoft Intune or MECM.
This article will walk you through creating and deploying Microsoft Outlook email signature templates to devices within your organization. Organizations can use this approach to deploy Outlook signatures as if they were deploying a standard application using Microsoft Intune and Microsoft Endpoint Configuration Manager (MECM). Cut signature-related support tickets to zero and keep every employee’s Outlook signature perfect and on-brand – automatically with Intune or MECM.
We will use the WPSecure Personalization Packaging Tool (a.k.a. The Branding Tool) to create silent installers containing the Outlook signature templates. To download and install the packager, click the DOWNLOAD button in the top-right corner of the page to get it from the Microsoft Store.
There are three types of Microsoft Outlook Clients.
Outlook Classic: The traditional Office365 Client. This Client comes bundled with Microsoft Word, Microsoft Excel, Microsoft PowerPoint, etc..
Outlook On The Web: This is what used to be called ‘Outlook Web Access‘. All operations happen on the web.
Outlook New: It appears to be a local Outlook Client, but it’s actually ‘Outlook On The Web‘ masquerading as a locally installed application. So treat this as if it were a Web Client.
There are three email signature template file formats:
HTM – HTML format: The HTM template is required for both Outlook Classic and Outlook Web/New.
RTF – Rich Text format: The RTF template is only used by Outlook Classic. The RTF template is optional.
TXT – Text format: The Text template is used by both Outlook Classic and Outlook Web/New. The TXT template is optional.
Use the following guidelines when designing and creating Outlook email signature templates. These guidelines apply to all signature types.
The total file size of each signature and its associated assets must not exceed 10 MB. To ensure optimal performance and compatibility, it is recommended to keep HTML file character counts below 25,000 for New and Reply signatures, and below 8,000 for Web signatures.
New Message Signature (Classic Outlook)
The New Message signature is applied when composing a new message in Outlook Classic. It requires the wpsecure_new.htm file. The wpsecure_new.txt and wpsecure_new.rtf Files are optional.
Microsoft Word is recommended for creating HTM signatures, as it embeds images using VML, ensuring consistent rendering across Outlook clients. When saving the HTM file from Word, any referenced images are automatically stored in a companion folder named wpsecure_new_files. If this folder exists, it will be automatically included in the signature package.
Reply Message Signature (Classic Outlook)
The Reply Message signature is applied when responding to a message in Outlook Classic. It requires the wpsecure_reply.htm file. The wpsecure_reply.txt and wpsecure_reply.rtf files are optional.
As with the New Message signature, Microsoft Word is recommended for authoring the HTM file. Referenced images are automatically stored in a companion folder named wpsecure_reply_files and will be included in the signature package if present.
Web Signature (Exchange Online)
The Web signature is used by organisations that deploy signatures via Exchange Online. It requires the wpsecure_web.htm file. The wpsecure_web.txt file is optional. RTF is not supported for this signature type.
All images referenced in the Web signature must use HTTPS-based URLs. Local image files are not supported by Exchange Online and must not be used. When deployed via Exchange Online, this signature is applied to both new messages and replies.
New Message Cloud Signature (New Outlook & Outlook on the Web)
The New Message Cloud signature is applied when composing a new message in New Outlook or Outlook on the Web (OWA). It requires the wpsecure_cloud_new.htm file and an optional wpsecure_cloud_new.txt.
Microsoft Word is recommended for creating the HTM file; the file must be saved as Web Page, Filtered — unlike the HTM files created for Classic Outlook. Referenced images are automatically stored in a companion folder named wpsecure_cloud_new_files and will be included in the signature package if present.
Reply Message Cloud Signature (New Outlook & Outlook on the Web)
The Reply Message Cloud signature is applied when replying to or forwarding a message in New Outlook or Outlook on the Web (OWA). It requires the wpsecure_cloud_reply.htm file and an optional wpsecure_cloud_reply.txt.
As with the Cloud New signature, the HTM file must be saved from Word as Web Page, Filtered. Referenced images are automatically stored in a companion folder named wpsecure_cloud_reply_files and will be included in the signature package if present.
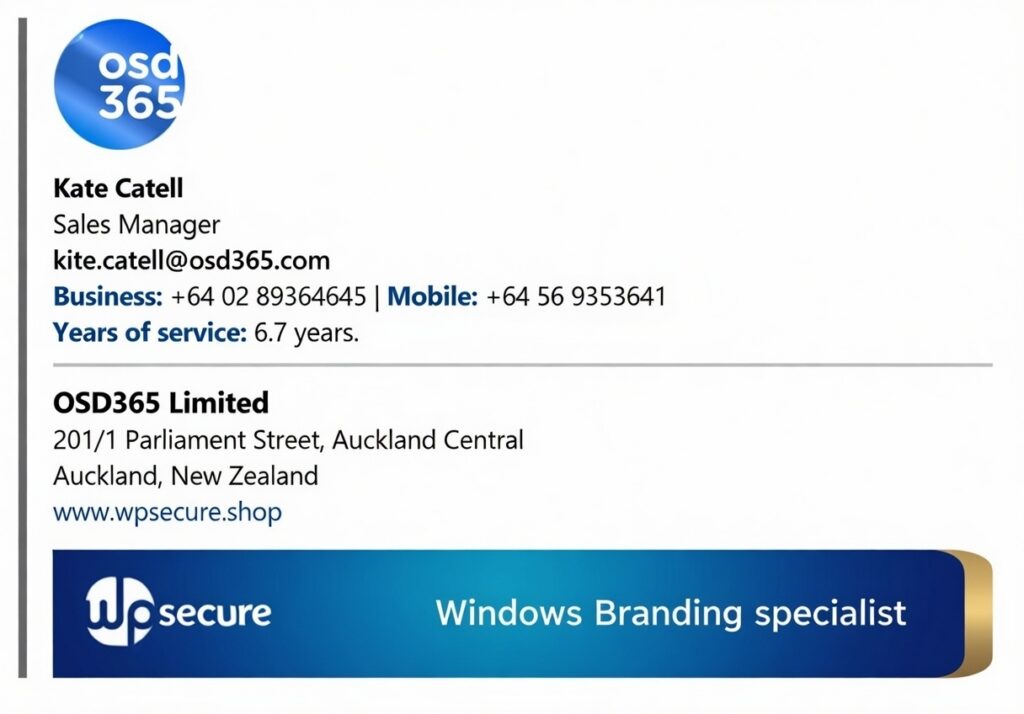
Placeholders for user attributes
Use placeholders like {{az_displayname}}, {{az_mobilephone}}, or {{az_jobtitle}} in the ‘wpsecure_new.htm’, ‘wpsecure_new.rtf’, ‘wpsecure_new.txt’, ‘wpsecure_reply.htm’, ‘wpsecure_reply.rtf’, ‘wpsecure_reply.txt’, ‘wpsecure_web.htm’, and ‘wpsecure_web.txt’ files to automatically load user-specific data at runtime.
You can also use placeholders like {{az_displayname, ad_displayname, custom_displayname}} to get the first available value from left to right. If az_displayname is not available, ad_displayname is used; if ad_displayname is also unavailable, custom_displayname is used.
The WPSecure Outlook signature engine replaces placeholders with the registry information corresponding to each placeholder.
Visit the documentation page and navigate to the section titled ‘Outlook Email Signature’.
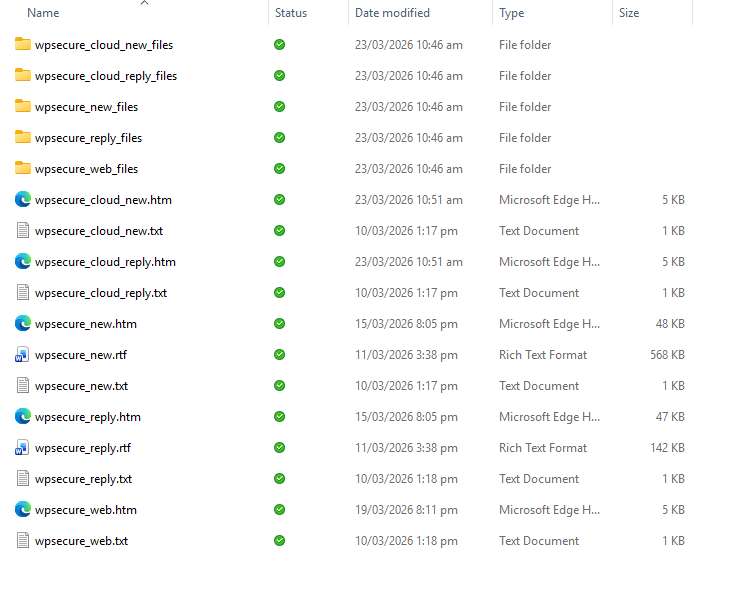
After creating all the Outlook email signature templates with placeholders, the target folder will look like the image below.
Creating the Personalization Package.
Before you read this article, download and install the Windows Personalization Packager by clicking on the “Download” button in the top right corner of this screen.
Open the Personalization Packager from the start menu. After installing the Packager, you will see two items on the start menu.
- WPSecure personalization Packager.
- WPSecure Campaign Manager.
Open the Personalization Packager from the start menu. After installing the Packager, you will see two items on the start menu.
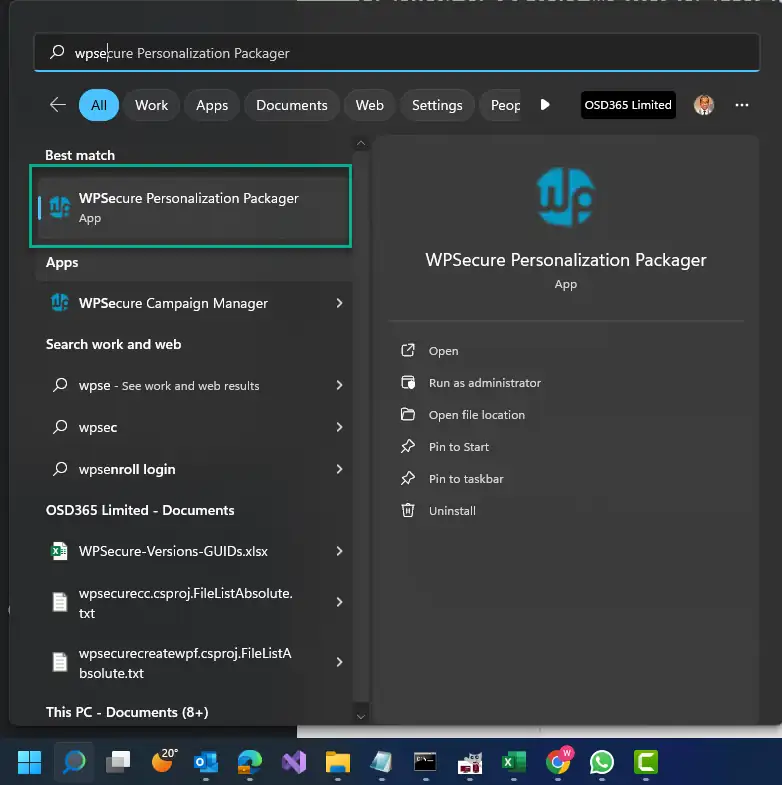
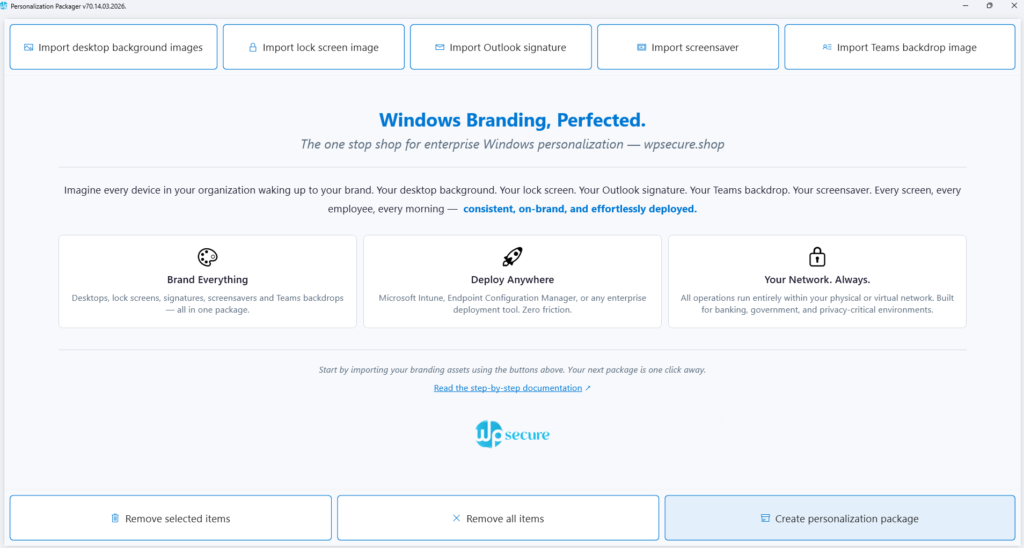
Click on the item called “WPSecure Personalization Packager.” Doing so will open the Packager in full-screen mode. Click the button at the bottom to agree to the terms and enter the application.
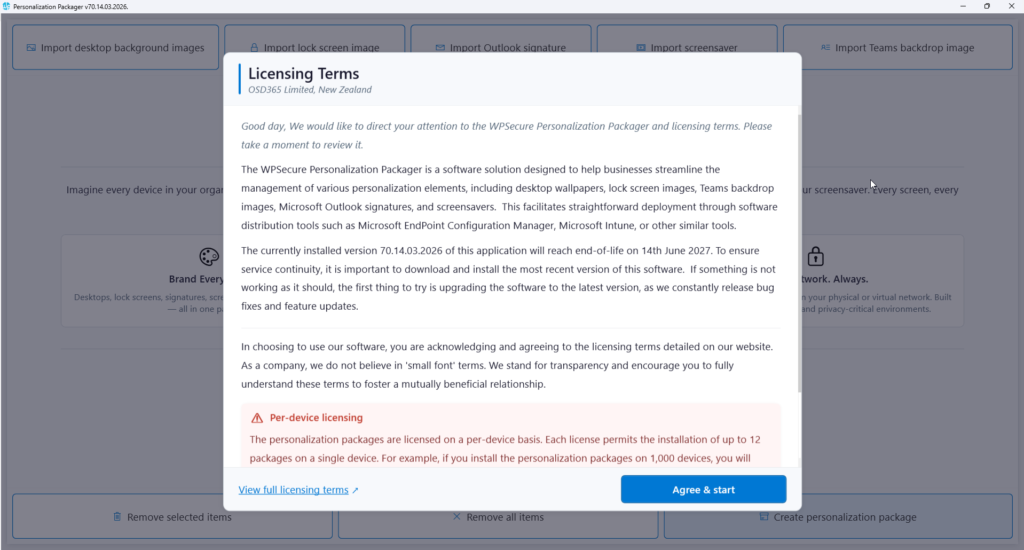
You will land on the following page. The buttons on the application’s top help the user add the following items.
- Add one or more Desktop background images (Not covered in this article)
- Add two Lock screen images, one for Landscape and optionally another for Portrait Screens. (Not covered in this article)
- Import a “New”, “Reply”, “Web”, “Cloud New”, and “Cloud Reply” signature templates.
- Add an MP4 video file for the Windows Screensaver. You can add a video for Landscape screens and a video for Portrait screens. (Not covered in this article)
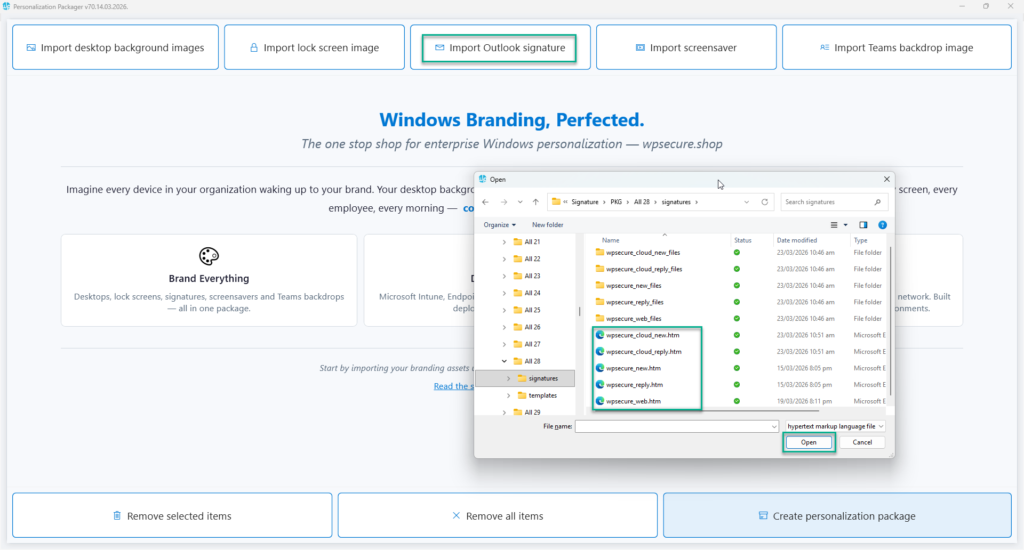
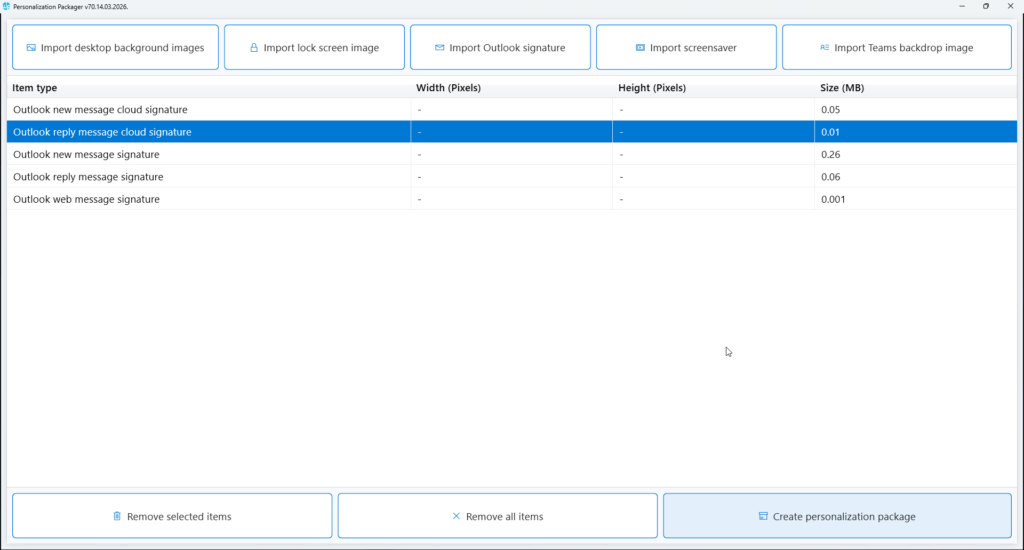
Click the “Import Outlook signature” button to import the newly designed email signatures—New, Reply, and Web message signatures — one at a time from the folder containing the email signatures. When adding the Signature templates to the WPSecure Personalization Package, select the HTM file. The supporting folders, RTF & TXT files (if present) will be added automatically. Click on the imported item to preview it.

After adding the necessary Personalization items, click the “Create Personalization Package” button to start the package creation process.
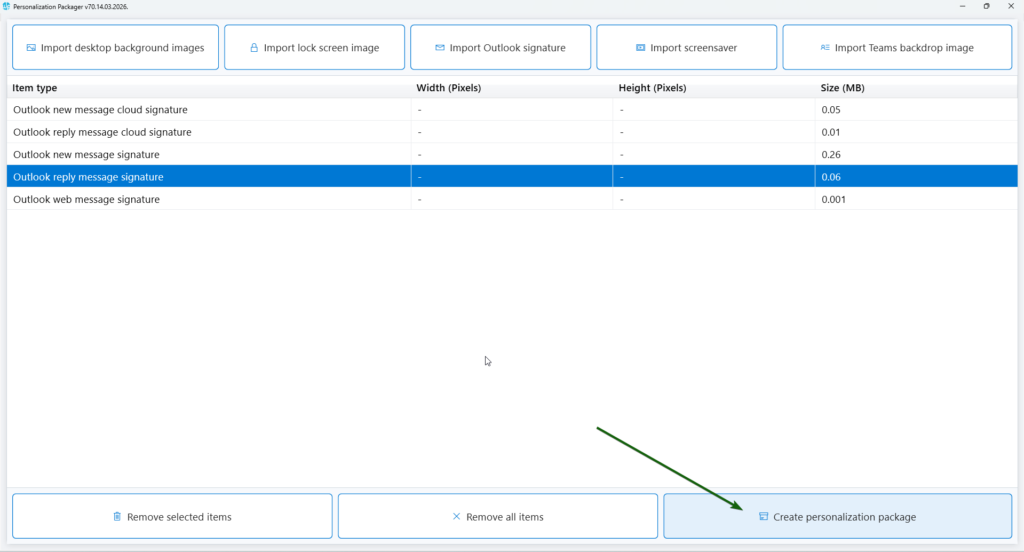
After adding the necessary Personalization items, click the “Create Personalization Package” button to start the package creation process.
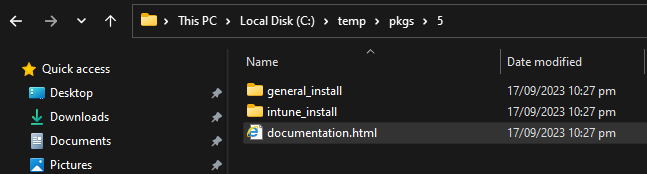
Use this button to export the personalization package to a folder. A personalization package is a collection of all the settings and files you have imported or created for your desktop backgrounds, Outlook signatures, and screensavers. The selected destination folder has to be empty. The personalization package creation process creates two folders: general_install and intune_install.
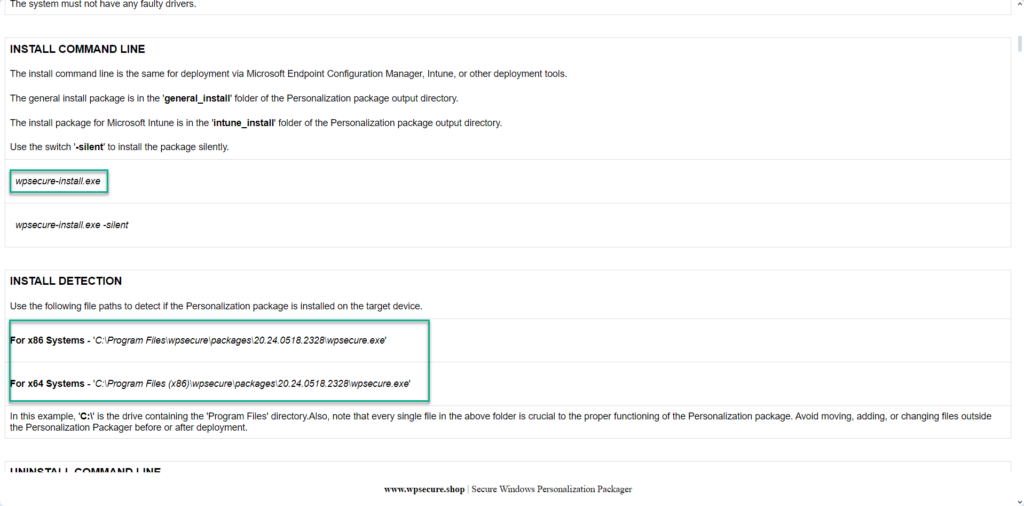
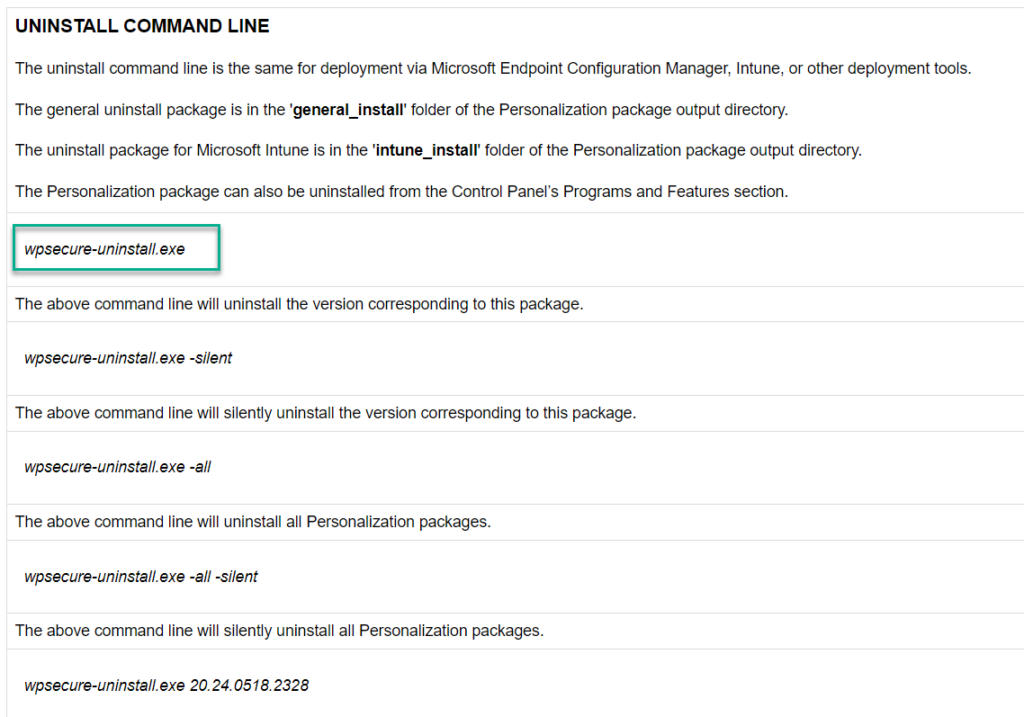
The general_install folder contains installation files for deployment via enterprise software management tools like Microsoft Endpoint Configuration Manager (SCCM). Run the ‘wpsecure-install.exe’ to install the personalization package. More details regarding the enterprise installation and uninstallation process are in the ‘documentation.html’ file.
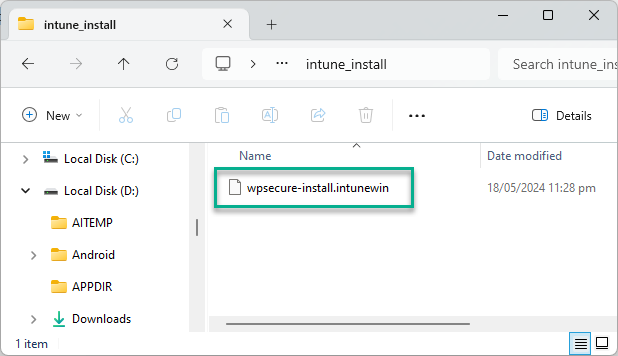
The intune_install folder contains the ‘wpsecure-install.intunewin’ file to be uploaded to the Microsoft Endpoint Device Management portal (Intune). The command-line for this is identical to the general install.
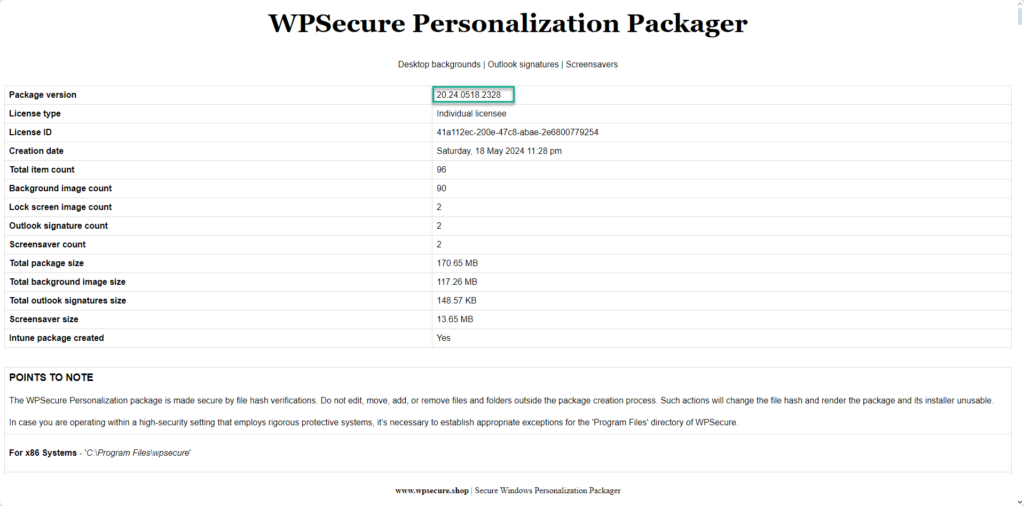
The process also creates a ‘documentation.html’ file that provides all the information required to deploy the personalization package, like package version, install command line, uninstall command line, and detection methods.
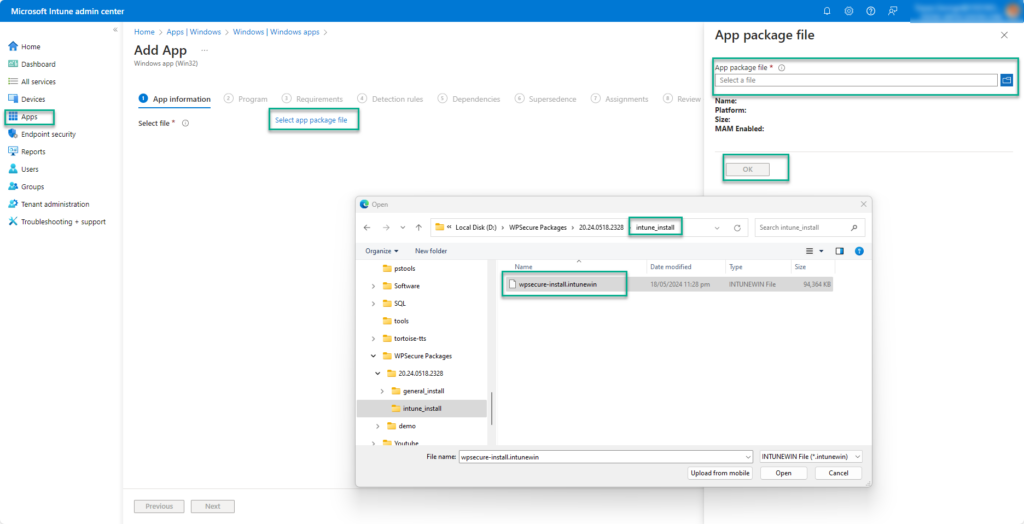
This article will only discuss deployment via Microsoft Intune. Open the “intune_install” folder. Inside the folder, you will find the ‘wpsecure-install.intunewin‘ file that will be uploaded to Intune.
Deploy Microsoft Outlook signatures using Microsoft Intune
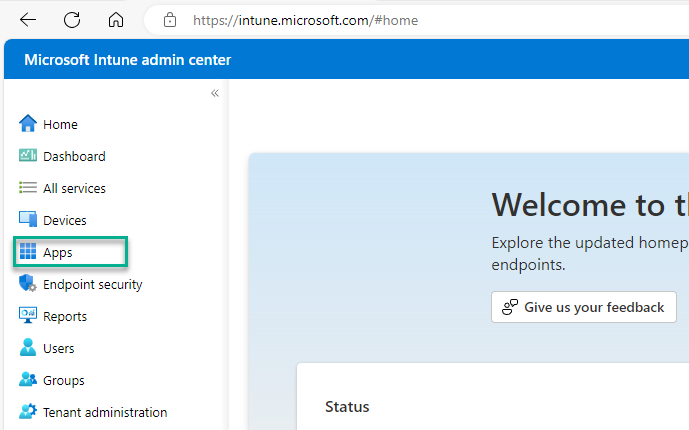
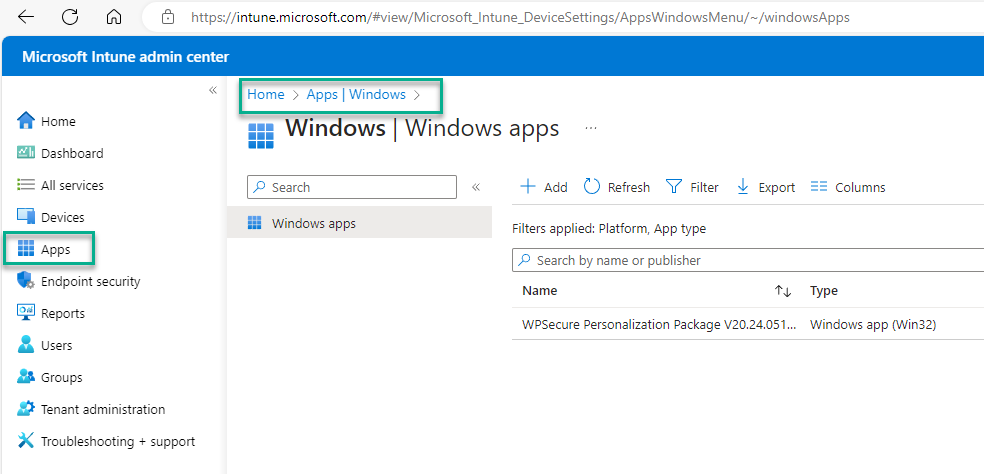
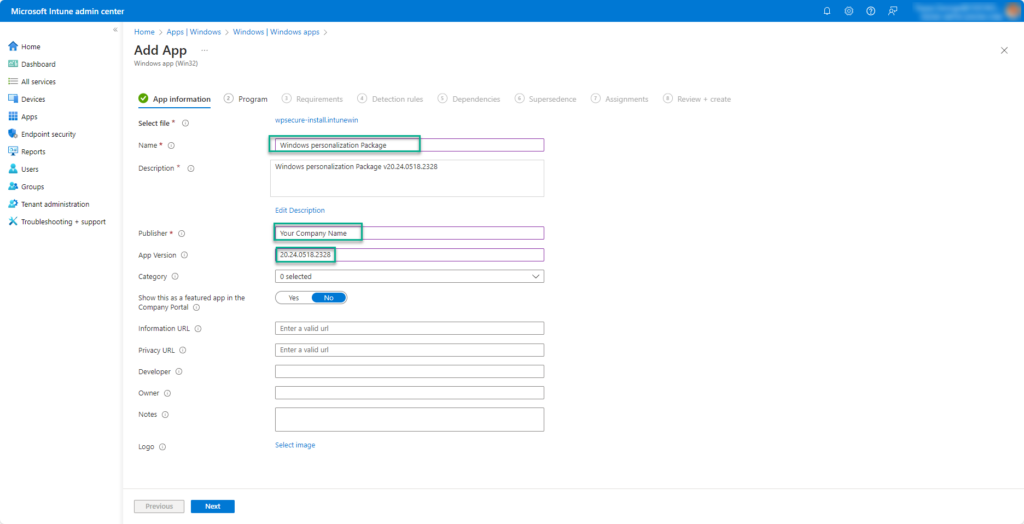
Open the Microsoft Intune Admin Center, click “Apps,” then choose “Windows Apps.”
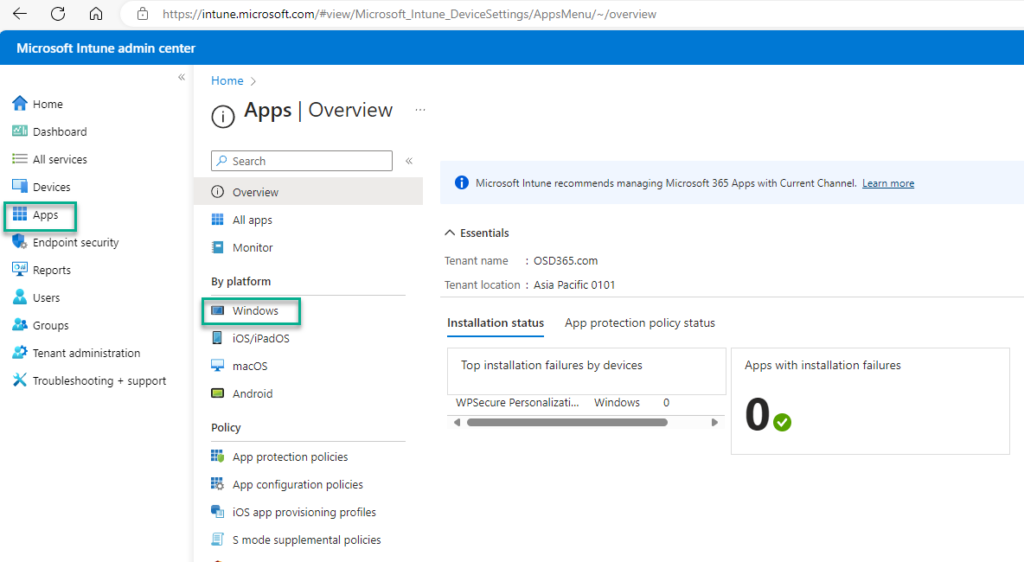
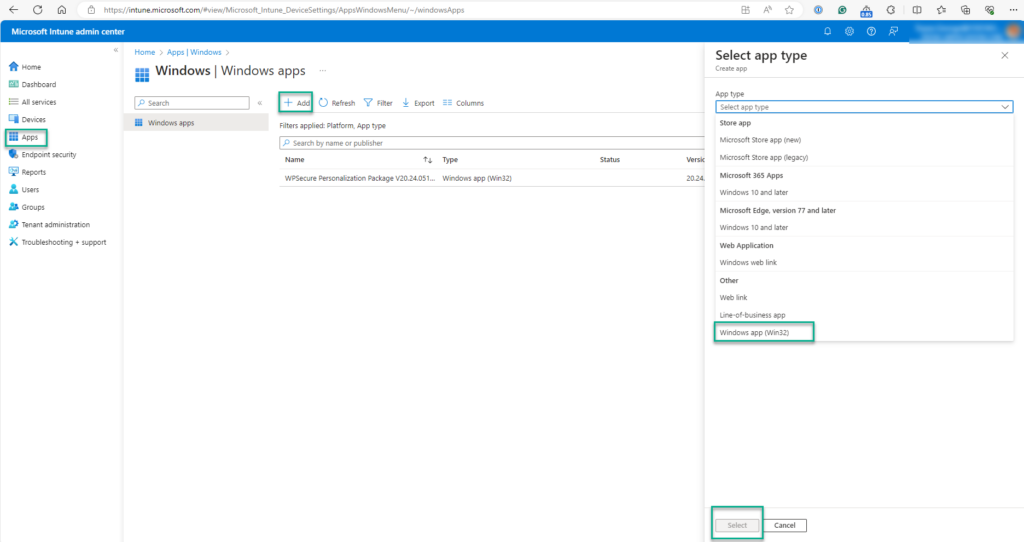
Use the “+ Add” button to create the Intune Win32 App deployment. Follow the images below to get through the first steps of the setup process.
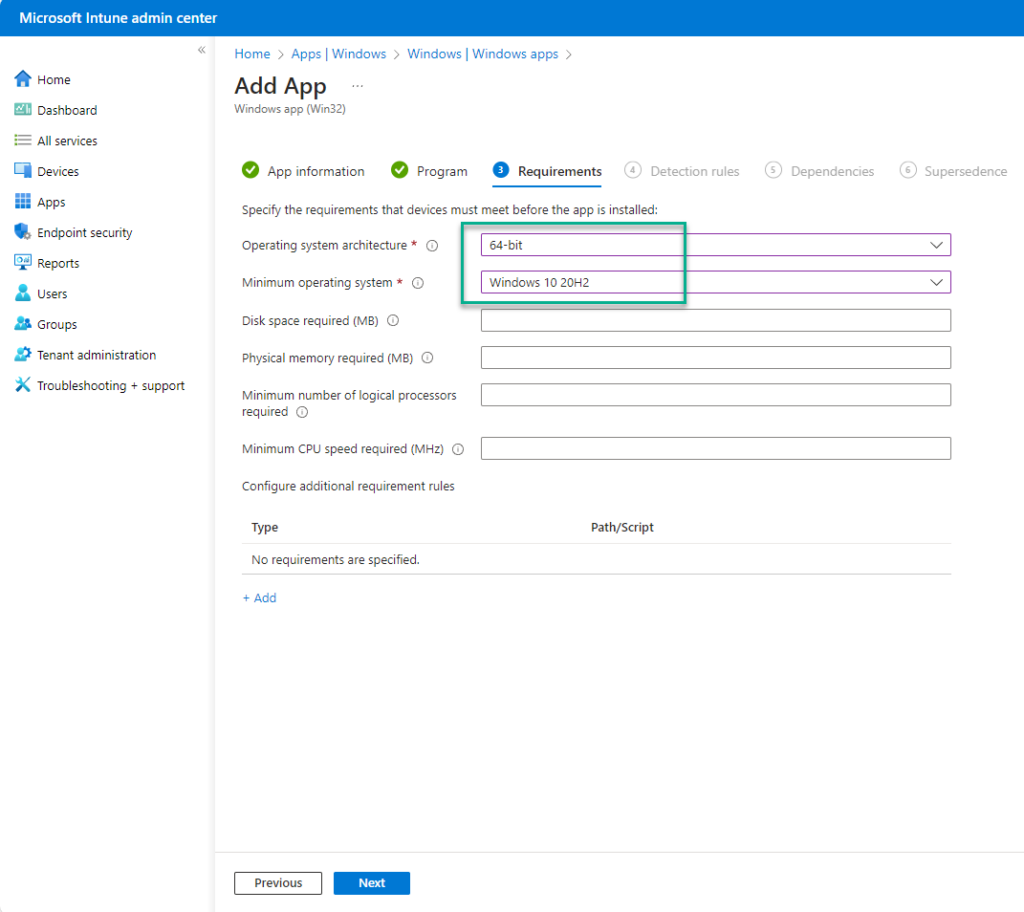
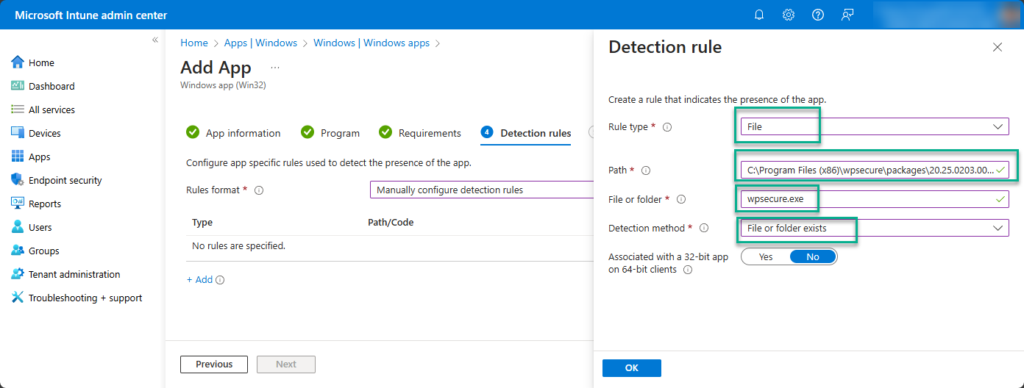
The ‘documentation.html’ file provides all the information required to deploy the personalization package, like package version, install command line, uninstall command line, and detection methods.
Using the above information, fill out the Intune Win32 application setup form.
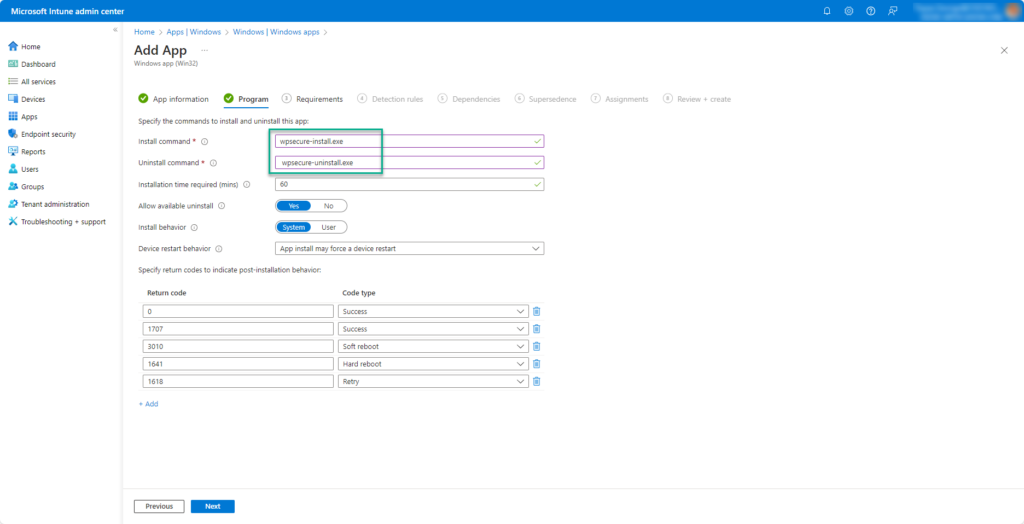
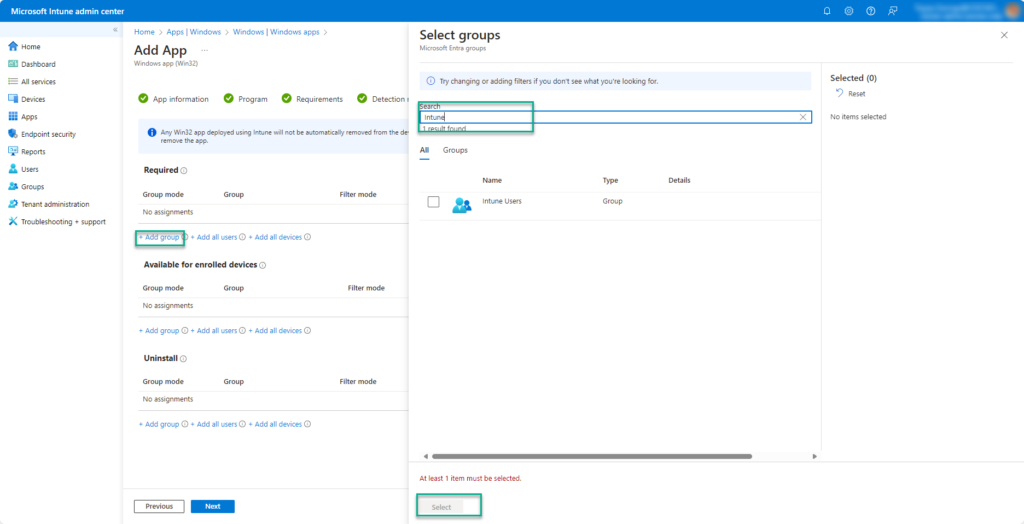
Click Next and complete the process. Wait for Microsoft Intune to upload and set up your Windows Personalization package.
Steps to deploy using Microsoft Endpoint Configuration Manager
The source files for non-Intune installs are located inside the “general_install” folder.

The ‘documentation.html’ file provides all the information required to deploy the personalization package, like package version, install command line, uninstall command line, and detection methods.
Open the SCCM console and start a new Application creation process. Fill out the required information in the SCCM Application using the above information.


Create a new deployment type. Clicking the ‘Add’ button will open a new Window.


Click Next to close the ‘deployment type’ Window.


Click Next and complete the process. Distribute the Windows Personalization package to the required distribution points. When the branding package is installed, it will deploy Microsoft Outlook signatures to the device.
Deploying Microsoft Outlook signatures across your organization doesn’t have to be complicated. By using Microsoft Intune and Windows Branding Packages, you can streamline the process, ensure consistency, and maintain compliance with corporate branding standards. This proven approach to deploy Microsoft Outlook signature settings saves time for IT teams and delivers a professional experience for end users. Start implementing this method today to simplify signature management and enhance your enterprise communication.
Advantages of using branding packages to set Outlook email signatures |
|---|
Eliminate email signature chaos forever with centralized deployment of Outlook signatures using Microsoft Intune or MECM (Microsoft Endpoint Configuration Manager). No more manual updates, inconsistent branding, or reliance on third-party tools—deploy and manage professional signatures across all Windows 10/11 devices in minutes. This solution ensures uniform corporate identity, simplifies compliance, and scales effortlessly without extra infrastructure or databases. With application-style deployment, setting up signatures is as easy as installing Google Chrome or Adobe Reader. A secure, cost-effective way to standardize email signatures across your organization. |
Say goodbye to broken PowerShell scripts and endless manual fixes—manage corporate Outlook email signatures at scale with zero ongoing effort. Deploy signatures centrally using Microsoft Intune or MECM, ensuring consistent branding across all Windows 10/11 devices without third-party tools or extra infrastructure. Updates take minutes, not hours, and everything is applied securely and reliably. A simple, scalable solution for organizations that want professional email signatures without the headaches. |
Deploy once and relax forever—fully automated Outlook email signature management via Microsoft Intune and MECM. No scripts, no manual updates, and no third-party tools required. Signatures are applied silently across all Windows 10/11 devices, ensuring consistent branding and compliance at scale. Updates take minutes, and everything runs securely without extra infrastructure or databases. A simple, cost-effective solution for professional email signature deployment. |
Centrally control every Outlook email signature in your organization without relying on login scripts, GPOs, or third-party cloud tools. Deploy and manage signatures seamlessly through Microsoft Intune or MECM, ensuring consistent branding across all Windows 10/11 devices. A secure, scalable solution that eliminates manual updates and guarantees professional email identity at every level. |
Cut signature-related helpdesk tickets to zero by deploying professional, auto-populating Outlook email signatures like any other app. With Microsoft Intune or MECM, signatures install silently and update automatically—no scripts, GPOs, or third-party tools required. A simple, scalable solution that ensures consistent branding and eliminates manual fixes across all Windows 10/11 devices. |
Streamline and standardize Outlook email signatures across thousands of devices with a single Intune or MECM deployment package. No scripts, GPOs, or third-party tools—just simple, application-style deployment that works as easily as installing Google Chrome or Adobe Reader. Ensure consistent branding, reduce helpdesk tickets, and achieve full compliance with zero ongoing effort. |
Deploy Outlook email signatures as easily as installing standard applications like Google Chrome or Adobe Reader. Using Microsoft Intune or MECM, signatures are applied silently and consistently across all Windows 10/11 devices—no scripts, GPOs, or third-party tools required. A simple, scalable solution that ensures professional branding and eliminates manual updates. |