Table of Contents
Interactively set “Outlook On The Web” / “Outlook New” signatures. This is a User-driven approach.
Azure Function Apps/Exchange Online content, security, and setup are outside the scope of WPSecure package support and licensing. This integration is provided for convenience and interoperability with other cloud infrastructures. If you have any issues with Azure Function Apps or Exchange Online, please reach out to Microsoft Support.
This article will guide you through setting up an Azure Function with a Powershell Core runtime stack that will process and set the Exchange Online default signature based on the following files created by the WPSecure signature processing engine on the local computer.
wpsecure_web.htm | This file will be set as the default signature for messages in a HTML format. |
wpsecure_web.txt | (Optional) This file will be set as the default signature for messages in a TXT format. |
The process will also return User account attributes used in the email signature, such as FirstName, DisplayName, Email, JobTitle, etc.
What administrative permissions are required?
To successfully execute the procedures in this document, you will require the following permissions.
Exchange Online Administrator | Turn off signature roaming and to provide permissions to the Azure Functions Managed Identity. |
Azure Global Administrator | Provide correct Microsoft Graph permissions for the Azure Functions Managed Identity. |
Disable Exchange Online roaming signatures
Exchange Online’s Roaming Signature feature must be turned off.
You will have to be an Exchange Administrator to run the below command.
Set-OrganizationConfig -PostponeRoamingSignaturesUntilLater $true
Ways to secure the Azure Function
The Azure function you create will require a User to follow your organizational authentication and authorization process.
Function Key | Function keys help ensure that only authorized users or systems can execute your functions, adding an extra layer of security. Using a Function Key alone does not secure your Function App. |
Interactive login. | The authentication and authorization process safeguards your Azure Functions from unauthorized access and ensures secure communication |
VNI and NSGs | Deploy your function app within a virtual network to manage inbound and outbound traffic. Use Network Security Groups (NSGs) to restrict traffic based on port, protocol, source IP address, or destination IP address. Note that this topic is beyond the scope of this article. |
The process flow: What happens in the background?
The process from creating the email signature to setting the signature in Exchange Online will be similar to that shown in the table below.
The user launches the "WPSecure Signature Data Sync' item from StartMenu. |
After the User authenticates, the process will upload the locally available web signature with pre-filled attributes to the Azure Function. |
The process will return a list of account attributes that the WPSecure Signature Engine will use to replace placeholder values with corresponding values. E.g., firstName, surName, etc. |
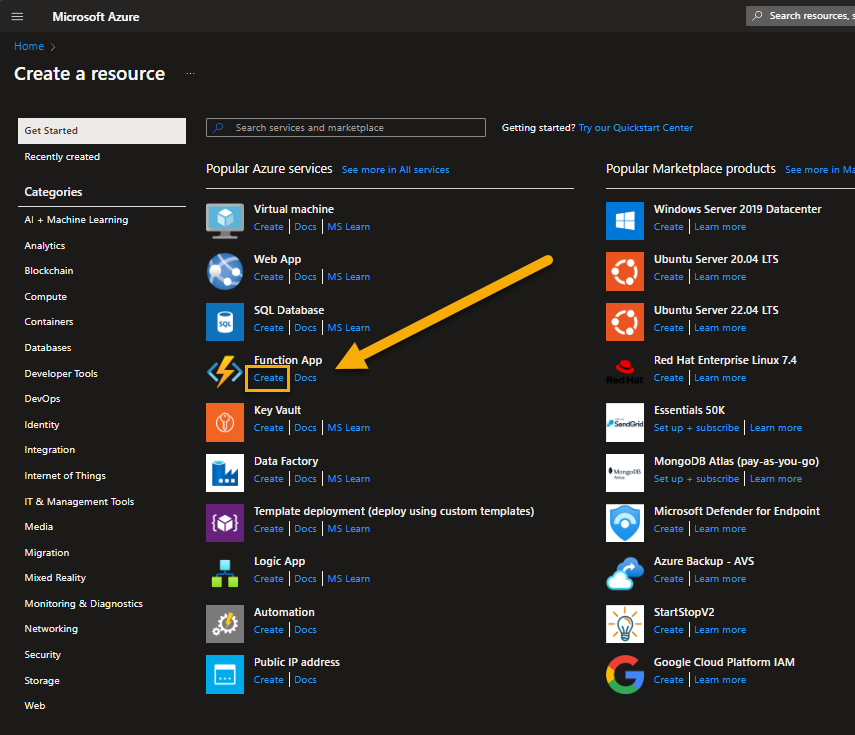
Create a Function App in Azure Portal
Now that the fundamentals are discussed, it is time to create the Azure Function and make the necessary configuration changes.
Create a resource in Azure. Select ‘Function App‘ as the Service.
Select either Consumption or Function Premium with the Windows OS option. However, select Function Premium to prevent cold starts.
In the next step, pick a name that describes the Function App’s nature as a user-driven authenticated function. This is necessary because there is an option to create another Function App, a Certificate-authenticated Function App that silently syncs the web signature to Exchange Online in the background without user interaction.

Choose a storage account. Azure Functions requires an Azure Storage account when you create a function app instance. If you have an existing storage, choose to use it.

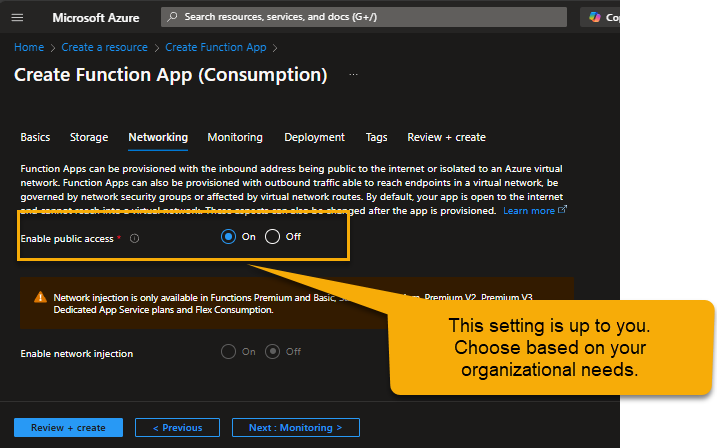
Public access? Choose based on your organizational needs. This is entirely up to your Organizational security governance requirements.
But we recommend ‘Public‘ during setup. After a successful setup, you can add more network restrictions.
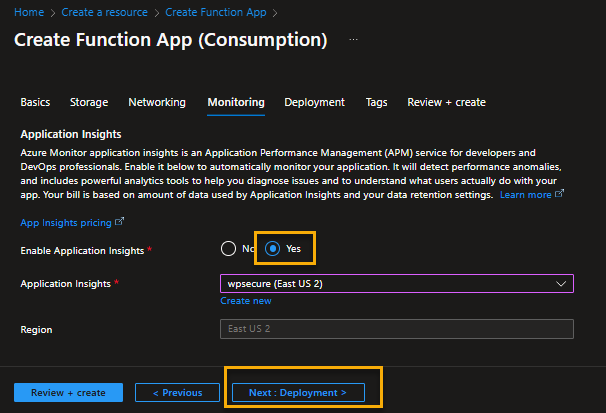
Azure Monitor application insights is an Application Performance Management (APM) service for developers and DevOps professionals. Enable it below to monitor your application automatically. It will detect performance anomalies and include powerful analytics tools to help you diagnose issues and understand what users do with your app.
Continuous deployment settings and the tags should be based on your organization’s needs. Finally, review and Create.

When the deployment is complete, go to the resource.

Copy the Function App default domain
On the overview page of the Function App. The first parameter required to be copied and saved for future reference is the “Default Domain.” Copy and paste the default domain to a Notepad file.

Copy Function App Managed Identity ID
Enable “System Assigned Managed Identity” and save and copy the PrincipalID of the managed identity.

Copy the Azure AD Tenant ID
Open the EntraID portal in a new window/tab and copy the Tenant ID from the ‘basic information‘ section.

Copy the Exchange Online Organizational Unit Root
Open Powershell on your computer and run the following commands. You will need the ExchangeOneline PowerShell module installed to run the below commands. You will have to run the below commands as an Exchange Administrator. Copy and paste the value corresponding to the ‘OrganizationalUnitRoot’ attribute to Notepad for future reference.
					Install-Module -Name ExchangeOnlineManagement
Connect-ExchangeOnline
Get-OrganizationalUnit

Grant the required permissions to the Managed Identity.
We need to grant the Function App’s managed identity Exchange Administrator permissions. The permissions can be granted using the script below. Before executing the script, you need to do the following:
- Install the Microsoft Graph SDK if you have not done so before. That happens by executing the following PowerShell command as an administrator:
Install-Module Microsoft.Graph -Scope CurrentUser - Set your tenant ID and the managed identity (Principal) object ID you copied earlier as the script variable values.
The script below will also provide the required access to Microsoft Graph for the Managed Identity.
					Disconnect-MgGraph
$tenantId = "9fa4d4d6-7541-490f-a49a-001d3392731f"
$managedIdentityIds = "c0c7589b-f806-408b-aca0-54669c0dec9a"

Connect-MgGraph -Scopes AppRoleAssignment.ReadWrite.All, Application.Read.All, RoleManagement.ReadWrite.Directory -TenantId $tenantId

# Exchange Online

# Office 365 Exchange Online (the GUID is the same in all tenants)
$resourceId = (Get-MgServicePrincipal -Filter "AppId eq '00000002-0000-0ff1-ce00-000000000000'").Id
# Exchange.ManageAsApp (the GUID is the same in all tenants)
$appRoleId = "dc50a0fb-09a3-484d-be87-e023b12c6440"
$roleDefinitionId = (Get-MgRoleManagementDirectoryRoleDefinition -Filter "DisplayName eq 'Exchange Administrator'").Id

foreach ($managedIdentityId in $managedIdentityIds) {
    # Grant the Exchange.ManageAsApp API permission for the function app
    New-MgServicePrincipalAppRoleAssignment -ServicePrincipalId $managedIdentityId -PrincipalId $managedIdentityId -AppRoleId $appRoleId -ResourceId $resourceId
    # Grant the Exchange Administrator role for the function app
    New-MgRoleManagementDirectoryRoleAssignment -PrincipalId $managedIdentityId -RoleDefinitionId $roleDefinitionId -DirectoryScopeId "/"
}

# Microsoft Graph

# Get the Microsoft Graph service principal
$graphServicePrincipal = Get-MgServicePrincipal -Filter "DisplayName eq 'Microsoft Graph'"

# Get the app role
$msGraphAppRoleName = "User.Read.All"
$msGraphAppRole = $graphServicePrincipal.AppRoles | Where-Object { $_.Value -eq $msGraphAppRoleName }

foreach ($managedIdentityId in $managedIdentityIds) {
    # Assign the app role to the managed identity
    New-MgServicePrincipalAppRoleAssignment -ServicePrincipalId $managedIdentityId -PrincipalId $managedIdentityId -ResourceId $graphServicePrincipal.Id -AppRoleId $msGraphAppRole.Id
}
Create a function within the Azure Function App
Open the ‘Overview’ node of the Function App. Click on the ‘Create Function’ button.

Choose ‘HTTP Trigger’ and click next.

On the next window, type ‘setWebSignature‘ as the function name and choose ‘Function‘ as the Authorization level. Click Create.

When you click ‘Create,’ you will be presented with a ‘run.ps1‘ PowerShell file in edit mode. Review the file content and understand the layout. Replace the file content with the following code. Please do not forget to ‘Save.‘
					using namespace System.Net
using namespace System.Web

# Input bindings are passed in via param block.
param($Request, $TriggerMetadata)

# Write to the Azure Functions log stream.
Write-Host "A new process has started to set Exchange email signature for a User."

try {
    # Get the HTTP request context
    $request = $Request; $upn = $request.Headers["X-MS-CLIENT-PRINCIPAL-NAME"]
    Write-Output "The UPN of the authenticated user is: $upn"
    if (-not [string]::IsNullOrEmpty($upn) -and $upn -ne "") {
        # The tenant name (orgname.onmicrosoft.com) set in the Function App configuration
        $EXCHANGE_ORGANIZATIONAL_UNIT_ROOT = $env:EXCHANGE_ORGANIZATIONAL_UNIT_ROOT
        if (-not [string]::IsNullOrEmpty($EXCHANGE_ORGANIZATIONAL_UNIT_ROOT) -and $EXCHANGE_ORGANIZATIONAL_UNIT_ROOT -ne "") {
            # Get signature related environment variables
            $AUTO_ADD_SIGNATURE_ON_NEW_MESSAGE = $true
            $AUTO_ADD_SIGNATURE_ON_REPLY_MESSAGE = $true
            try {$AUTO_ADD_SIGNATURE_ON_NEW_MESSAGE = [bool]::Parse($env:AUTO_ADD_SIGNATURE_ON_NEW_MESSAGE) } catch {$AUTO_ADD_SIGNATURE_ON_NEW_MESSAGE = $true} # Set as detault signature for New messages?
            try {$AUTO_ADD_SIGNATURE_ON_REPLY_MESSAGE = [bool]::Parse($env:AUTO_ADD_SIGNATURE_ON_REPLY_MESSAGE) } catch {$AUTO_ADD_SIGNATURE_ON_REPLY_MESSAGE = $true} # Set as detault signature for Reply messages?
            Import-Module ExchangeOnlineManagement -Force
            Connect-ExchangeOnline -ManagedIdentity -Organization $EXCHANGE_ORGANIZATIONAL_UNIT_ROOT
            #$email = $Request.Body.email;
            $signatureHtml = [System.Web.HttpUtility]::HtmlDecode($Request.Body.signatureHtml)
            $signatureText = [System.Web.HttpUtility]::HtmlDecode($Request.Body.signatureText);
            Write-Host "Starting the process to set Exchange email signature for mailbox with UPN => $upn."
            if ((-not [string]::IsNullOrEmpty($signatureHtml)) -and ($signatureHtml -ne "") -and (-not [string]::IsNullOrEmpty($signatureText)) -and ($signatureText -ne "")) {
                Write-Host "Setting HTML and TXT signatures for UPN => $upn."
                Set-MailboxMessageConfiguration -Identity $upn -SignatureHTML $signatureHtml -SignatureText $signatureText
                Write-Host "Finished setting HTML and TXT signature for UPN => $upn."
            } elseif ((-not [string]::IsNullOrEmpty($signatureHtml)) -and ($signatureHtml -ne "")) {
                Write-Host "Setting HTML signature for UPN => $upn."
                Set-MailboxMessageConfiguration -Identity $upn -SignatureHTML $signatureHtml
                Write-Host "Finished setting HTML signature for UPN => $upn."
            } elseif ((-not [string]::IsNullOrEmpty($signatureText)) -and ($signatureText -ne "")) {
                Write-Host "Setting TXT signature for UPN => $upn."
                Set-MailboxMessageConfiguration -Identity $upn -SignatureText $signatureText
                Write-Host "Finished setting TXT signature for UPN => $upn."
            } else {
                Write-Host "Signature files empty or NULL. Did not set HTML and TXT signatures for UPN => $upn."
            }
            Write-Host "Setting AUTO signature application settings for UPN => $upn."
            Set-MailboxMessageConfiguration -Identity $upn -AutoAddSignature $AUTO_ADD_SIGNATURE_ON_NEW_MESSAGE -AutoAddSignatureOnReply $AUTO_ADD_SIGNATURE_ON_REPLY_MESSAGE
            Write-Host "Finished setting AUTO signature application settings for UPN => $upn."

            # Import Microsoft Graph Users module.
            Import-Module Microsoft.Graph.Users -Force
            # Connect to Microsoft Graph using Managed Identity so as to get the following attributes.
            Connect-MgGraph -Identity -NoWelcome
            # Define the required attributes
            $requiredAttribs = @(
                "businessPhones",
                "city",
                "companyName",
                "country",
                "department",
                "displayName",
                "employeeId",
                "faxNumber",
                "givenName",
                "jobTitle",
                "mail",
                "mailNickname",
                "mobilePhone",
                "officeLocation",
                "postalCode",
                "state",
                "streetAddress",
                "surname",
                "interests",
                "userPrincipalName"
            )

            # Query Microsoft Graph API for user details
            $user = Get-MgUser -UserId $upn -Property ($requiredAttribs -join ',')

            # Extract the required attributes
            $userDetails = @{
                City = $user.city
                CompanyName = $user.companyName
                Country = $user.country
                Department = $user.department
                DisplayName = $user.displayName
                EmployeeId = $user.employeeId
                FaxNumber = $user.faxNumber
                GivenName = $user.givenName
                JobTitle = $user.jobTitle
                Mail = $user.mail
                MailNickname = $user.mailNickname
                MobilePhone = $user.mobilePhone
                OfficeLocation = $user.officeLocation
                PostalCode = $user.postalCode
                State = $user.state
                StreetAddress = $user.streetAddress
                Surname = $user.surname
                UserPrincipalName = $user.userPrincipalName
            }

            # Add businessPhones to userDetails
            if ($user.businessPhones) {
                $i = 1
                foreach ($phone in $user.businessPhones) {
                    $userDetails["BusinessPhones$i"] = $phone
                    $i++
                }
            }

            # Add interests to userDetails
            if ($user.interests) {
                $i = 1
                foreach ($interest in $user.interests) {
                    $userDetails["Interests$i"] = $interest
                    $i++
                }
            }

            Push-OutputBinding -Name Response -Value ([HttpResponseContext]@{
			StatusCode = [HttpStatusCode]::OK
			Headers = @{
				"Content-type" = "application/json"
			}
			# Will keep the order of the keys as specified.
			Body = $userDetails | ConvertTo-Json
    })


        } else {
            Write-Host "Error: No EXCHANGE_ORGANIZATIONAL_UNIT_ROOT value supplied for this transaction."
        }
    }
    else {
        Write-Host "Error: UPN not identified."
    }
}
catch {
    $ex = $_.Exception
    Write-Host "Exception: The process failed. $($ex.Message)"
}
finally {
    Disconnect-ExchangeOnline -Confirm:$false
    Get-PSSession | Remove-PSSession
}

Copy the function key
Click on the “Function Keys” tab. Copy the function key of the new function and paste it into Notepad.

Set Azure Function App Environment variables
Move to the main page of the Function App. Go to ‘Settings/Environmental variables‘
We will have to input 3 environmental variables into the Azure Function App.
AUTO_ADD_SIGNATURE_ON_NEW_MESSAGE | Set this value to TRUE. |
AUTO_ADD_SIGNATURE_ON_REPLY_MESSAGE | Set this value to TRUE. |
EXCHANGE_ORGANIZATIONAL_UNIT_ROOT | Copy and paste this value from Notepad. We got this value in one of the previous steps. yourorgvalue.onmicrosoft.com |


Add an authentication identity provider
Go to ‘Settings/Authentication‘ and add ‘Microsoft‘ as the identity provider.

Accept the default settings for most of the values. Choose ‘Secret‘ expiration duration and remind the secret to be renewed.

In ‘Permissions‘, accept default values and click ‘Add‘.

The process will take you to a screen that resembles the image below. Click to open the newly created Identity Provider, which is a standard Entra ID App Registration object.

Click to open the newly created Identity Provider, a standard Entra ID App Registration object.
Copy the “Application (Client) ID” and the “Directory (tenant) ID” to Notepad. You would have already copied the Tenant ID in the previous steps.

Authentication Provider Platform configuration
The authentication provider ‘Microsoft’ is just an ‘app registration’ object in Entra ID. The automatic ‘app registration’ defaults are mostly correct but require a few modifications. Let’s remove the ‘Web‘ platform and replace it with the ‘Mobile and Desktop application‘ platform.

Click on “Add a platform“.

Choose ‘Mobile and desktop applications‘.

Add the following values as redirect URIs and click ‘Configure.’
https://login.microsoftonline.com/common/oauth2/nativeclient |
http://localhost:5453 |

For ‘Allow public client flows,’ select ‘Yes‘ to Enable the following mobile and desktop flows. Click ‘Save‘.

Grant admin consent to the Authentication Provider API
From within the App Registration (Authentication Provider) window, select ‘Manage\API permissions‘. Click on the ‘Grant admin consent‘ button.

Prepare Powershell modules for upload to Azure Function App
Let’s upload the following PowerShell modules to the Function App from your computer. The reason for doing so is simple: The Function App will time-out if the modules were to be downloaded and installed at Function run time.
Install the following modules on your computer. Aim for the latest but stable version.
Az.Accounts | 4.0.2 |
Az.ManagedServiceIdentity | 1.3.0 |
ExchangeOnlineManagement | 3.7.1 |
PowerShellGet | 2.2.5 |
PackageManagement | 1.4.8.1 |
Microsoft.Graph.Users | 2.19.0 |
Microsoft.Graph.Authentication | 2.24.0 |
Some modules might not be required, but we recommend uploading them. These modules will allow you to expand the Azure Function to accommodate your organization-specific needs.
Install the latest or the most appropriate version of each of the above-listed modules on your computer. The newly installed modules will be found at the following location, Assuming the ‘C:’ drive contains your Program Files folder.
C:\Program Files\WindowsPowerShell\Modules
Let’s copy the required modules from the above location to a temp location of your choice.
Look for the required PowerShell modules and copy the module folder to your temporary location. Each module could have one or more versions within subfolders. For the sake of space management, we recommend deleting unnecessary versions.

Compress all of the above folders into a ZIP file and call the ZIP file “PSModules.zip“.

Add references to Powershell modules in the Azure Function App
Open the Azure Function App in the portal. Go to ‘Function/App files‘. Paste the following content into the ‘requirements.psd1′ file. Make sure you use the correct version for each of these modules.
					'Az.Accounts' = '4.0.2'
    'Az.ManagedServiceIdentity' = '1.3.0'
    'ExchangeOnlineManagement' = '3.7.1'
    'PowerShellGet' = '2.2.5'
    'PackageManagement' = '1.4.8.1'
    'Microsoft.Graph.Users' = '2.19.0'
    'Microsoft.Graph.Authentication' = '2.24.0'
Paste the above content under the commented module #’AZ’ = ’13.*’.


Please Save your Function App before you proceed with the setup.
Deploy Powershell modules to the Azure Function App
Upload the ZIP file containing the Powershell modules to the Function App. Open the Function App in the portal and go to ‘Development Tools/Advanced Tools.‘
Clicking ‘Go‘ will open Microsoft KUDU+ Environment.

Click on the ‘Debug console‘ menu item and then ‘PowerShell.‘
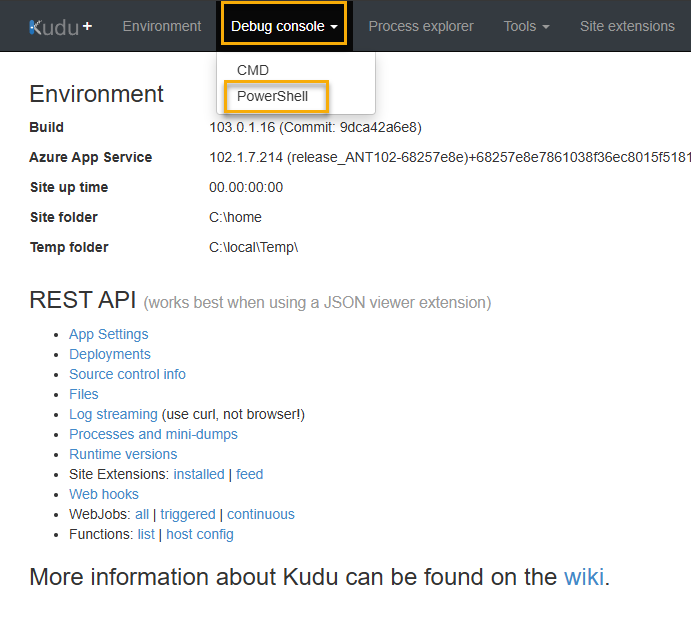
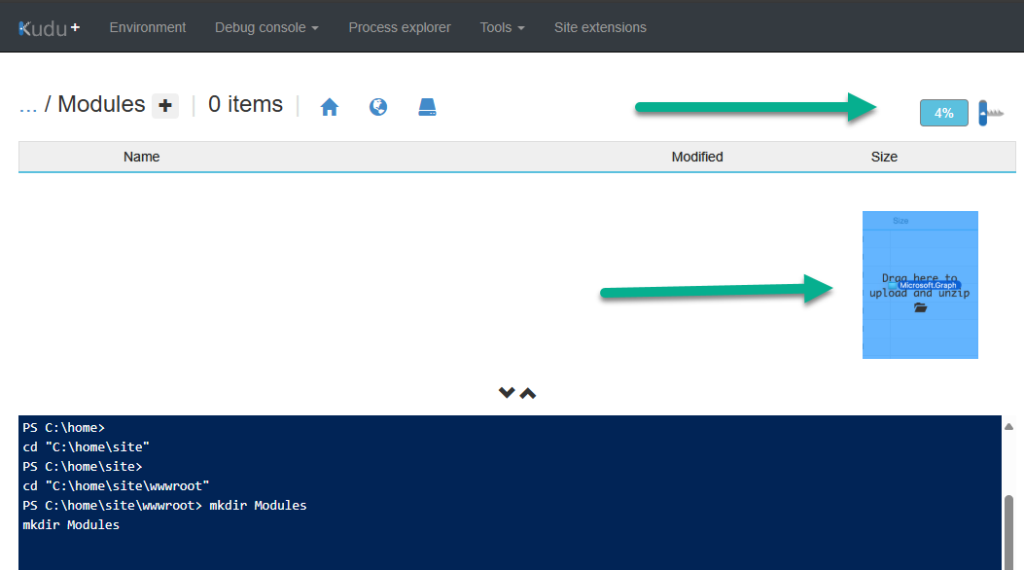
Click on the directory structure at the top. Change directory to ‘site/wwwroot/‘.


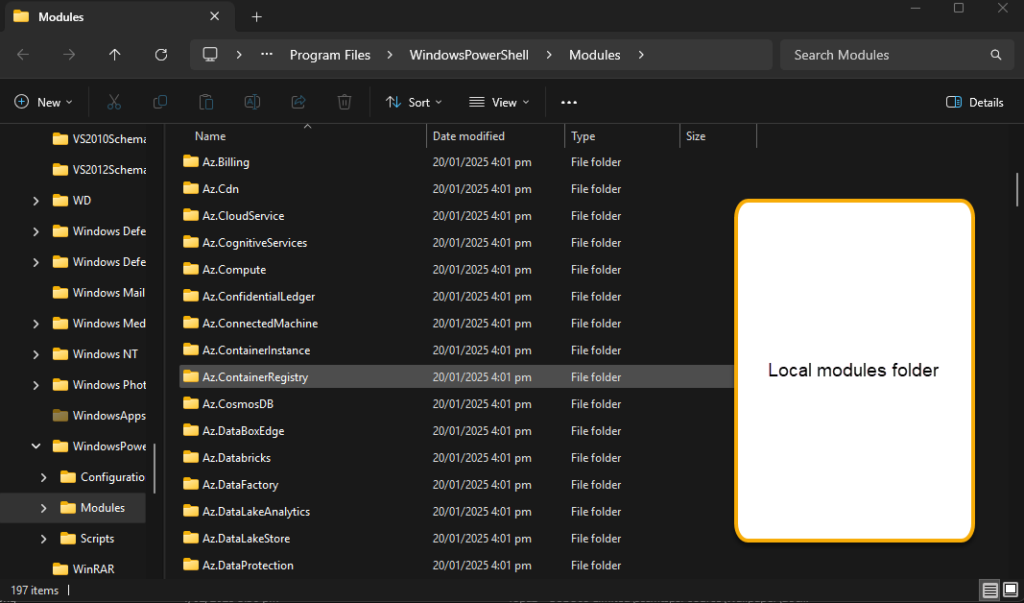
The individual module folders will be placed in this directory. Change the directory into the Modules directory.
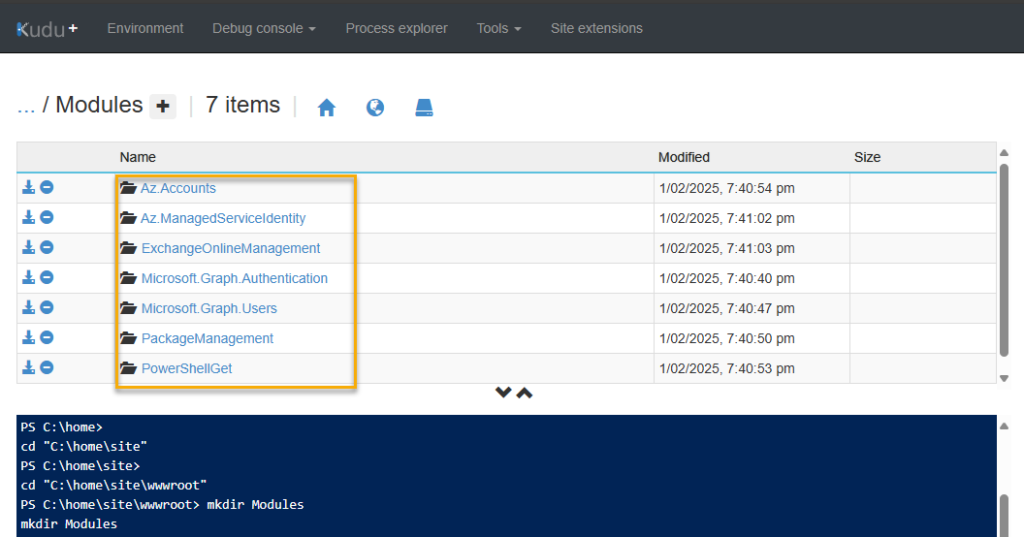
After uploading the Powershell modules, the ‘Modules‘ directory will look similar to the image below.
The Azure function is now ready to receive a request from WPSecure. The rest of the article will explain how to set up a WPSecure package to call the Azure function.
Ensure you save the Notepad file with the necessary inputs for future use. The WPSecure Signature Processing Engine will use the highlighted items to communicate with this Azure Function App.

Deploying shortcut to StartMenu
Users can launch the Web Signature sync by clicking the “WPSecure Signature Data Sync” item on the start menu.

To deploy the shortcut, run the following command as an administrator. Use the values that you captured in Notepad in the following command line.

"C:\Program Files (x86)\wpsecure\wpsecure-set.exe" -defaultdomain wpsecure-user-synced-signature.azurewebsites.net -functionkey bc-pHXD2S1UCnGqyxC6o_R2cCHKZkqMxMGn-Yd_UcCjfAzdghhNAkbUA== -tenantid34-7541-490f-a49a-001234392731f -clientid fa96e21d-a938-4cd3-b5c8-4f6195f8ae345 -createsc -version 5.3.56
To remove the shortcut, run the following command as an administrator.
"C:\Program Files (x86)\wpsecure\wpsecure-set.exe" -smsssc
If you deploy the shortcut using SCCM or Intune, use the version number to evaluate its presence or absence.
					Path : HKLM:SOFTWARE\WPSecure
Name: sssversion
Value: 5.3.56 (The version your are deploying)
Troubleshooting
After a successful setup, the Azure Function App will be triggered when the User launches the process from the StartMenu and authenticates. But getting there is never a straight line. That is when ‘Log stream‘ plays a vital role.
- The User has to authenticate to access the function.
- The StartMenu shortcut must use the correct “function code” to access the function.
- If no logs appear in the “Log steam,” the device has not correctly authenticated to the Function App.
- From within the function, all the PowerShell modules should have been loaded.
- The System assigned managed identity should have access to Exchange Online.
Client-side logs will be in ‘wpsecure-set.log‘ in the ‘%TEMP%’ directory
