WPSecure Beacon gathers login time, boot time, location, and other properties that describe the Who, Where, and When information of Windows 10 and 11 devices. The process runs silently without user intervention.
This article will guide you through setting up an Azure Function with a PowerShell Core runtime stack to collect the below information at preset intervals and publish it to a SharePoint Online list. Although this article focuses on using SharePoint Online, you can modify the PowerShell function to direct the data to your chosen datastore, such as MSSQL, MySQL, Dataverse, etc.
| Details | Variable Name |
|---|---|
| User Principal Name | upn |
| Device Hostname | hostname |
| Operating System and Version | operatingsystem |
| Device Location Latitude | latitude |
| Device Location Longitude | longitude |
| Beacon Launch Time | beaconlaunchtime |
| Device Last Used By User | lastusetime |
| System Boot Time | systemboottime |
| User Last Logon Time | lastlogontime |
| WPSecure Desktop Wallpaper Package Version | bgversion |
| WPSecure Lock Screen Package Version | lsversion |
| WPSecure Signature For New Messages Package Version | signewversion |
| WPSecure Signature For Reply Messages Package Version | sigreplyversion |
| WPSecure Signature For Web Messages Package Version | sigwebversion |
| WPSecure Screensaver Package Version | scrnsaveversion |
| Is Device Pending Reboot? | pendingreboot |
| Is Device Compliant? | compliant |
Prerequisites and Required Expertise
To successfully complete the procedures outlined in this document, the following permissions are required:
- Azure Global Administrator permissions to create and configure the Azure Function App and associated Azure resources.
- SharePoint Online Administrator permissions to create the SharePoint List and to grant the Azure Function’s managed identity the appropriate access to the list.
Execution of the procedures described below requires the involvement of an experienced Azure administrator, particularly one with expertise in Azure API Management (APIM) gateways and Azure Functions. These procedures assume a strong working knowledge of Azure security concepts, identity and access management, and industry-standard cloud networking practices.
Technology touchpoints
WPSecure engine | Collects the required information and then calls on the Azure APIM API. |
Azure APIM API | The backend Azure Function is protected by Azure API Management (APIM). This architecture enables the application of layered security policies that block all traffic except for requests that are explicitly authorized and required. |
The Azure Function | The Azure Function serves as the computational layer within the architecture. It receives input from the WPSecure engine through the Azure API Management (APIM) layer, performs the required data processing and formatting, and persists the resulting data to a SharePoint Online list. For security purposes, the Azure Function should not be directly accessible and should be configured to accept connections only from the Azure APIM endpoint. |
Azure APIM Service
While Azure API Management (APIM) is not the only security control available for protecting Azure Functions, it commonly serves as the primary protective layer. APIM acts as a managed gateway, preventing direct access to backend functions and reducing the risk of unauthorized access or exploitation. In enterprise environments, it is a standard practice to further secure APIM by placing it behind Azure Front Door to provide an additional layer of global edge security, traffic filtering, and resiliency.
For the purposes of this documentation, the Azure API Management Consumption tier is used. However, for production workloads, it is recommended to use the Standard, or Premium tiers. These tiers offer enhanced scalability, reliability, networking options, and advanced operational capabilities that are better suited to enterprise-grade and production environments.
| Security Type | Explanation |
|---|---|
| mTLS (Mutual TLS) | Ensures only clients with a valid client authentication certificate from a trusted CA can connect by validating the full certificate chain. |
| VNet / ExpressRoute | Keeps traffic between clients, the API, and the Azure Function on private network paths, preventing any exposure to the public internet. |
| UPN validation in inbound rules | Inbound policy extracts the UPN from the client certificate's SAN and compares it with the UPN in the request body to ensure identity integrity. |
| Rate limiting | Protects the API and Azure Function by controlling the number of requests a client can send within a defined timeframe, preventing abuse and ensuring fair usage. |
This GitHub file illustrates the structure of the Azure APIM inbound rule and is provided for illustration purposes only. Click here to open the GitHub repository.
We will not cover the detailed implementation or full configuration of an Azure API Management (APIM) service in this document. However, there are a small number of recommended default settings that we strongly suggest configuring out of the box to establish a secure and well‑behaved baseline even during the development and testing phase.
After creating an Azure API Management (APIM) service within your subscription, navigate to Deployment and infrastructure → Custom domains, and set Request client certificate to Yes.
Enabling this setting configures APIM to require the calling client to present a TLS client certificate during the connection handshake. While this configuration does not perform full certificate chain or issuer validation on its own, it ensures that a client certificate is provided before any request is accepted or processed by APIM.
As noted earlier, the APIM Consumption tier—used for the purposes of this demonstration—does not support advanced mutual TLS (mTLS) validation capabilities, such as trusted certificate authority enforcement or full certificate chain validation. For production and enterprise workloads, it is strongly recommended to use a higher‑tier APIM plan (Standard, or Premium), which provides comprehensive mTLS validation, enhanced security controls, and advanced networking features suitable for secure, large‑scale deployments.
During development and testing phases, it is recommended to explicitly allow your current public IP address by adding it to an IP filtering [Allow] rule. This ensures controlled access to the API while avoiding unnecessary exposure during early implementation stages.
The WPSecure engine will consistently present the appropriate client authentication certificate with each request. This enables APIM to enforce the presence of a client certificate and, when higher-tier APIM plans are used, perform full certificate chain validation and trusted issuer verification as part of the request processing pipeline.

Client Authentication Certificate
A Client Authentication SCEP certificate can be deployed either by using an on‑premises or internal Certificate Authority (CA), or by leveraging Microsoft Intune Cloud PKI to issue and deploy the certificate through an Intune SCEP certificate profile.
A client authentication certificate containing the Extended Key Usage (EKU) value Client Authentication (OID 1.3.6.1.5.5.7.3.2) can be used to securely invoke an Azure Function exposed through Azure API Management (APIM) by implementing mutual TLS (mTLS).
In this architecture, the client presents an X.509 certificate that includes the Client Authentication EKU when initiating a TLS connection to the APIM endpoint. APIM enforces the requirement for a client certificate during the TLS handshake and, in supported tiers, validates the certificate against an approved Certificate Authority (CA). Only requests authenticated with a valid client certificate containing the appropriate EKU are allowed to proceed.
Once successfully authenticated, APIM forwards the request to the backend Azure Function. The function itself is not directly exposed to the public internet and relies on APIM as its primary security boundary, thereby reducing the attack surface and centralizing access control and policy enforcement.
It is important to emphasize that while the APIM Consumption tier—used in this article for demonstration purposes—can enforce the presence of a client certificate, it does not support full certificate chain validation or trusted issuer enforcement. For production and enterprise workloads, it is strongly recommended to use a Basic, Standard, or Premium APIM tier, which provides comprehensive mTLS validation, enhanced security capabilities, and greater control over certificate trust and validation policies.
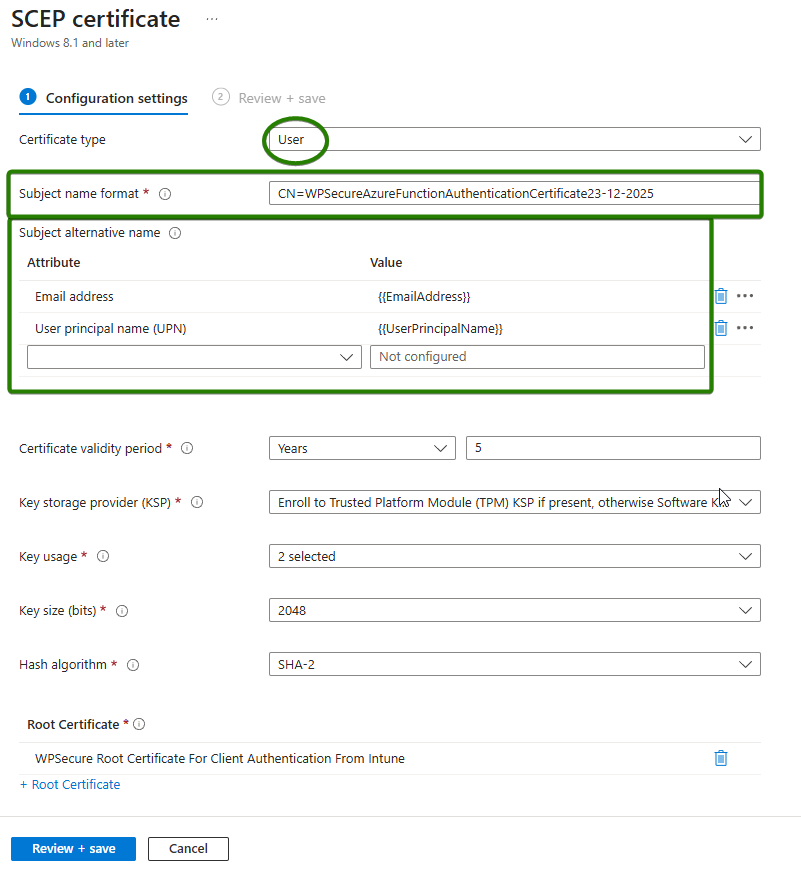
In addition to the required Client Authentication Extended Key Usage (EKU)
(OID 1.3.6.1.5.5.7.3.2), the user’s User Principal Name (UPN) must be included in the certificate’s Subject Alternative Name (SAN) extension.
The UPN can be expressed in the SAN using either of the following supported formats:
- Other Name → Principal Name
- RFC 822 Name
As illustrated in the image below, either method enables explicit binding of the certificate to a specific user or identity.
Before any request is sent to the Azure API Management (APIM) gateway, the WPSecure engine performs a strict identity validation check. Specifically, it verifies that the configured user identifier exactly matches the Principal Name value contained within the certificate’s SAN extension.
If the configured identifier and the SAN Principal Name do not match precisely, the request is immediately blocked and not forwarded to the Azure APIM service. This enforcement ensures that only certificates explicitly issued for the intended user or identity are permitted to initiate API calls, preventing certificate misuse or impersonation.
The Principal Name in the SAN extension should match the UPN output of the following command.
whoami /upn
For ease of administration and reliable certificate selection, it is recommended that the certificate Subject Name (Common Name — CN) clearly reflects its intended purpose and follows a consistent naming convention across all environments and devices.
A well‑defined and standardized CN simplifies operational management, reduces the risk of incorrect certificate selection, and improves traceability during troubleshooting and security audits. In this implementation, the Subject Name (CN) is referenced by command‑line tools to select and present the appropriate client certificate when establishing a connection to the Azure API Management–protected Azure Function, as discussed later in this document.
As a final requirement, the client authentication certificate must be installed in the user’s Personal certificate store. This ensures that the certificate is accessible to the WPSecure engine for initiating authenticated connections to the Azure APIM service.
Create a Function App in Azure Portal
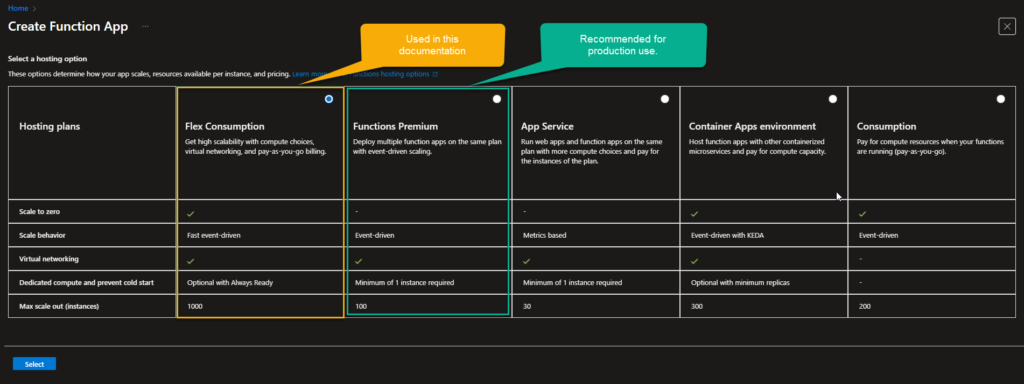
When deploying Azure Functions, it is recommended to use the Premium Plan for production workloads. The Premium Plan provides consistent performance and eliminates cold start behavior, making it well suited for latency‑sensitive and continuously used applications.
The Flex Consumption plan may experience cold starts, which can introduce latency during periods of inactivity. However, if cold start delays are acceptable for your use case, the Flex Consumption plan can also be used as a cost‑effective alternative.
Function Key (Only discussed) | Function keys provide a basic access control mechanism that helps ensure only authorized users or systems can invoke an Azure Function, adding an additional layer of protection. However, function keys alone do not secure a Function App and should not be relied upon as the primary security control. They are most effective when used in combination with other security measures such as network isolation, and API gateway protections (for example, Azure APIM). For the purposes of this demonstration, the Azure Function is secured using a Function Key only. |
Private Network Access Model | By integrating both Azure API Management and the Azure Function App with the same Virtual Network—or peered VNets—traffic between APIM and the Function can be routed entirely through private network paths. This allows the Azure Function to be exposed only via private endpoints or internal addresses, eliminating public endpoint access. |
Having discussed the fundamentals, it is now time to create the Azure Function and make the necessary configuration changes.
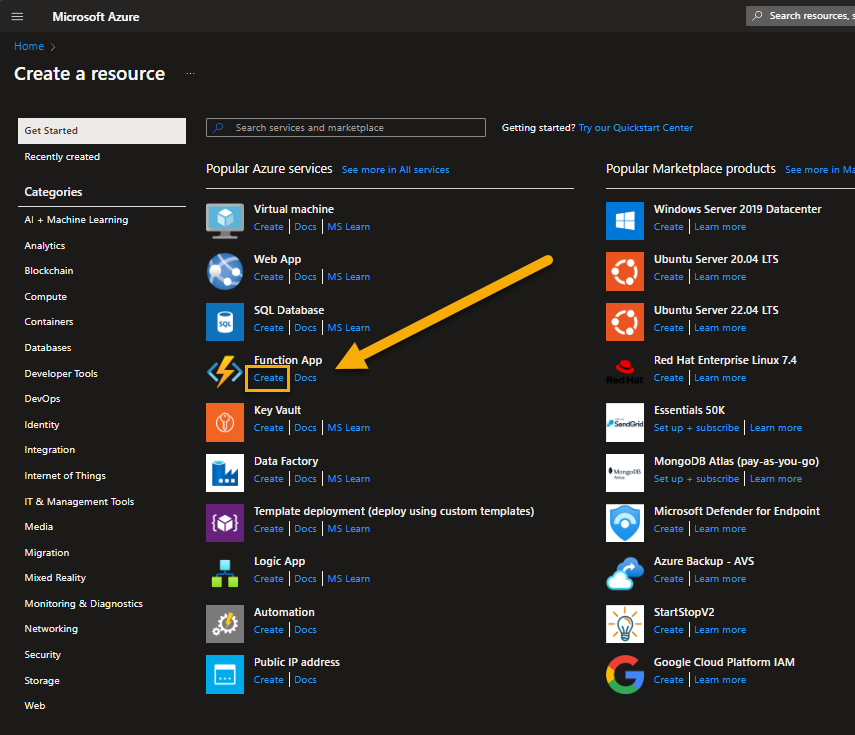
Create a resource in Azure and select ‘Function App‘ as the service type.
Select either Flex Consumption or Function Premium with the Windows OS option. However, select Function Premium to prevent cold starts.
In the next step, please select a name for the beacon.
We recommend using the format wpsecure-beacon-****, where **** is a unique random number specific to your organization (between 4 and 8 digits).
For consistency, use the same number across all other WPSecure-related Azure Functions that you configure.
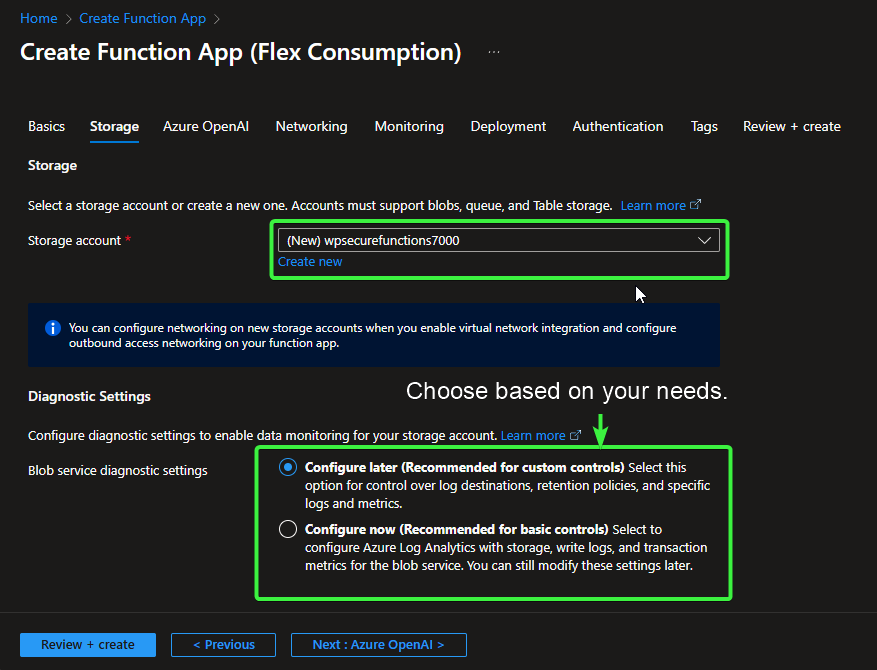
In the next step, select a storage account.
If you already have an existing storage account that meets the requirements, you may choose to reuse it.
To simplify service association and maintain consistency, we recommend incorporating the same unique number from the previous step (e.g., naming the storage account wpsecurefunctions**** or similar, using your chosen 4–8 digit identifier). This helps keep all related WPSecure components easily identifiable and linked.
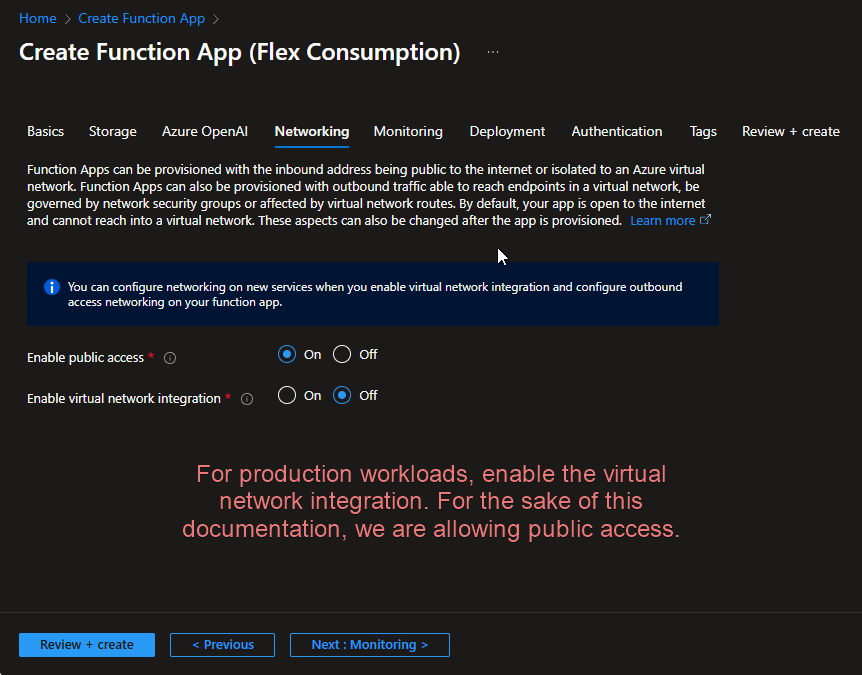
For production systems, do not enable public access to the Azure Function.
If public access is unavoidable during the initial configuration (e.g., due to temporary constraints), you may select Public only for the setup and testing phase.
Once the setup is complete and you have successfully verified that the connections are working correctly:
- Navigate to the Function App settings.
- Enable Virtual Network Integration.
- Select the same Virtual Network (VNet) and subnet used by your Azure API Management (APIM) service.
This configuration ensures that the only inbound connections allowed to the Azure Function are those originating from your Azure APIM service, effectively restricting public exposure in production.
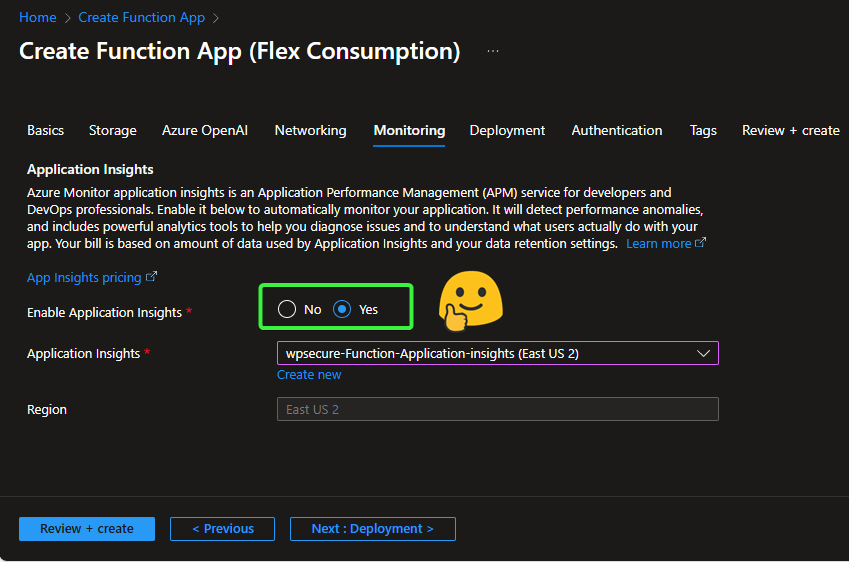
To effectively troubleshoot issues with your Azure Function (e.g., verifying whether requests are reaching it from Azure API Management, identifying processing failures, and taking corrective actions), enable Azure Monitor Application Insights during or after deployment.
Application Insights provides deep visibility into:
- Incoming requests: Track request volume, sources (including APIM), response times, and success/failure rates.
- Request processing details: View end-to-end traces, dependencies, and custom events/logs to understand how the function handles each request.
- Failures and exceptions: Automatically capture failed requests, exceptions, stack traces, and error details for rapid diagnosis.
- Performance anomalies: Detect slow responses, high failure rates, or unusual patterns in real time
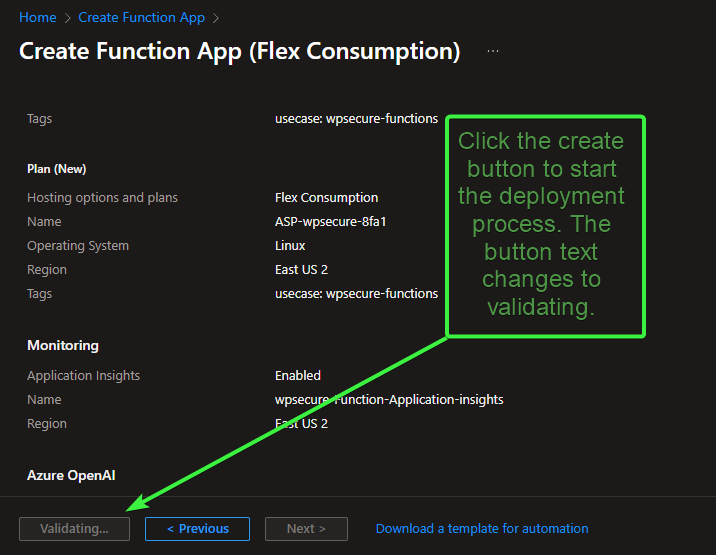
Continuous deployment settings and the tags should be based on your organization’s needs. Finally, review and Create.
When the deployment is complete, go to the resource.
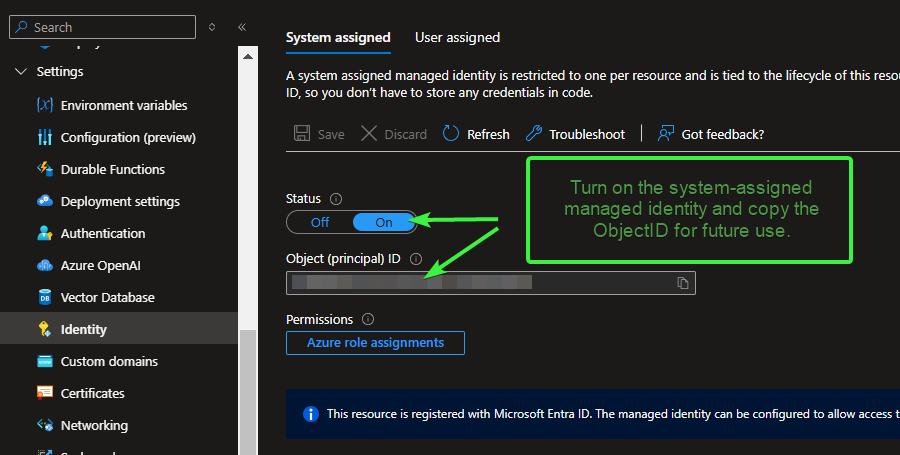
Copy Function App Managed Identity ID
Go to Settings > Identity in the left-hand menu. Under the System assigned tab, set the Status to On. Click Save. After saving, the Object ID (also referred to as the Principal ID) will appear on the same page. Copy this Object (Principal) ID and paste it into Notepad (or your preferred text editor) for use in subsequent steps.
Create SharePoint List and Copy ID's
You need PowerShell 7.4.4 or later to use PnP PowerShell. Read more.
Install-Module PnP.PowerShell -Scope CurrentUser
Run the below PowerShell script to create a SharePoint List. Copy and paste your SiteURL into the below script.
$spSiteURL = "https://Your-SharePoint-Organization.onmicrosoft.com/sites/Your-Site-Name"
$spListName = "WPSecure Beacon Information"
$spListDesc = "Gather infomation about System boot time, User logon time, WPSecure package versions etc."
Connect-PnPOnline -UseWebLogin -Url $spSiteURL
New-PnPList -Title $spListName -Template GenericList
Set-PnPList -Identity $spListName -Description $spListDesc
Add-PnPField -List $spListName -DisplayName "upn" -InternalName "int_upn" -Type Text -AddToDefaultView
Add-PnPField -List $spListName -DisplayName "hostname" -InternalName "int_hostname" -Type Text -AddToDefaultView
Add-PnPField -List $spListName -DisplayName "operatingsystem" -InternalName "int_operatingsystem" -Type Text -AddToDefaultView
Add-PnPField -List $spListName -DisplayName "devicemodel" -InternalName "int_devicemodel" -Type Text -AddToDefaultView
Add-PnPField -List $spListName -DisplayName "beaconlaunchtime" -InternalName "int_beaconlaunchtime" -Type DateTime
Add-PnPField -List $spListName -DisplayName "lastusetime" -InternalName "int_lastusetime" -Type DateTime -AddToDefaultView
Add-PnPField -List $spListName -DisplayName "systemboottime" -InternalName "int_systemboottime" -Type DateTime -AddToDefaultView
Add-PnPField -List $spListName -DisplayName "lastlogontime" -InternalName "int_lastlogontime" -Type DateTime -AddToDefaultView
Add-PnPField -List $spListName -DisplayName "pendingreboot" -InternalName "int_pendingreboot" -Type Boolean -AddToDefaultView
Add-PnPField -List $spListName -DisplayName "location" -InternalName "int_location" -Type Geolocation -AddToDefaultView
Add-PnPField -List $spListName -DisplayName "bgversion" -InternalName "int_bgversion" -Type Text
Add-PnPField -List $spListName -DisplayName "lsversion" -InternalName "int_lsversion" -Type Text
Add-PnPField -List $spListName -DisplayName "signewversion" -InternalName "int_signewversion" -Type Text
Add-PnPField -List $spListName -DisplayName "sigreplyversion" -InternalName "int_sigreplyversion" -Type Text
Add-PnPField -List $spListName -DisplayName "sigwebversion" -InternalName "int_sigwebversion" -Type Text
Add-PnPField -List $spListName -DisplayName "scrnsaveversion" -InternalName "int_scrnsaveversion" -Type Text
Add-PnPField -List $spListName -DisplayName "teamsbgversion" -InternalName "int_teamsbgversion" -Type Text
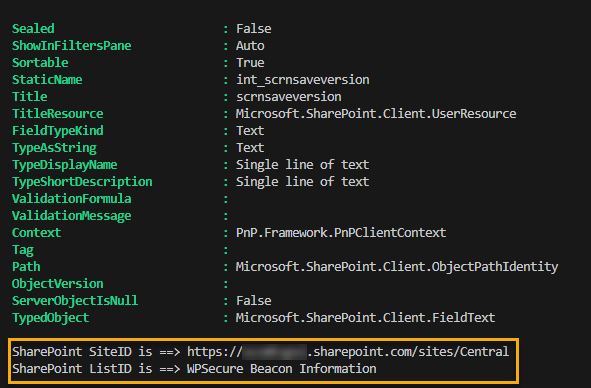
Write-Host "SharePoint SiteID is ==> $($(Get-PnPSite -Includes Id).Url)"
Write-Host "SharePoint ListID is ==> $spListName"
Copy and paste the SharePoint Site URL and the List name from the script output to Notepad.
Grant the required permissions to the Managed Identity.
To grant the Function App’s managed identity permissions for SharePoint Online, you can use the scripts provided below. The Permission process has two parts
- Register a PNP application in Entra ID that will allow you set PnP AzureAD Service Principal App Role.
- Using the PNP App registration ApplicationID (ClientID) you can set the permissions for the Managed Identity.
!! Note: The below commands will only work under PowerShell V7 or greater.
The below command will register a PNP application in Entra ID that will allow you set PnP AzureAD Service Principal App Role.
Register-PnPEntraIDAppForInteractiveLogin -ApplicationName "PnP Permission Setting App" -Tenant "Your-SharePoint-Organization.onmicrosoft.com" -Interactive

Provide necessary consents during the process (Organization wide consent not required). Copy the “AzureAppId/ClientId” from the PowerShell script output. The value for “AzureAppId/ClientId” can also be fetched directly from the new App Registration.
					$principalId = "Copy-From-Notepad" # This is the System Assigned Managed Indetity ID of the Azure Function.
$clientID = "From-Previous-Step" # This is the AzureAppId/ClientId from previous step.
$spSiteURL = "https://Your-SharePoint-Organization.sharepoint.com/sites/Central" # URL for your SharePoint site.

# Connect to SharePoint Online
Connect-PnPOnline -Interactive -Url $spSiteURL -ClientId $clientID

Add-PnPAzureADServicePrincipalAppRole -Principal $principalId -AppRole "Directory.ReadWrite.All" -BuiltInType MicrosoftGraph
Add-PnPAzureADServicePrincipalAppRole -Principal $principalId -AppRole "Sites.FullControl.All" -BuiltInType SharePointOnline
Create a function within the Azure Function App
The deployment method for Azure Functions varies depending on the pricing tier (Consumption, Premium, or Dedicated/App Service Plan). To simplify the process and ensure consistency across all tiers, we have provided a pre-written Function in our GitHub repository.
- Navigate to our GitHub repository – https://github.com/osd365/wpsecure-azure-functions
- Download or clone the repository to your local machine.
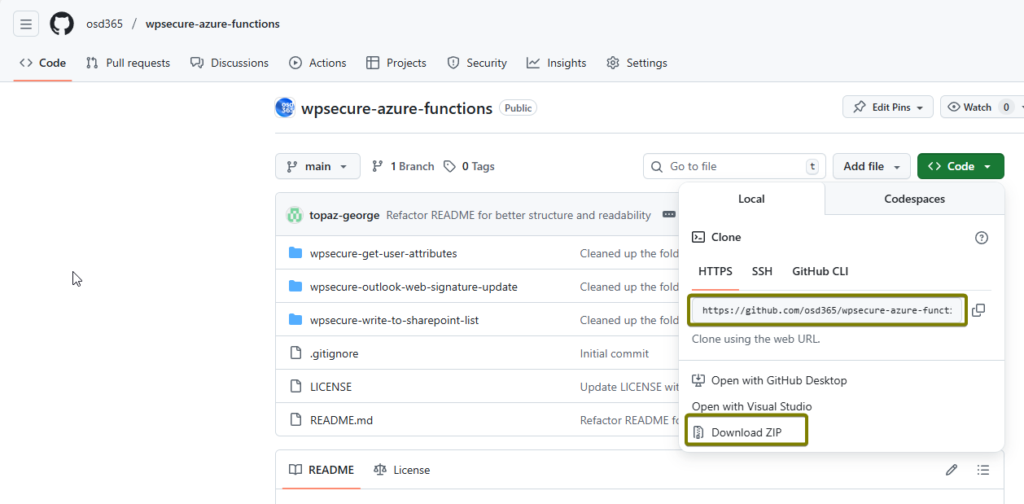
After cloning or extracting the files, the folder structure will look similar to the image below. You will see three functions, each represented by its own folder. Select the folder that is highlighted in the image below.
Change directory to the above displayed directory.
Compress the required contents into a single ZIP archive named beacon.zip.
The beacon.zip file must contain the following items at the root level of the archive:
- The
beacon/directory - The
modules/directory - The
host.jsonfile - The
profile.ps1file
Ensure that these files and folders are included directly in the ZIP package and not nested within an additional parent directory.
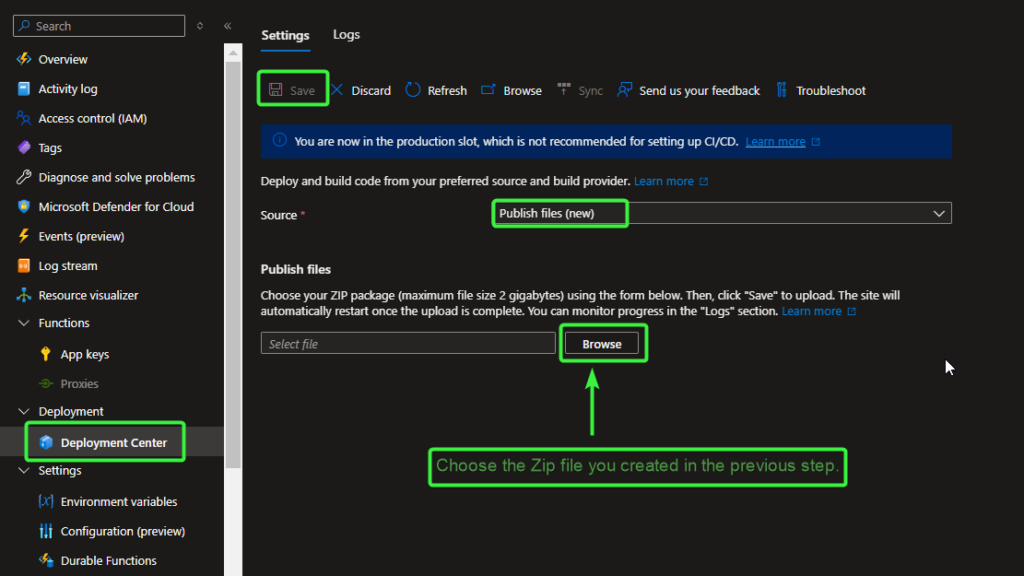
The ZIP file can now be uploaded to your Azure Function. In the Azure portal, navigate to your Function App, then go to Deployment Center. Select Publish Files (New), click Browse, and choose the ZIP file you created in the previous step.
Make sure you click ‘Save‘ to begin the upload and import process.
In the Overview tab, you should now see your deployed function(s) listed under the Functions section (it may take a few moments to appear).
Click the function name to open its details, navigate to the Code + Test tab to review the PowerShell code in run.ps1, then switch to the Function Keys tab, copy the default function key, and paste it into Notepad (or a secure location) for future use.
					using namespace System.Net
using namespace System.Web

# Input bindings are passed in via param block.
param($Request, $TriggerMetadata)

# Write to the Azure Functions log stream.
Write-Host "A new beacon receive process has started."

#Variable definition

try {
    $upn = $Request.Body.upn
    $hostname = $Request.Body.hostname
    $operatingsystem = $Request.Body.operatingsystem
    $devicemodel = $Request.Body.devicemodel
    $latitude = $Request.Body.latitude
    $longitude = $Request.Body.longitude
    $beaconlaunchtime = $Request.Body.beaconlaunchtime
    $lastusetime = $Request.Body.lastusetime
    $systemboottime = $Request.Body.systemboottime
    $lastlogontime = $Request.Body.lastlogontime
    $bgversion = $Request.Body.bgversion
    $lsversion = $Request.Body.lsversion
    $signewversion = $Request.Body.signewversion
    $sigreplyversion = $Request.Body.sigreplyversion
    $sigwebversion = $Request.Body.sigwebversion
    $scrnsaveversion = $Request.Body.scrnsaveversion
    $teamsbgversion = $Request.Body.teamsbgversion
    $pendingreboot = $Request.Body.pendingreboot
    $compliant = $Request.Body.compliant

    Write-Host "######################################################################"
    Write-Host "A beacon with the following information was received."
    Write-Host "User Principal Name:$upn"
    Write-Host "Device Hostname:$hostname"
    Write-Host "Operating System and Version:$operatingsystem"
    Write-Host "Device Model and Manufacturer:$devicemodel"
    Write-Host "Device Location Latitude:$latitude"
    Write-Host "Device Location Longitude:$longitude"
    Write-Host "Beacon Launch Time:$beaconlaunchtime"
    Write-Host "Device Last Used By User:$lastusetime"
    Write-Host "System Boot Time:$systemboottime"
    Write-Host "User Last Logon Time:$lastlogontime"
    Write-Host "WPSecure Desktop Wallpaper Package Version:$bgversion"
    Write-Host "WPSecure Lock Screen Package Version:$lsversion"
    Write-Host "WPSecure Signature For New Messages Package Version:$signewversion"
    Write-Host "WPSecure Signature For Reply Messages Package Version:$sigreplyversion"
    Write-Host "WPSecure Signature For Web Messages Package Version:$sigwebversion"
    Write-Host "WPSecure Screensaver Package Version:$scrnsaveversion"
    Write-Host "WPSecure Teams Backdrop Package Version:$teamsbgversion"
    Write-Host "Is Device Pending Reboot?:$pendingreboot"
    Write-Host "Is Device Compliant?:$compliant"
    Write-Host "######################################################################"

    #SharePoint ID's stored in Environmental Variables

    $SHAREPOINT_SITE_URL = $env:SHAREPOINT_SITE_URL
    $SHAREPOINT_LIST_NAME = $env:SHAREPOINT_LIST_NAME

    if ((-not [string]::IsNullOrWhiteSpace($SHAREPOINT_SITE_URL)) -and (-not [string]::IsNullOrWhiteSpace($SHAREPOINT_LIST_NAME))) {
        $internalbeaconlaunchtime = try { ([datetime]$beaconlaunchtime).ToUniversalTime().ToString("o") } catch { "1900-01-01T00:00:00Z" }
        $internallastusetime      = try { ([datetime]$lastusetime).ToUniversalTime().ToString("o") } catch { "1900-01-01T00:00:00Z" }
        $internalsystemboottime   = try { ([datetime]$systemboottime).ToUniversalTime().ToString("o") } catch { "1900-01-01T00:00:00Z" }
        $internallastlogontime    = try { ([datetime]$lastlogontime).ToUniversalTime().ToString("o") } catch { "1900-01-01T00:00:00Z" }
        $internallatitude = try { [double]::Parse($latitude) } catch { 0.0 }
        $internallongitude = try { [double]::Parse($longitude) } catch { 0.0 }
        $internalupn = $upn
        $internalhostname = $hostname
        $internalTitle = "$internalupn ON $hostname"
        $internaloperatingsystem = $operatingsystem
        $internaldevicemodel = $devicemodel
        $internalbgversion = $bgversion
        $internallsversion = $lsversion
        $internalsignewversion = $signewversion
        $internalsigreplyversion = $sigreplyversion
        $internalsigwebversion = $sigwebversion
        $internalscrnsaveversion = $scrnsaveversion
        $internalteamsbgversion = $teamsbgversion
        $internalpendingreboot = try { [bool]::Parse($pendingreboot) } catch { $false }
        $internalcompliant = try { [bool]::Parse($compliant) } catch { $false }

        $fieldValues = @{
            "Title" = "$internalTitle"
            "int_upn" = "$internalupn"
            "int_hostname" = "$internalhostname"
            "int_operatingsystem" = "$internaloperatingsystem"
            "int_devicemodel" = "$internaldevicemodel"
            "int_beaconlaunchtime" = "$internalbeaconlaunchtime"
            "int_lastusetime" = "$internallastusetime"
            "int_systemboottime" = "$internalsystemboottime"
            "int_lastlogontime" = "$internallastlogontime"
            "int_bgversion" = "$internalbgversion"
            "int_lsversion" = "$internallsversion"
            "int_signewversion" = "$internalsignewversion"
            "int_sigreplyversion" = "$internalsigreplyversion"
            "int_sigwebversion" = "$internalsigwebversion"
            "int_scrnsaveversion" = "$internalscrnsaveversion"
            "int_teamsbgversion" = "$internalteamsbgversion"
            "int_pendingreboot" = "$internalpendingreboot"
            "int_compliant" = "$internalcompliant"
            "int_location" = "POINT($internallongitude $internallatitude)"
        }

        Connect-PnPOnline -ManagedIdentity -Url $SHAREPOINT_SITE_URL -Debug

        Write-Host "Checking if a record exist for the UPN and HOSTNAME combination."

        $existingItemSearchQuery = "<View><Query><Where><And><Eq><FieldRef Name='int_hostname' /><Value Type='Text'>$internalhostname</Value></Eq><Eq><FieldRef Name='int_upn' /><Value Type='Text'>$internalupn</Value></Eq></And></Where></Query></View>"

        $existingItem = Get-PnPListItem -List $SHAREPOINT_LIST_NAME -Query $existingItemSearchQuery -Debug

        if ($existingItem) {
            Write-Host "Record exist for the UPN and HOSTNAME combination. Existing record will be updated."
            Set-PnPListItem -List $SHAREPOINT_LIST_NAME -Identity $existingItem.Id -Values $fieldValues -Debug
        }
        else {
            Write-Host "Record does not exist for the UPN and HOSTNAME combination. New record will be created."
            Add-PnPListItem -List $SHAREPOINT_LIST_NAME -Values $fieldValues -Debug
        }
    } else {
        Write-Host "The environment variables SHAREPOINT_SITE_URL and/or SHAREPOINT_LIST_NAME are not set."
        # NEW: Return a 400 Bad Request when required configuration is missing
        Push-OutputBinding -Name Response -Value ([HttpResponseContext]@{
            StatusCode = [HttpStatusCode]::BadRequest
            Body       = @{ error = "Missing configuration: SHAREPOINT_SITE_URL and/or SHAREPOINT_LIST_NAME are not set." }
            Headers    = @{ "Content-Type" = "application/json" }
        })
        return

    }
}
catch {
    $ex = $_.Exception
    Write-Error "Exception: The process failed. $($ex.Message)"
    Write-Error "Stack Trace: $($ex.StackTrace)" # Uncomment for detailed troubleshooting.
    Write-Error "Inner Exception: $($ex.InnerException)" # Uncomment for detailed troubleshooting.

    # Return a 500 Internal Server Error to the caller
    Push-OutputBinding -Name Response -Value ([HttpResponseContext]@{
        StatusCode = [HttpStatusCode]::InternalServerError
        Headers    = @{ "Content-Type" = "application/json" }
        Body       = @{
            error        = "An error occurred while processing the beacon."
            message      = $ex.Message
            # Optional: include diagnostics when you need them
            # stackTrace   = $ex.StackTrace
            # innerMessage = $ex.InnerException?.Message
            # requestId    = $TriggerMetadata?.InvocationId
        }
    })
}
finally {
    Get-PSSession | Remove-PSSession
}
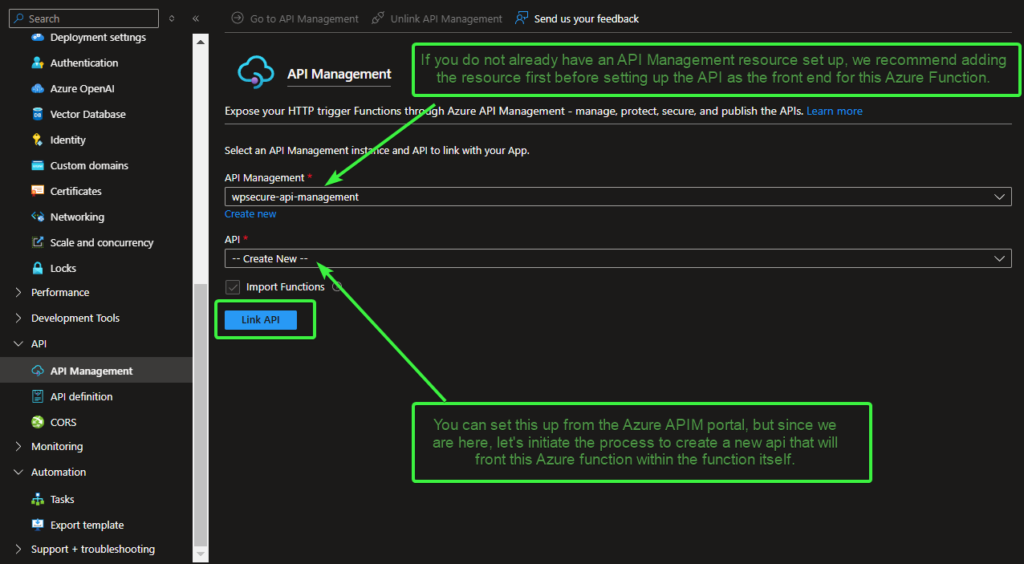
Navigate to the API / API Management section, select the API Management service you created earlier (or an existing one), leave API set to Create new, and on the next screen, accept all the default settings for linking the API. Click Link API.
Set the header value for x-functions-key by using the function key you copied in the previous steps. Click Save.
Click on the Settings tab, copy the Base URL for future use, and then ensure that the Subscription Required option is UNCHECKED. Click Save.
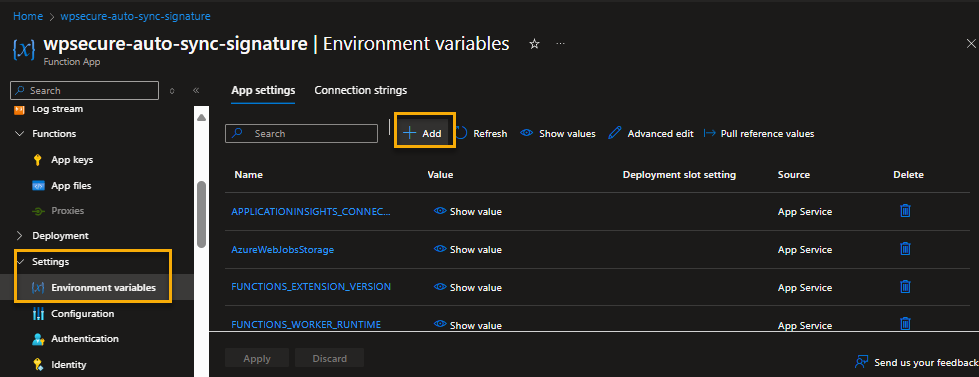
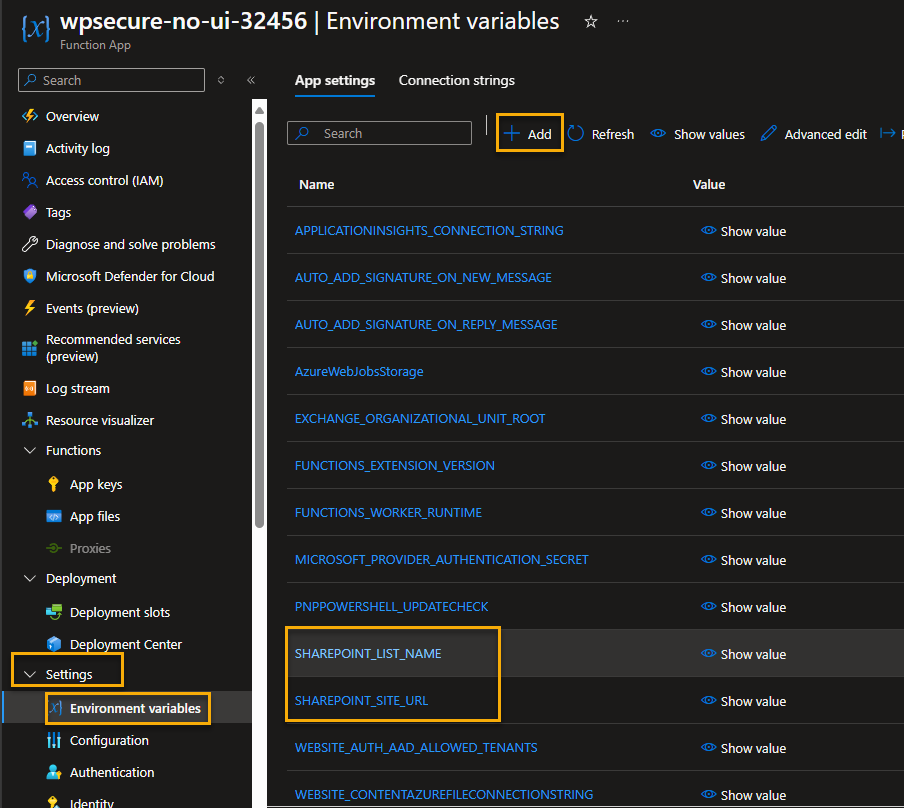
Set Azure Function App Environment variables
Move to the main page of the Function App. Go to ‘Settings/Environmental variables‘
We will have to input 2 environmental variables into the Azure Function App.
SHAREPOINT_SITE_URL | Copy and paste from Notepad where you saved earlier. |
SHAREPOINT_LIST_NAME | Copy and paste from Notepad where you saved earlier. |
Enabling or disabling WPSecure Beacon
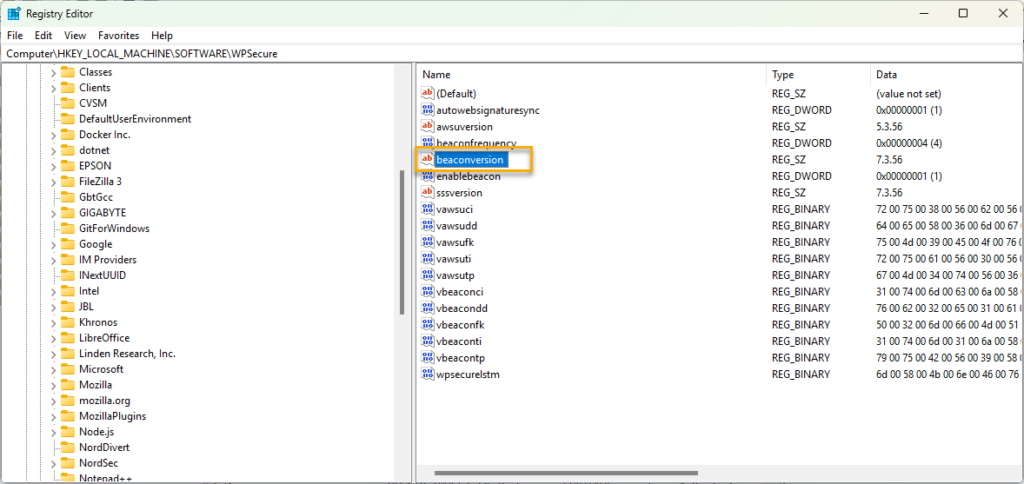
By default, automatic Beacon is disabled. To enable it, run the following command as an administrator. The executable is in the WPSecure application directory within the ProgramFiles (x86) directory.
"C:\Program Files (x86)\wpsecure\wpsecure-set.exe" -beaconuri <https://your-api-base-url-copied-previously> -frequency 2 -subjectname WPSecureAzureFunctionAuthenticationCertificate24 -version 7.3.56
-beaconuri | From notepad copied previously: The base URL of the API |
-frequency | 2 or 4 or 6 or 8 (How often does the beacon fireup) |
-subjectname | The Subject name of the certificate (sometimes called the Subject Common Name) issued by Cloud PKI or your Internal CA. Note: The Subject name should remain the same across all devices, while the Subject Alternative Name (SAN) must contain the UPN of the user. |
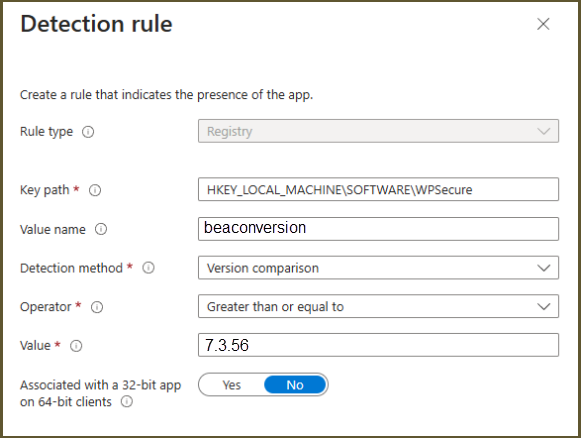
-version | Registry detection after deployment (See below) |
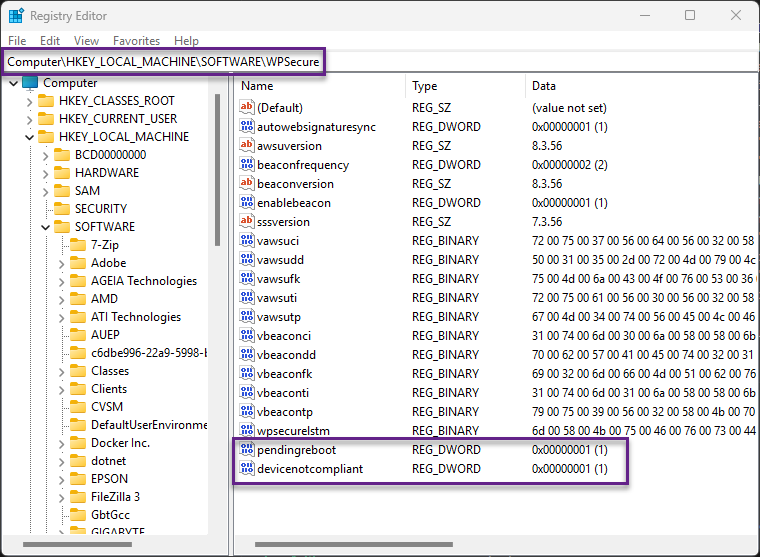
To detect the setting’s presence, set your detection methods to look for the following registry value and use the operator “greater than or equal to” to compare the value as a TYPE: Version.
To disable, run the following command as an administrator.
"C:\Program Files (x86)\wpsecure\wpsecure-set.exe" -dbeacon
Pending Reboot and Device Compliance attributes
WPSecure does not calculate these attributes; these states are just picked up and uploaded by the Becon. Organizations can run their baselines to populate the Registry DWord values below. The Beacon will send the status to SharePoint via the Azure Function.
‘pendingreboot‘ value of 1 would mean the device is pending a reboot, and a ‘devicenotcompliant‘ value of 1 would mean the device is not compliant.
Troubleshooting
After a successful setup, the process runs fully on autopilot at your chosen frequency (2, 4, 6, or 8 hours). However, getting to that point is rarely straightforward—that’s where the Log stream becomes invaluable for troubleshooting.
Common issues to check if things aren’t working as expected:
- Devices must be successfully validated by the Azure APIM Service to access the Function App.
- The APIM Service must use the correct function key (sometimes referred to as the “function code”) to call the function.
- If no logs appear in the Log stream, the device has not successfully authenticated to the Function App.
- Within the function execution, all required PowerShell modules should load successfully.
- The System-assigned managed identity must have the necessary permissions to access Exchange Online.
- The Client Authentication Certificate must contain the user’s UPN in its Subject Alternative Name (SAN).
- The APIM Service must be configured to always Request a client certificate.
Client-side logs will be in ‘wpsecure-set.log‘ in the ‘%TEMP%’ directory.
In summary, the workflow establishes a seamless chain of connections starting from the client-side request, which is routed securely through Azure API Management (APIM) for policy enforcement and traffic management, then invokes the Azure Function to execute custom logic (such as PowerShell scripts for automation), and finally integrates with the SharePoint list to store, retrieve, or update data—ensuring end-to-end efficiency, security, and scalability for your application.
After you have successfully implemented everything covered in this document, ensure you start tightening the security—the as-is setup is not sufficient for a production implementation. Work with your Azure administrator to secure the connection from clients to the Azure APIM Service, as well as the connection between the Azure APIM Service and the Azure Function. After each security enhancement, verify that the solution remains fully functional.