Advanced Management of Desktop Wallpapers, Lock Screens, Outlook Signatures, Teams Backgrounds & Screensavers with Intune and MECM
In this article, you’ll learn how to use Microsoft Intune or MECM to deploy and manage Outlook email signatures, desktop wallpapers, Windows lock screen images, Microsoft Teams backgrounds, and video screensavers. This step‑by‑step guide is ideal for IT administrators looking to optimize Windows device personalization and enforce consistent corporate branding.
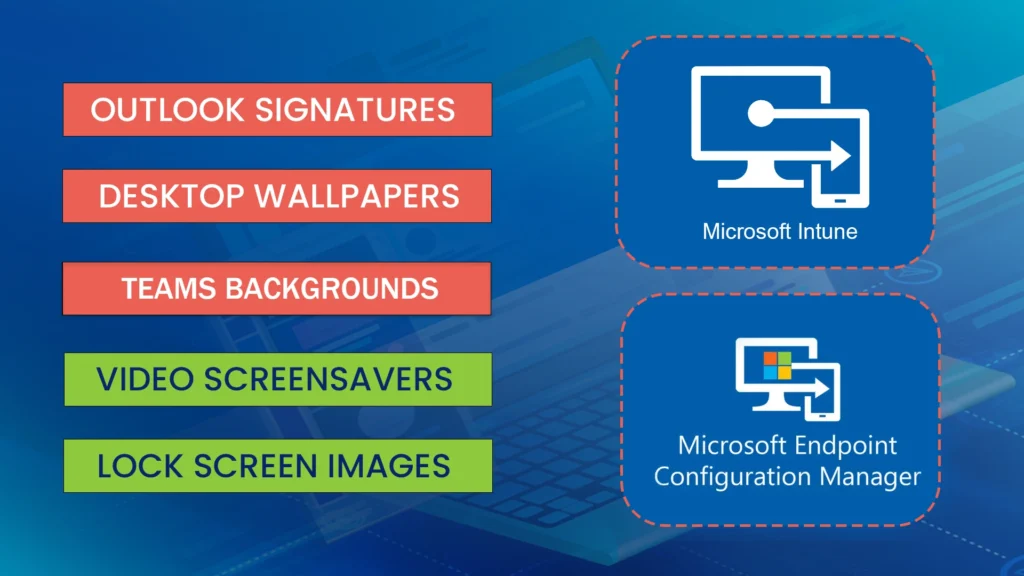
WPSecure Personalization Packager, commonly known as The Windows Branding Tool, enables organizations to create Intune‑ and SCCM‑ready deployment packages that contain Windows branding assets such as wallpapers, lock screens, Outlook signatures, Teams backgrounds, and screensavers. It’s the go‑to solution for centralized Windows personalization management.
Each branding package can include one or more Windows personalization items, giving you full flexibility when deploying corporate branding through Microsoft Intune or Microsoft Endpoint Configuration Manager. Supported items include:
- Outlook email signatures for new, reply, and web messages (HTM, RTF, and TXT formats), compatible with Outlook Classic, Outlook on the Web, and Outlook New.
- Desktop wallpapers for landscape and portrait displays, supporting multiple screen resolutions and orientations with crisp, high‑quality images.
- Video screensavers for landscape and portrait screens, using MP4 video files—perfect for showcasing internal promotional videos across user devices.
- Lock screen images optimized for various resolutions and orientations, ensuring clean, sharp visuals on all Windows devices.
- Microsoft Teams background images, with simple deployment and removal for a seamless user experience.
Design, create, package, and deploy
Now it’s time to begin your journey to storyboard, design, create, package, and deploy the personalization items listed above. The following steps outline the complete process for building and delivering branded Windows user‑experience assets across your organization:
Design and create desktop background images
Craft high‑quality wallpapers in both landscape and portrait formats, optimized for multiple screen resolutions.Design and create Outlook email signatures
Build HTM, RTF, and TXT versions compatible with Outlook Classic, Outlook New, and Outlook on the Web.Design and create video screensavers
Produce engaging MP4‑based screensavers—ideal for internal communications or promotional content.Design and create Windows lock screen images
Create crisp, clear lock screen visuals tailored to various device resolutions and orientations.Design and create Microsoft Teams backdrop images
Develop branded Teams background images to reinforce visual identity during meetings.Create a silent installation package
Use WPSecure Personalization Packager to bundle your assets into a deployable, silent‑install application.Deploy the package using Microsoft Intune
Assign and distribute the package to Windows devices as a Win32 app with Intune.Deploy the package using Microsoft Endpoint Configuration Manager (SCCM)
Publish and manage the package as a standard application through MECM/SCCM for on‑prem or hybrid‑managed devices.
1. Design and create desktop background images.
When designing your Windows personalization images, aim for simplicity, coherence, clarity, and overall quality. Follow the guidelines below to ensure your branding assets display correctly across all devices:
1. Identify Required Resolutions and Orientations
- Determine all screen resolutions used across the organization, including multi‑monitor setups, remote, and work‑from‑home environments.
- Document all screen orientations (landscape and portrait) for each active display in your environment.
2. Supported Wallpaper Resolutions
Ensure your desktop wallpaper designs support the following common resolutions:
- 1080p (Full HD): 1920 × 1080 pixels
- 2K (Quad HD): 2560 × 1440 pixels
- 4K (Ultra HD): 3840 × 2160 pixels
- 5K: Approximately 5120 × 2880 pixels
- 8K: 7680 × 4320 pixels
3. Image Quality Requirements
- Each image file must be under 10 MB.
- Set the image PPI (Pixels Per Inch) to 72 PPI, which is standard for digital displays.
4. Create Image Prototypes
- Design a landscape prototype for your desktop wallpaper.
- Design a portrait prototype for environments that require vertical display layouts.
5. Final Production
Once the prototypes are approved, produce all required versions across the full set of screen resolutions and orientations identified during planning.

Once your internal communications team has approved the initial prototypes, you can proceed with creating the full set of images for all required screen resolutions and orientations. This includes generating both landscape and portrait variations as needed.
If achieving the highest possible image quality is not your primary priority, you may simplify your workflow by producing images only in the following commonly used aspect ratios:
- 16:9 (standard widescreen landscape)
- 9:16 (portrait/vertical orientation)
These aspect ratios cover the majority of modern displays while reducing the total number of image variations you need to create.
The WPSecure wallpaper engine will never stretch or pixelate an image. All image assignments to screens are fitted, not stretched. If your environment has screens with non-standard aspect ratios, make sure you include images that fit those screens. The engine focuses on quality, not convenience.
| Landscape | Portrait | Aspect Ratio | Use % | Class |
|---|---|---|---|---|
| 1920×1080 | 1080×1920 | 16:9 | 24% | FHD (1080p) |
| 1024×768 | 768×1024 | 4:3 | 14% | XGA (4:3) |
| 1536×864 | 864×1536 | 16:9 | 10% | HD (864p) |
| 1366×768 | 768×1366 | 683:384 | 10% | WXGA (HD) |
| 1280×800 | 800×1280 | 8:5 | 7% | WXGA (16:10) |
| 2560×1440 | 1440×2560 | 16:9 | 6% | QHD (1440p) |
| 3840×2160 | 2160×3840 | 16:9 | 5% | 4K UHD (2160p) |
| 1280×720 | 720×1280 | 16:9 | 5% | HD (720p) |
| 1440×900 | 900×1440 | 8:5 | 4% | WXGA+ (16:10) |
| 1280×960 | 960×1280 | 4:3 | 4% | SXGA- (4:3) |
| 1680×1050 | 1050×1680 | 8:5 | 3% | WSXGA+ (16:10) |
| 3440×1440 | 1440×3440 | 43:18 | 2% | UWQHD (21:9) |
| 1920×1200 | 1200×1920 | 8:5 | 2% | WUXGA (16:10) |
| 1600×900 | 900×1600 | 16:9 | 2% | HD+ (900p) |
| 5120×2880 | 2880×5120 | 16:9 | 1% | 5K (2880p) |
| 4096×2160 | 2160×4096 | 256:135 | 1% | DCI 4K (2160p) |
| 2736×1824 | 1824×2736 | 3:2 | 1% | Surface |
| 2560×1600 | 1600×2560 | 8:5 | 1% | WQXGA (16:10) |
| 2560×1080 | 1080×2560 | 64:27 | 1% | UW-FHD (21:9) |
| 2048×1536 | 1536×2048 | 4:3 | 1% | QXGA (4:3) |
| 1920×1440 | 1440×1920 | 4:3 | 1% | 4:3 (HiDPI) |
| 1920×1280 | 1280×1920 | 3:2 | 1% | 3:2 (HiDPI) |
| 1600×1200 | 1200×1600 | 4:3 | 1% | UXGA (4:3) |
| 7680×4320 | 4320×7680 | 16:9 | <1% | 8K UHD (4320p) |
| 1400×1050 | 1050×1400 | 4:3 | <1% | SXGA+ (4:3) |
| 1360×768 | 768×1360 | 85:48 | <1% | WXGA (HD) |
| 1280×1024 | 1024×1280 | 5:4 | <1% | SXGA (5:4) |
| 1280×768 | 768×1280 | 5:3 | <1% | WXGA (15:9) |
| 1280×600 | 600×1280 | 32:15 | <1% | WVGA (Wide) |
| 1152×864 | 864×1152 | 4:3 | <1% | XGA+ (4:3) |
| 1024×1280 | 1280×1024 | 4:5 | <1% | SXGA (5:4) |
| 960×540 | 540×960 | 16:9 | <1% | qHD (540p) |
| 960×1280 | 1280×960 | 3:4 | <1% | SXGA- (4:3) |
| 900×900 | 900×900 | 1:1 | <1% | Square (1:1) |
| 800×600 | 600×800 | 4:3 | <1% | SVGA (4:3) |
After creating the other images, the source folder will resemble the image below.


The images in this folder should be ready to be imported into the WPSecure Personalization Packager. However, before you do that, you need to create templates for Outlook email signatures for ‘web’, ‘new‘, and ‘reply‘ messages, as well as video screensavers, Microsoft Teams backgrounds, and lockscreen images for both landscape and portrait screens.
2. Design and create Outlook email signature templates.
There are three types of Microsoft Outlook Clients.
Outlook Classic: The traditional Office365 Client. This Client comes bundled with Microsoft Word, Microsoft Excel, Microsoft PowerPoint, etc..
Outlook On The Web: This is what used to be called ‘Outlook Web Access‘. All operations happen on the web.
Outlook New: It appears to be a local Outlook Client, but it’s actually ‘Outlook On The Web‘ masquerading as a locally installed application. So treat this as if it were a Web Client.
There are three email signature template formats:
HTM – HTML format: The HTM template is required for both Outlook Classic and Outlook Web/New.
RTF – Rich Text format: The RTF template is only used by Outlook Classic. The RTF template is optional.
TXT – Text format: The Text template is used by both Outlook Classic and Outlook Web/New. The TXT template is optional.
Use the following guidelines when designing and creating Outlook email signature templates. These guidelines apply to all signature types.
The total file size of each signature and its associated assets must not exceed 10 MB. To ensure optimal performance and compatibility, it is recommended to keep HTML file character counts below 25,000 for New and Reply signatures, and below 8,000 for Web signatures.
New Message Signature (Classic Outlook)
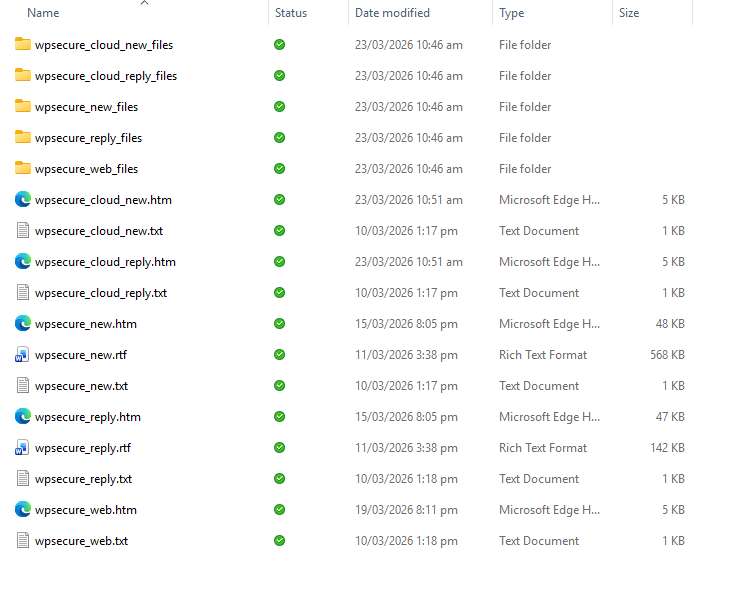
The New Message signature is applied when composing a new message in Outlook Classic. It requires the wpsecure_new.htm file. The wpsecure_new.txt and wpsecure_new.rtf Files are optional.
Microsoft Word is recommended for creating HTM signatures, as it embeds images using VML, ensuring consistent rendering across Outlook clients. When saving the HTM file from Word, any referenced images are automatically stored in a companion folder named wpsecure_new_files. If this folder exists, it will be automatically included in the signature package.
Reply Message Signature (Classic Outlook)
The Reply Message signature is applied when responding to a message in Outlook Classic. It requires the wpsecure_reply.htm file. The wpsecure_reply.txt and wpsecure_reply.rtf files are optional.
As with the New Message signature, Microsoft Word is recommended for authoring the HTM file. Referenced images are automatically stored in a companion folder named wpsecure_reply_files and will be included in the signature package if present.
Web Signature (Exchange Online)
The Web signature is used by organisations that deploy signatures via Exchange Online. It requires the wpsecure_web.htm file. The wpsecure_web.txt file is optional. RTF is not supported for this signature type.
All images referenced in the Web signature must use HTTPS-based URLs. Local image files are not supported by Exchange Online and must not be used. When deployed via Exchange Online, this signature is applied to both new messages and replies.
New Message Cloud Signature (New Outlook & Outlook on the Web)
The New Message Cloud signature is applied when composing a new message in New Outlook or Outlook on the Web (OWA). It requires the wpsecure_cloud_new.htm file and an optional wpsecure_cloud_new.txt.
Microsoft Word is recommended for creating the HTM file; the file must be saved as Web Page, Filtered — unlike the HTM files created for Classic Outlook. Referenced images are automatically stored in a companion folder named wpsecure_cloud_new_files and will be included in the signature package if present.
Reply Message Cloud Signature (New Outlook & Outlook on the Web)
The Reply Message Cloud signature is applied when replying to or forwarding a message in New Outlook or Outlook on the Web (OWA). It requires the wpsecure_cloud_reply.htm file and an optional wpsecure_cloud_reply.txt.
As with the Cloud New signature, the HTM file must be saved from Word as Web Page, Filtered. Referenced images are automatically stored in a companion folder named wpsecure_cloud_reply_files and will be included in the signature package if present.
User attribute placeholders
Placeholders are fields within Outlook signature templates that are automatically populated with user attributes such as first name, last name, and job title. Detailed instructions for configuring placeholders—either interactively or through a silent deployment—are available in the documentation under the Outlook Signature section.
Click the button below to open the documentation page. After reviewing the instructions, return to this page to continue with this article.
After creating the email signature templates with the placeholders, your folder will look similar to the example below.
You can now import all the signature templates into the WPSecure Personalization Packager. However, before you do that, you need to design and create video screensavers, Teams backgrounds, and lockscreen images for both landscape and portrait screens.
3. Design and create video screensavers.
Video screensavers offer a level of clarity, engagement, and impact that static images or slideshow‑based screensavers simply cannot achieve. They are an excellent medium for reinforcing company culture, promoting initiatives, and inspiring teamwork across the organization.
MP4 video files should be created to support the following screen setups:
- Landscape video that will be used if the display screen has a landscape layout.
- A portrait video that will be used if the display has a portrait layout.
Design and produce two MP4 video screensavers: one optimized for landscape displays and the other for portrait displays. Ensure that each video file is under 50 MB, in accordance with the WPSecure Personalization Packager requirements.
The landscape version will play on devices configured with a landscape screen orientation, while the portrait version will display on vertically oriented screens. The graphic below illustrates how the screensaver behaves when deployed on a device with dual monitors—one in landscape and the other in portrait orientation.
You can now import the landscape and portrait-oriented videos into the WPSecure Personalization Packager. However, before you do that, you will need to design and create Microsoft Teams backgrounds and lockscreen images for both landscape and portrait screens.
4. Design and create lockscreen images.
Lock screen images can serve several important purposes within your organization, including:
Organizational branding
Reinforce your company’s identity with consistent visual elements across all Windows devices.Device use disclaimers
Display essential compliance or security messages before a user accesses the device.Seasonal greetings
Share timely, engaging visuals during holidays, awareness months, or internal events.
Traditionally, Windows lock screen images have been designed in a landscape orientation, where the image width is greater than its height. In both Windows 10 and Windows 11, only the main monitor is capable of displaying the lock screen image—secondary monitors do not show it.
With the WPSecure Personalization Packager, you gain greater flexibility. The tool automatically applies a portrait lock screen image when the main monitor is set to portrait mode and a landscape image when the main monitor is set to landscape mode. This ensures the lock screen always appears correctly aligned with the user’s primary display orientation.
As part of your design workflow, create a simple prototype that includes your organization’s logo to validate layout, clarity, and orientation before producing the final versions.
Note: Windows only displays the lock screen image on the Main Screen. Secondary screens do not support lock screen rendering.
You can now import the landscape and portrait-oriented lockscreen images into the WPSecure Personalization Packager. Microsoft Teams backgrounds are the only outstanding items that require design and addition to the Personalization Packager.
5. Design and create Teams backdrop images
You can include multiple Microsoft Teams background images within a single branding package, allowing users to choose from a curated set of organizational backgrounds.
Follow these recommended guidelines when preparing your Teams backdrop images:
Recommended Dimensions
- 1920 × 1080 pixels (standard 16:9 aspect ratio)
File Size
- Keep images as small as possible while maintaining strong visual quality
- Maximum allowed: 25 MB per image
File Type
- Microsoft Teams only accepts .jpg files for custom backgrounds
Naming Convention
- The original filename (without the extension) will appear as the background name inside Teams
- Example:
Boardroom01.jpg→ appears in Teams as Boardroom01
- Example:

You can now import your Microsoft Teams background images into the WPSecure Personalization Packager.
At this stage, you should have all the required personalization assets prepared and ready for packaging, including:
- Desktop wallpaper images
- Outlook email signatures
- MP4 video files for screensavers
- Microsoft Teams background images
- Windows lock screen images
With these elements finalized, you’re now ready to move on to the packaging and deployment phase.
6. Create a silent installation package.
Use the WPSecure Personalization Packager to generate an installation package that includes all your personalization assets—video screensavers, Outlook email signatures, desktop wallpapers, Microsoft Teams backgrounds, and Windows lock screen images.
During this process, the tool will also create a .intunewin installation file, which can be deployed as a Win32 app through Microsoft Intune. This allows you to distribute the package across your Windows devices using standard Intune deployment methods.
Download and install the Windows Branding Tool (WPSecure Personalization Packager) from the Microsoft Store. Once the installation is complete, launch the tool from the Start Menu to begin creating your personalization package.

Agreed to the terms and entered the application.
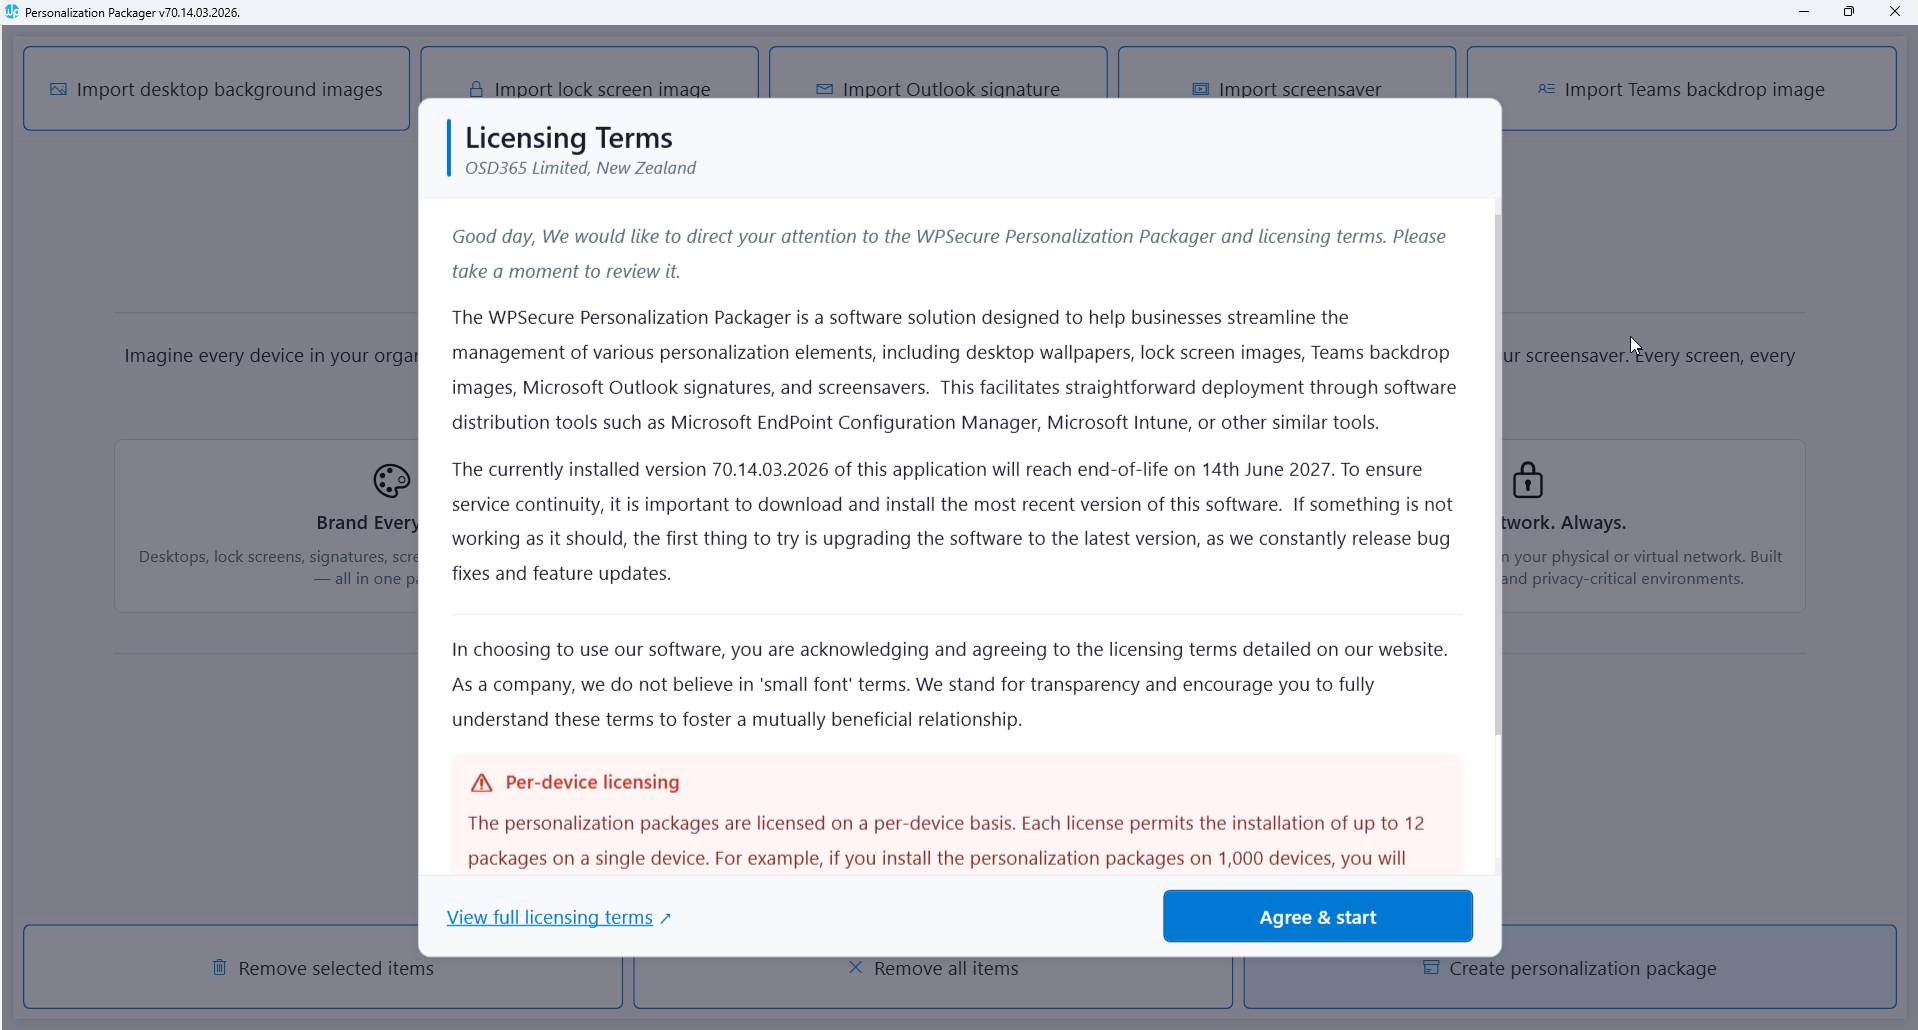
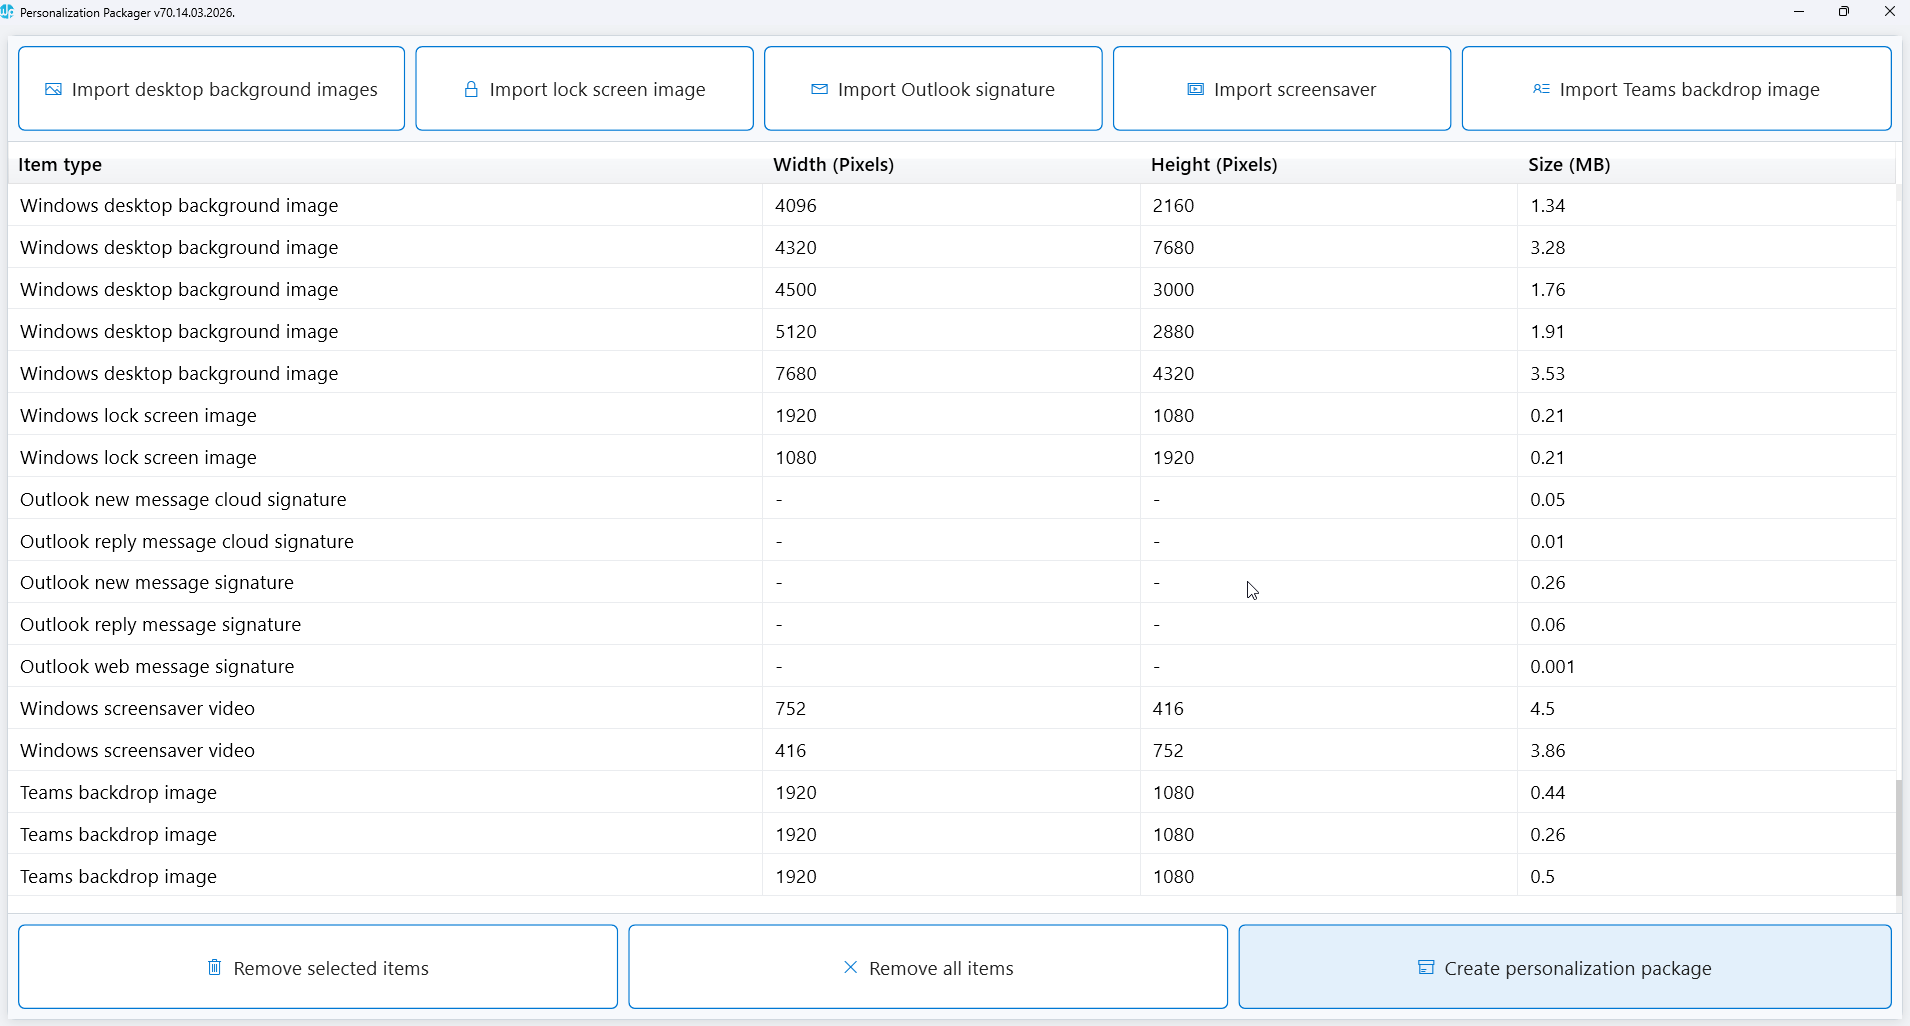
After agreeing to the terms of use, you will be redirected to the application’s main page. The buttons at the top of the page are personalization input buttons, and the buttons at the bottom are action buttons.
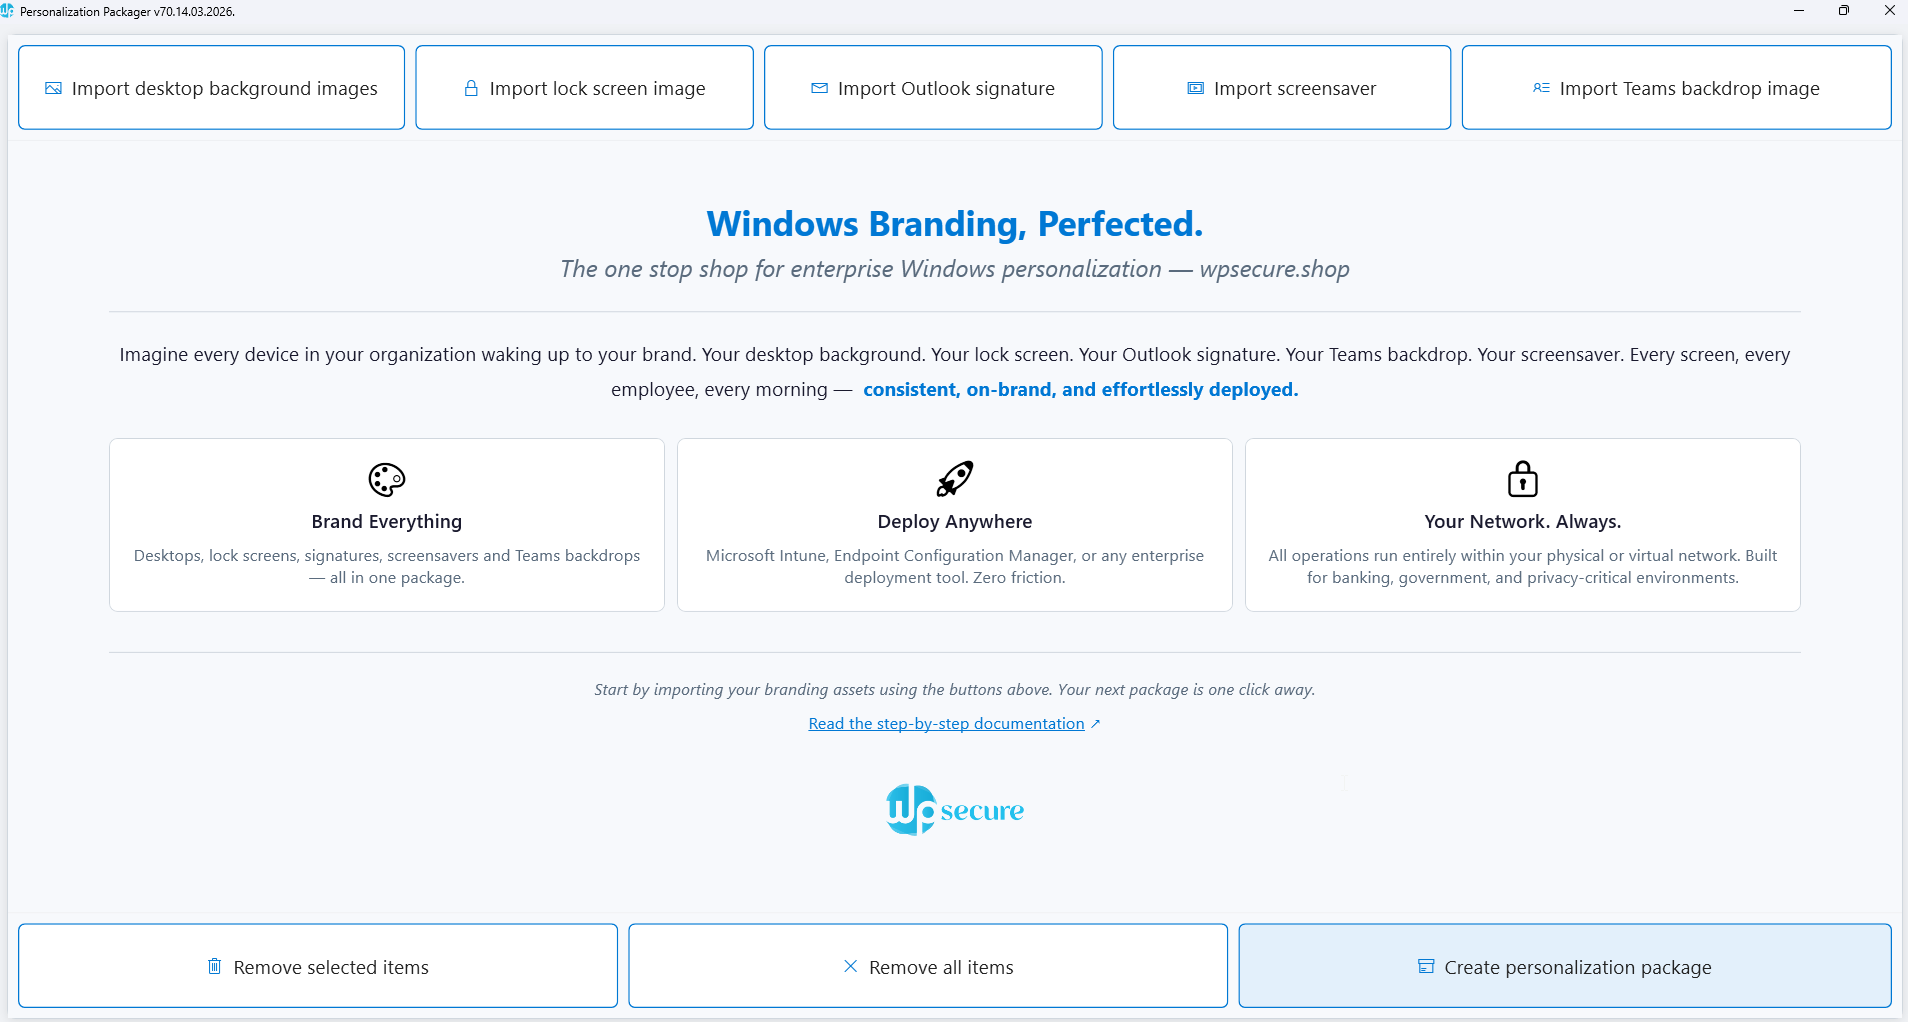
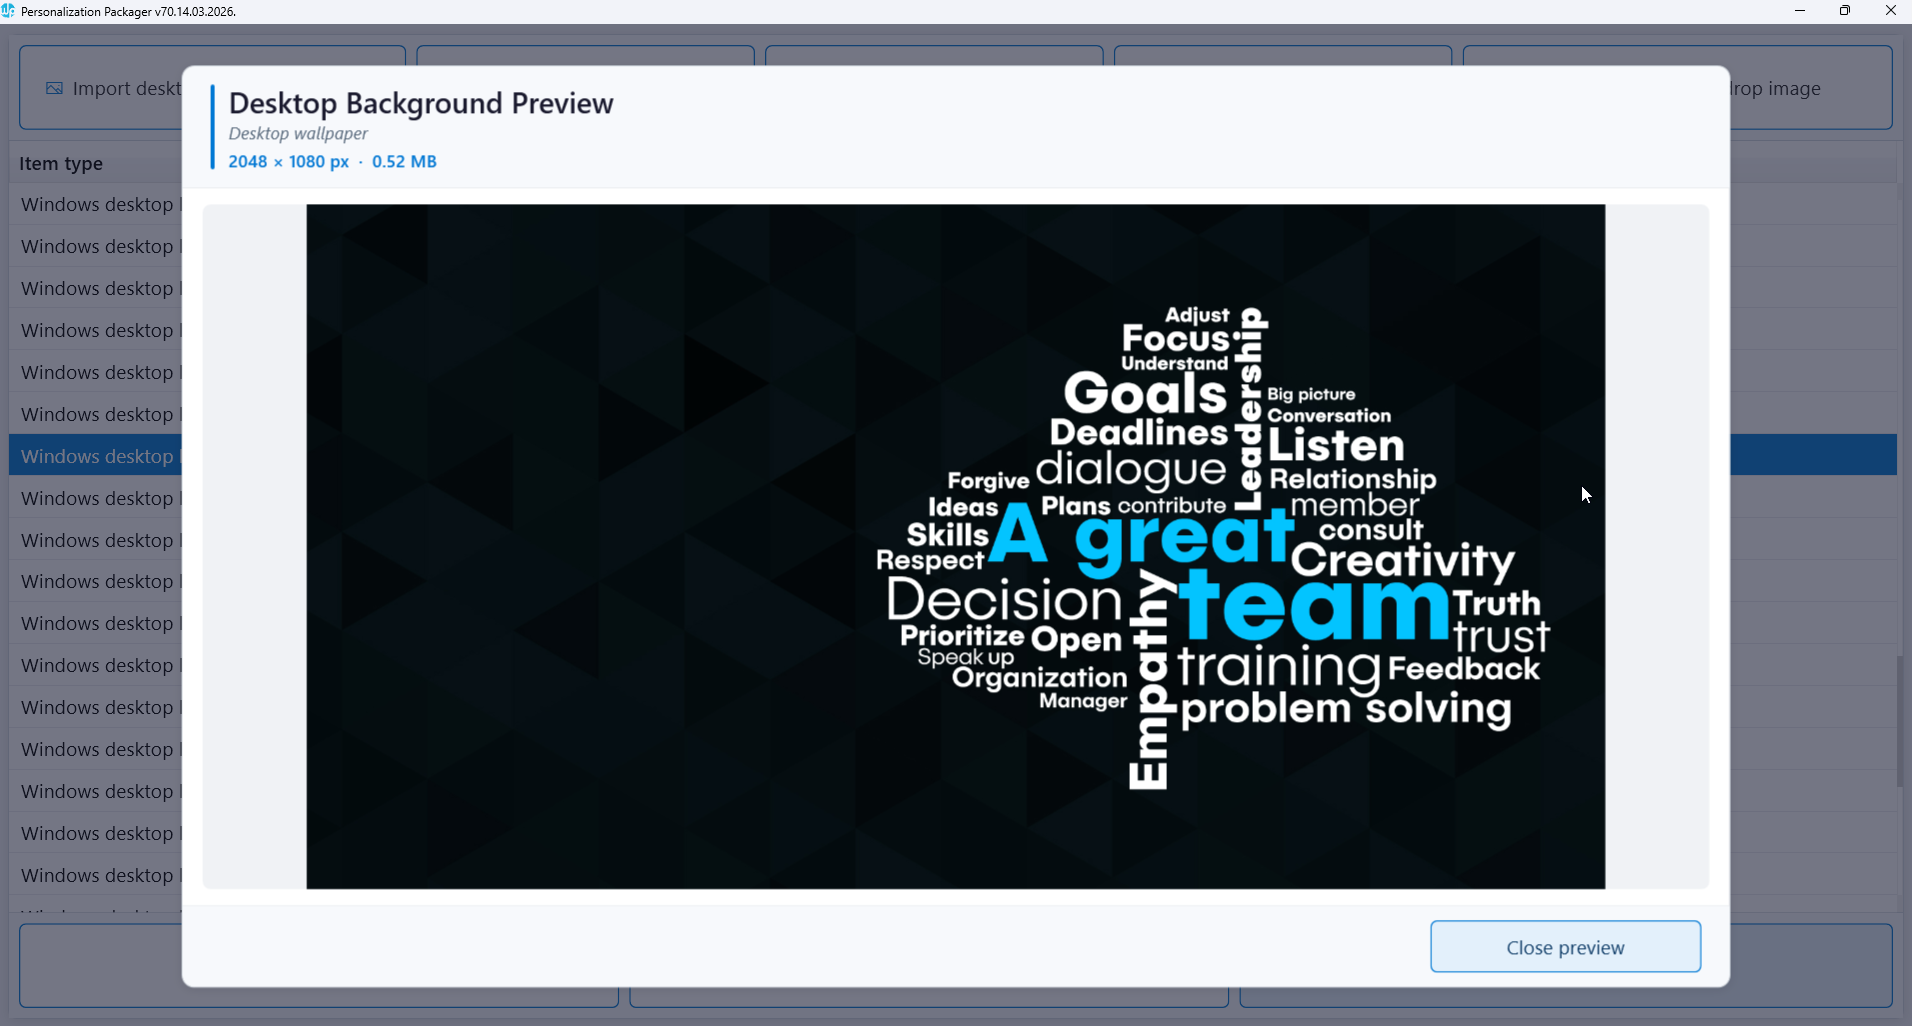
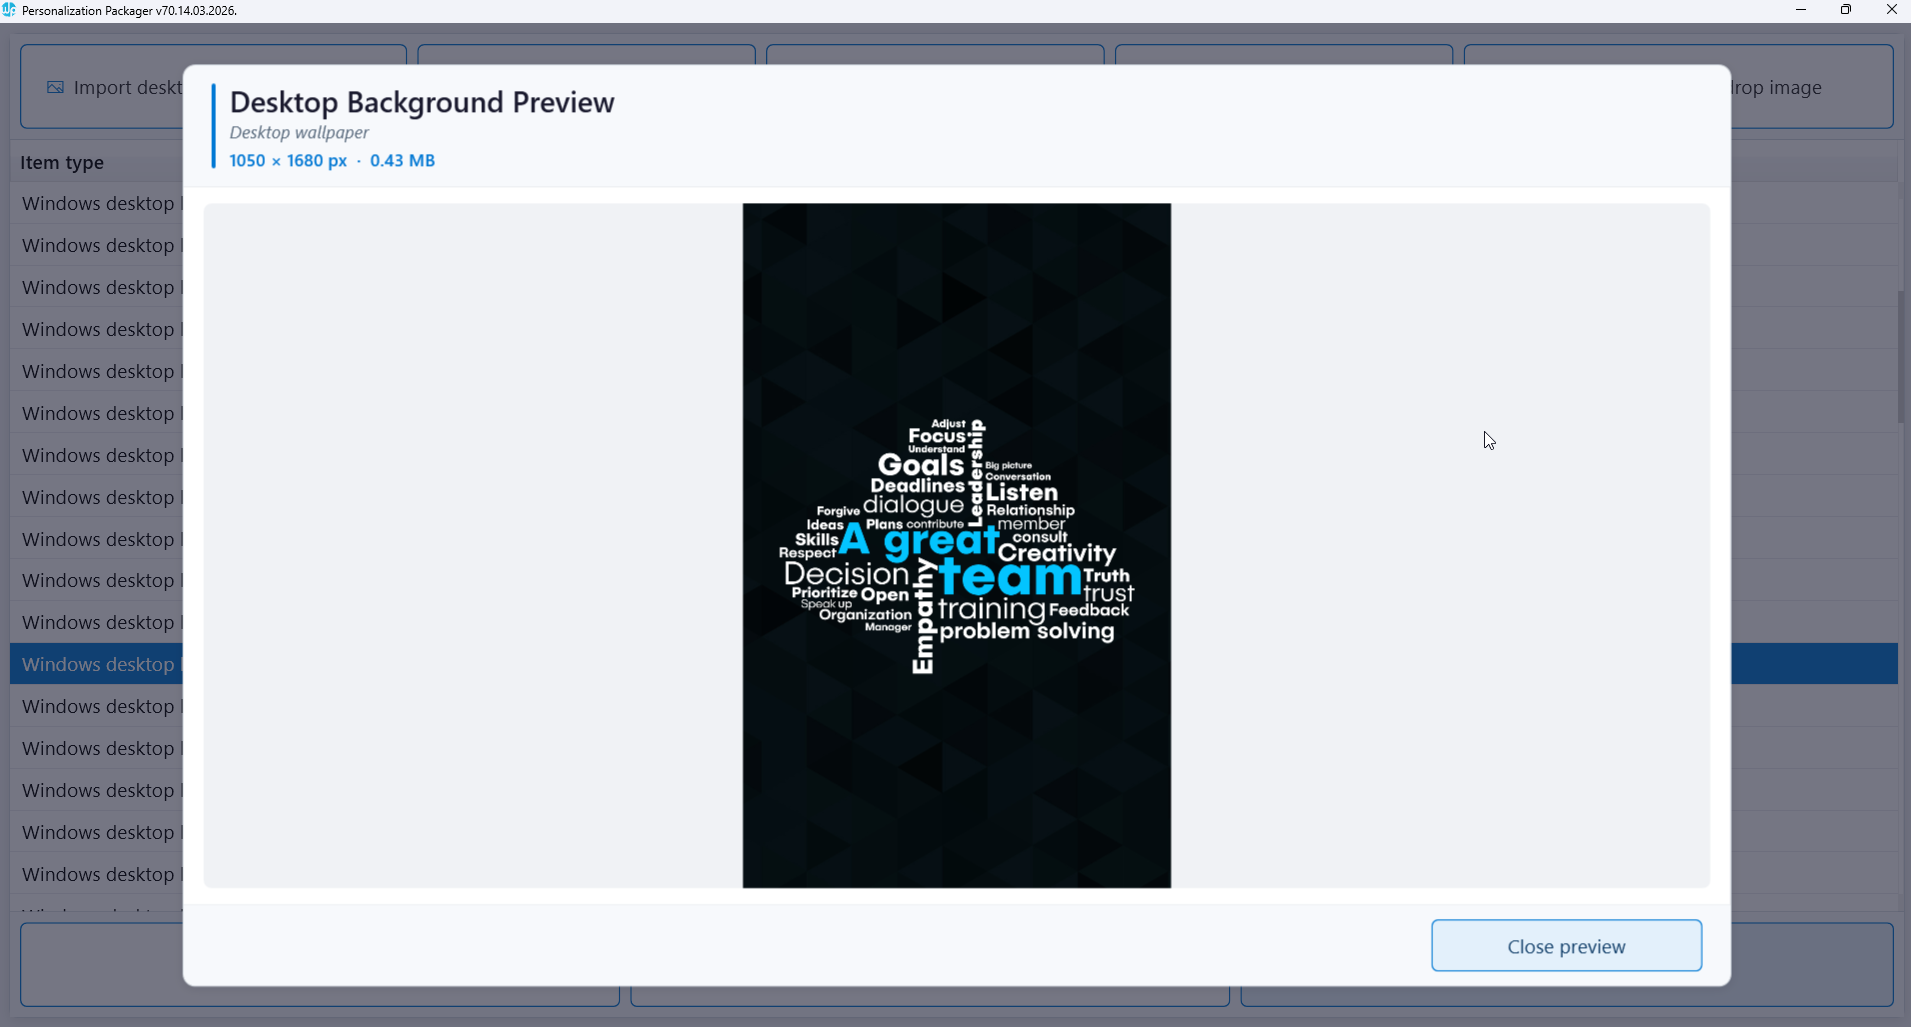
Click the “Import desktop background images” button to begin adding your newly designed wallpaper files. Navigate to the folder that contains your desktop background images, select all relevant files, and click “Open.”
Once the images are imported, the Personalization Packager will display a preview of the selected image, as shown in the example below.
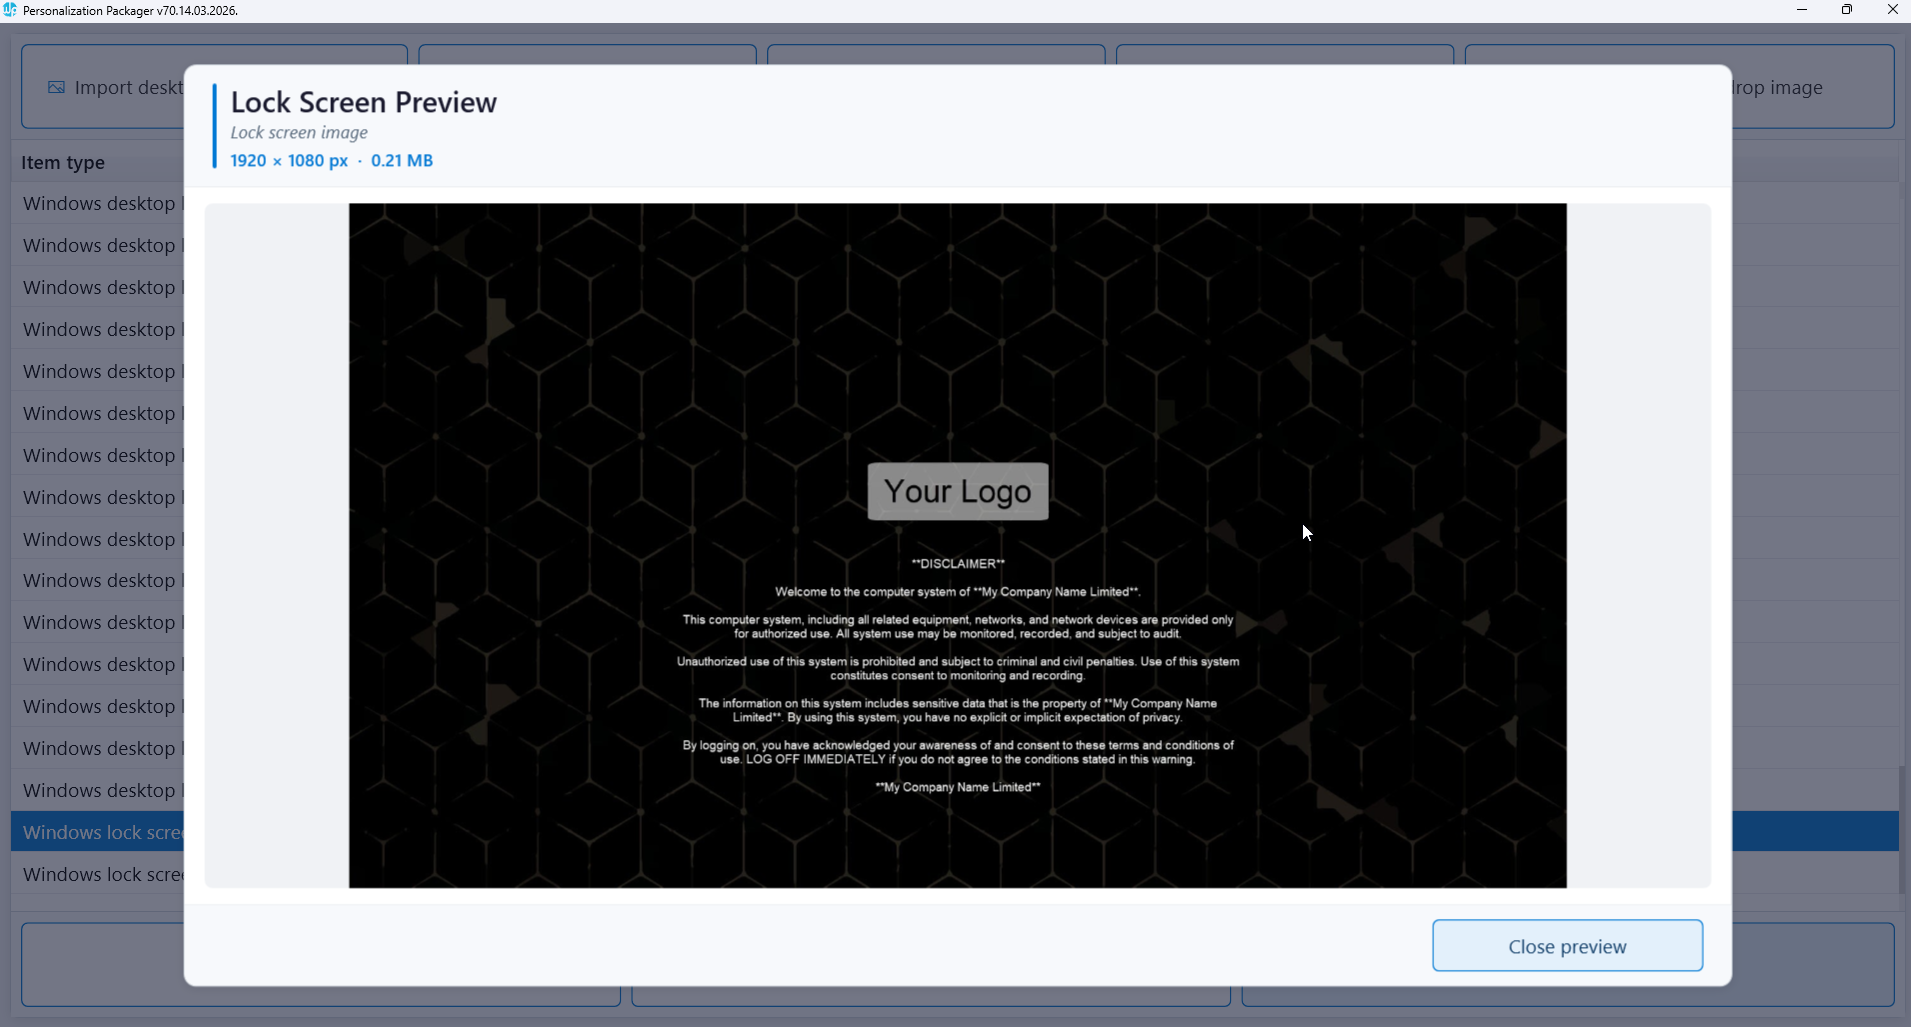
Click the “Import lock screen image” button to add your newly designed lock screen files. Lock screen images must be imported one at a time, so browse to the folder containing your lock screen assets and select each file individually.
In this example, we imported two images—one for landscape (1920 × 1080) and one for portrait (1080 × 1920)—to ensure the lock screen displays correctly regardless of the main monitor’s orientation.

Click the “Import Outlook signature” button to add your newly designed email signatures. Import each signature template—New, Reply, and Web message—one at a time from the folder containing your signature files.
When adding a signature to the WPSecure Personalization Packager, select the HTM file. The tool will automatically detect and include any associated RTF, TXT, and supporting folders (if present).
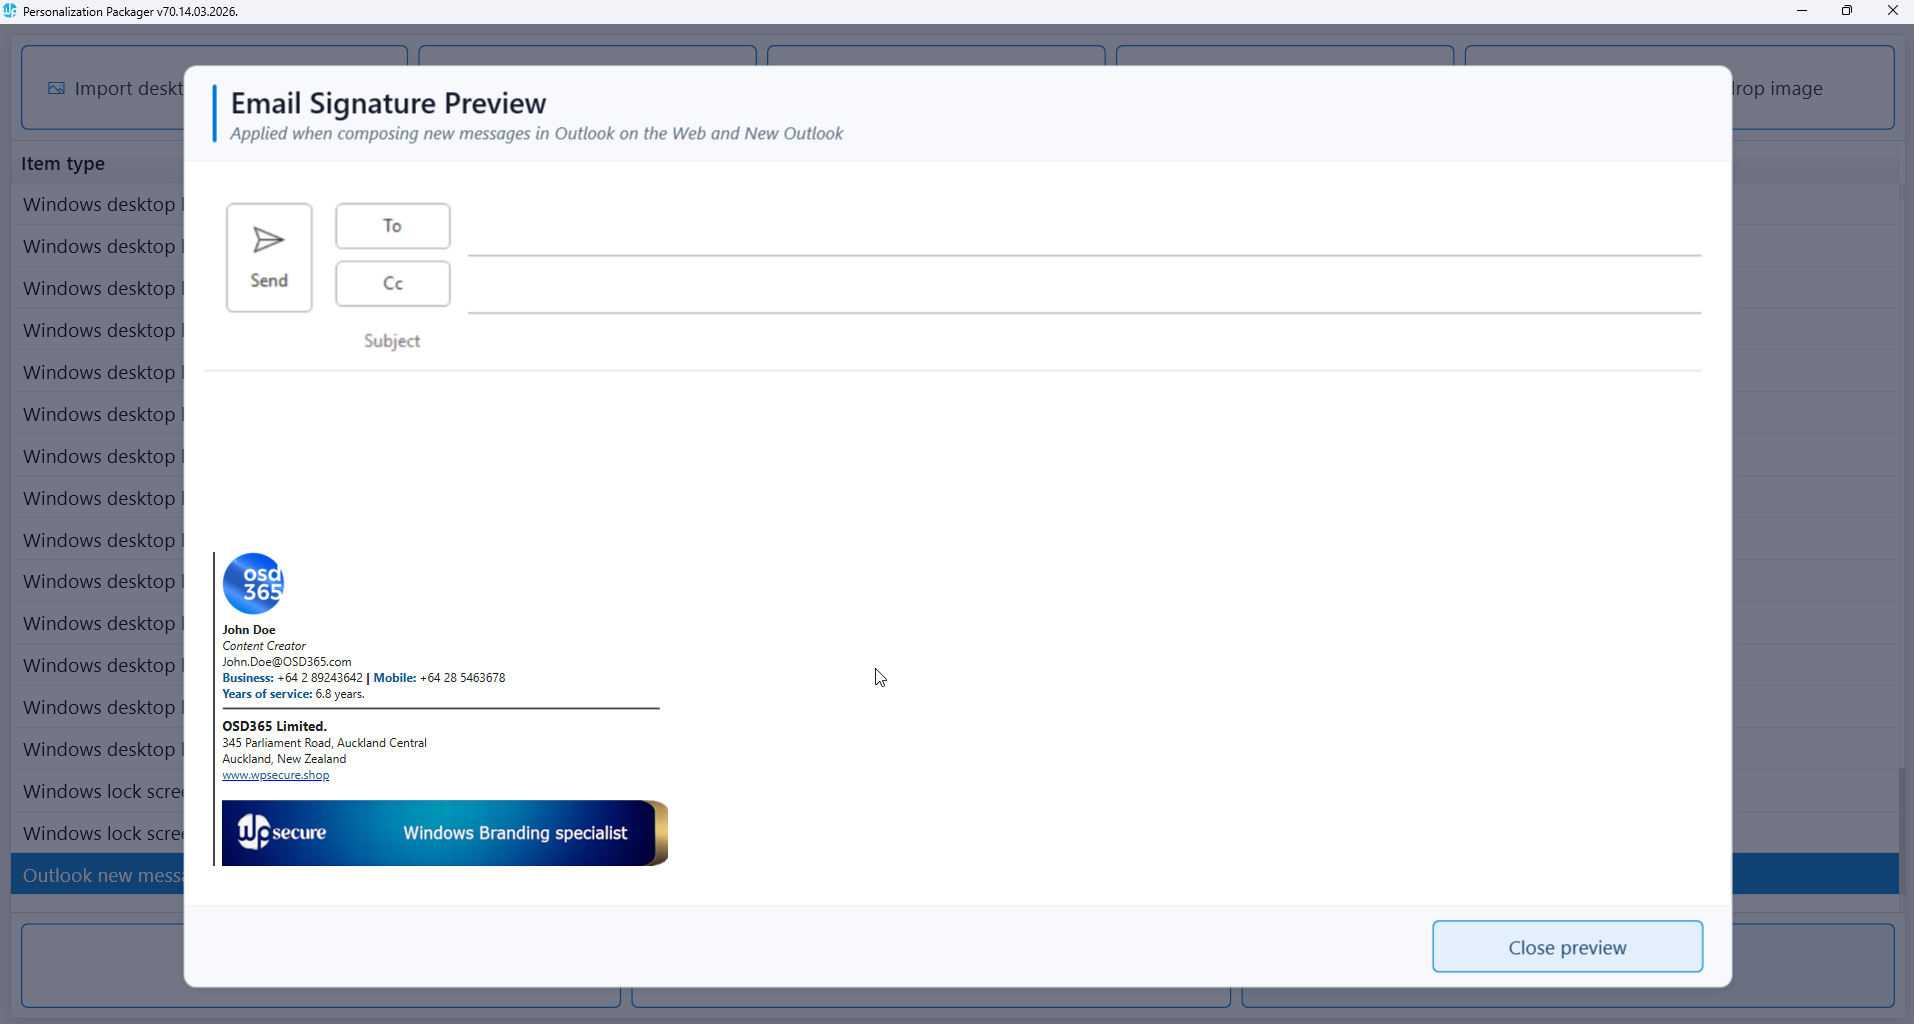
After importing, click on each item in the list to preview the signature within the Packager.
Click on each imported Outlook signature template to verify that the correct versions have been added for New, Reply, and Web messages.
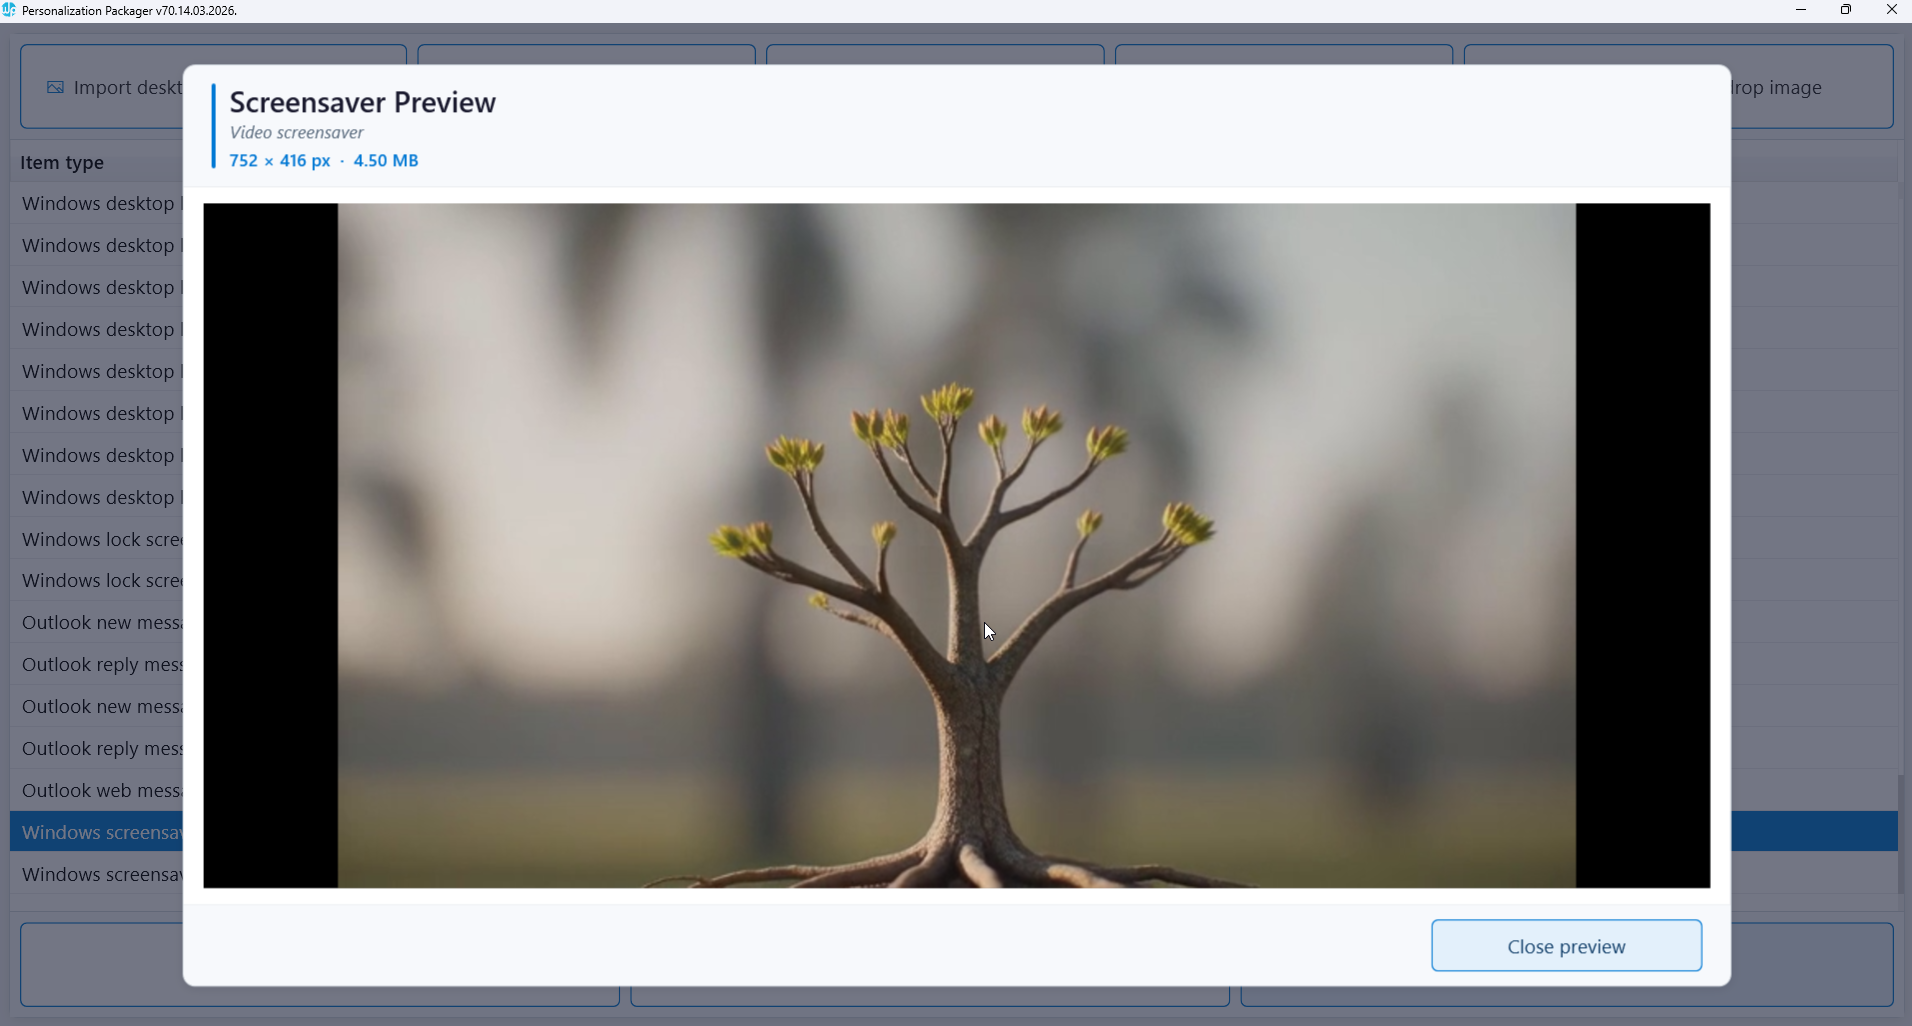
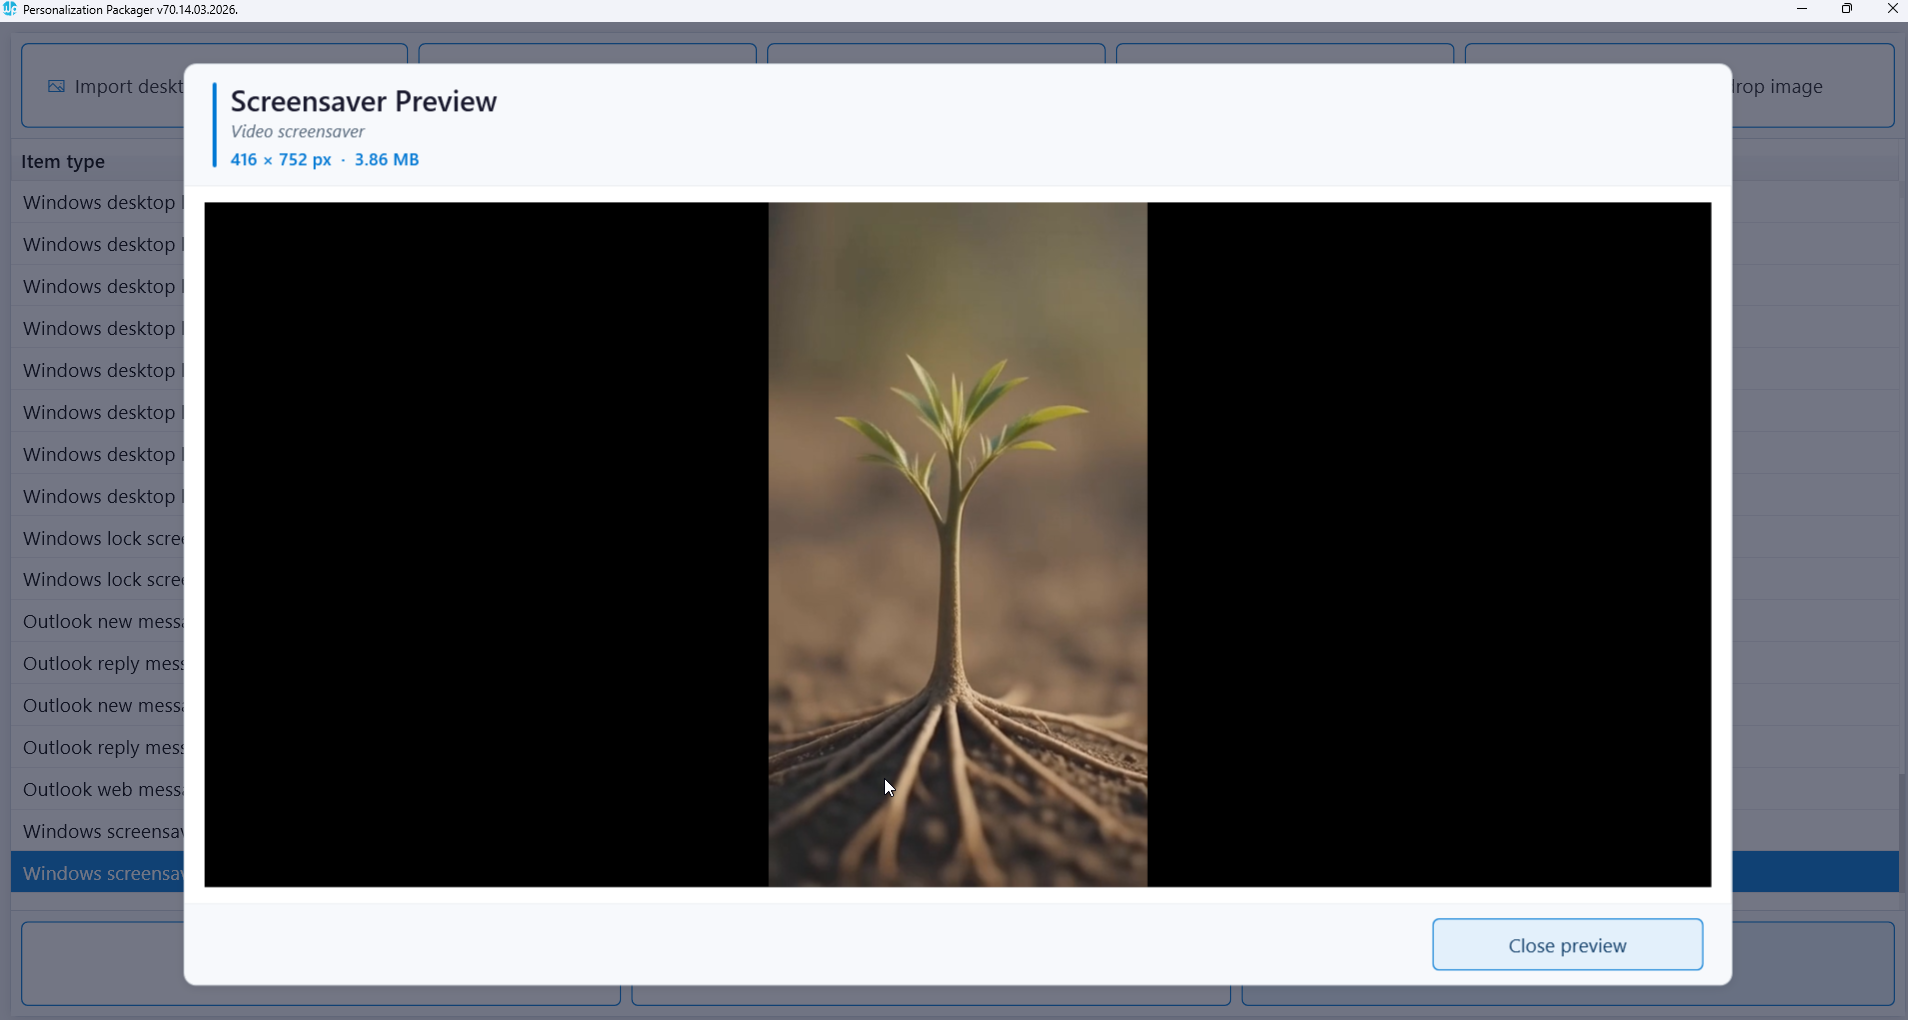
Click the “Import screensaver” button to add your newly created MP4 video files. Import each video one at a time, selecting both the landscape and portrait versions from the folder where your screensaver videos are stored.
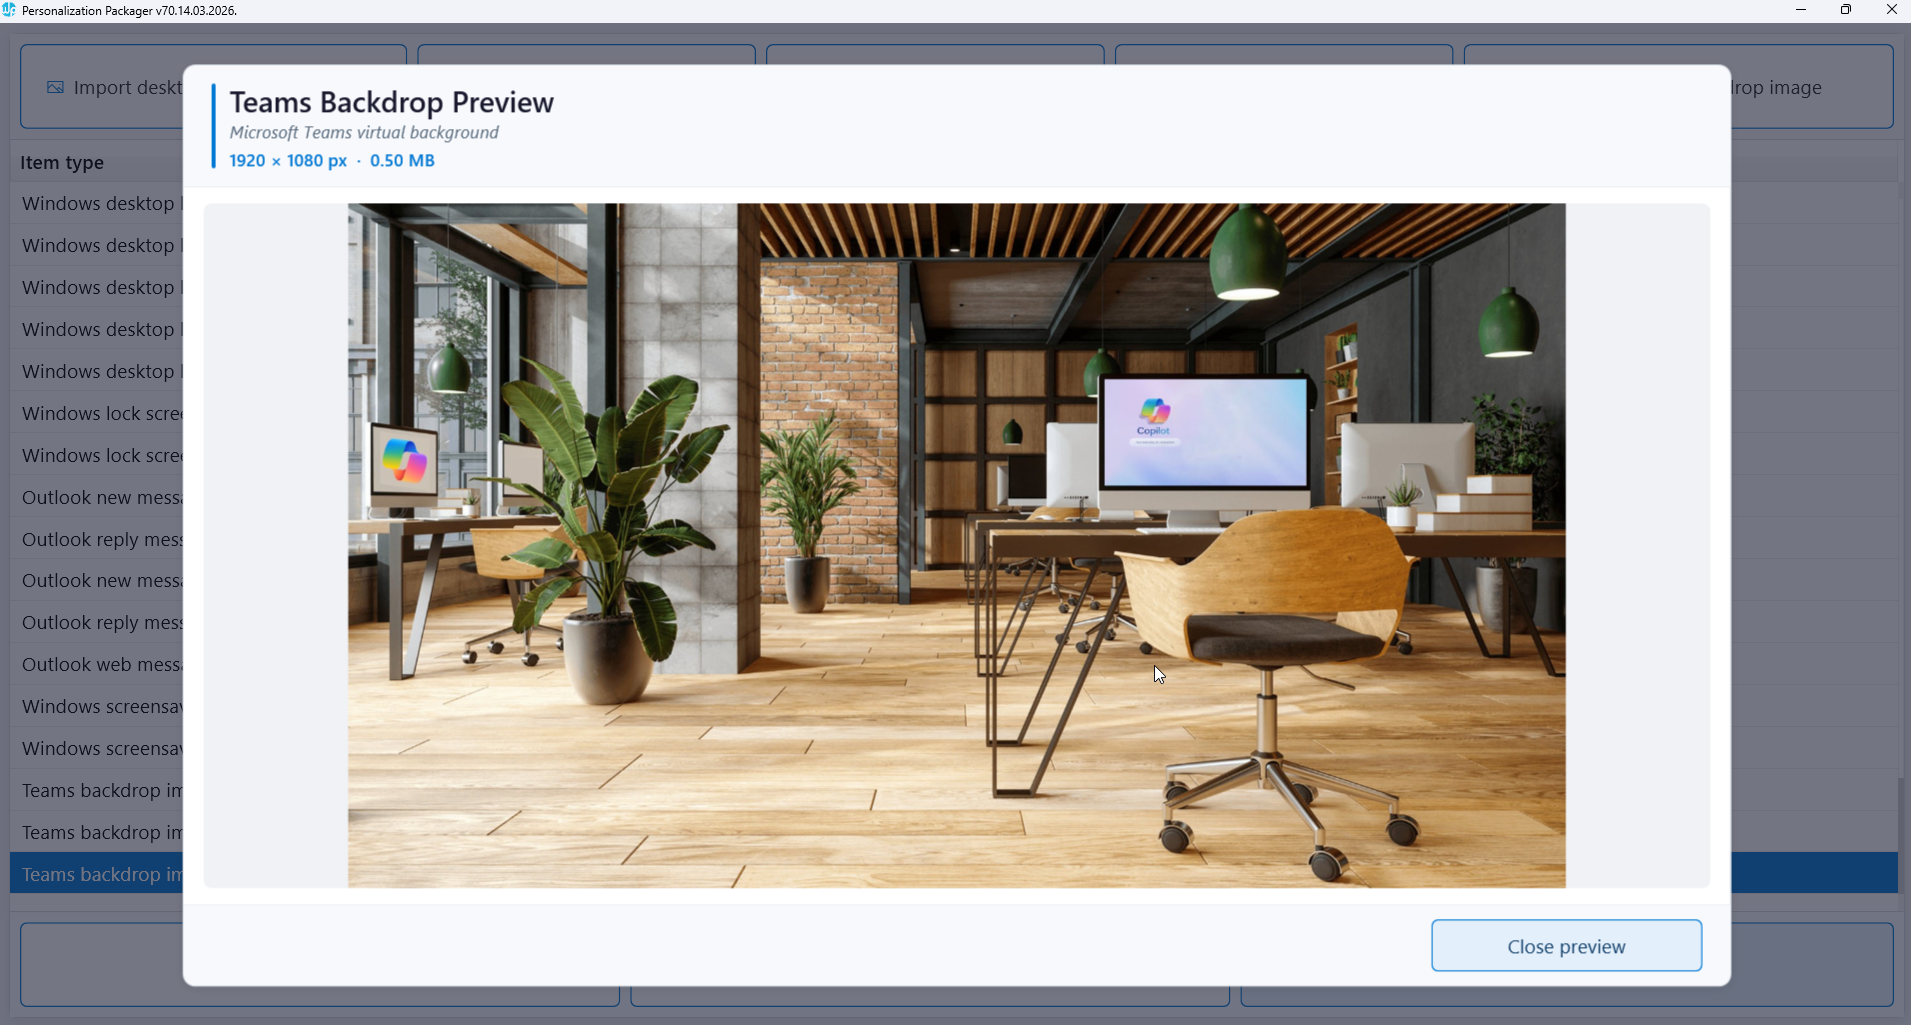
Finally, click the “Import Teams background” button to add your Microsoft Teams background images to the package.
After importing all personalization items—including desktop wallpaper images, video screensavers, Microsoft Teams backgrounds, Outlook email signatures, and lock screen images—click the “Create personalization package” button to begin the package creation process. This action generates the silent installation package that will be used for deployment.
Below are some key notes about the personalization package created by the WPSecure Personalization Packager:
What the Personalization Package Contains
A personalization package is a complete bundle of all the settings and files you imported or created, including:
- Desktop wallpaper images
- Outlook email signatures
- Lock screen images
- Video screensavers
- Microsoft Teams background images
This package brings all your branding assets together for standardized deployment.
Folder Requirements
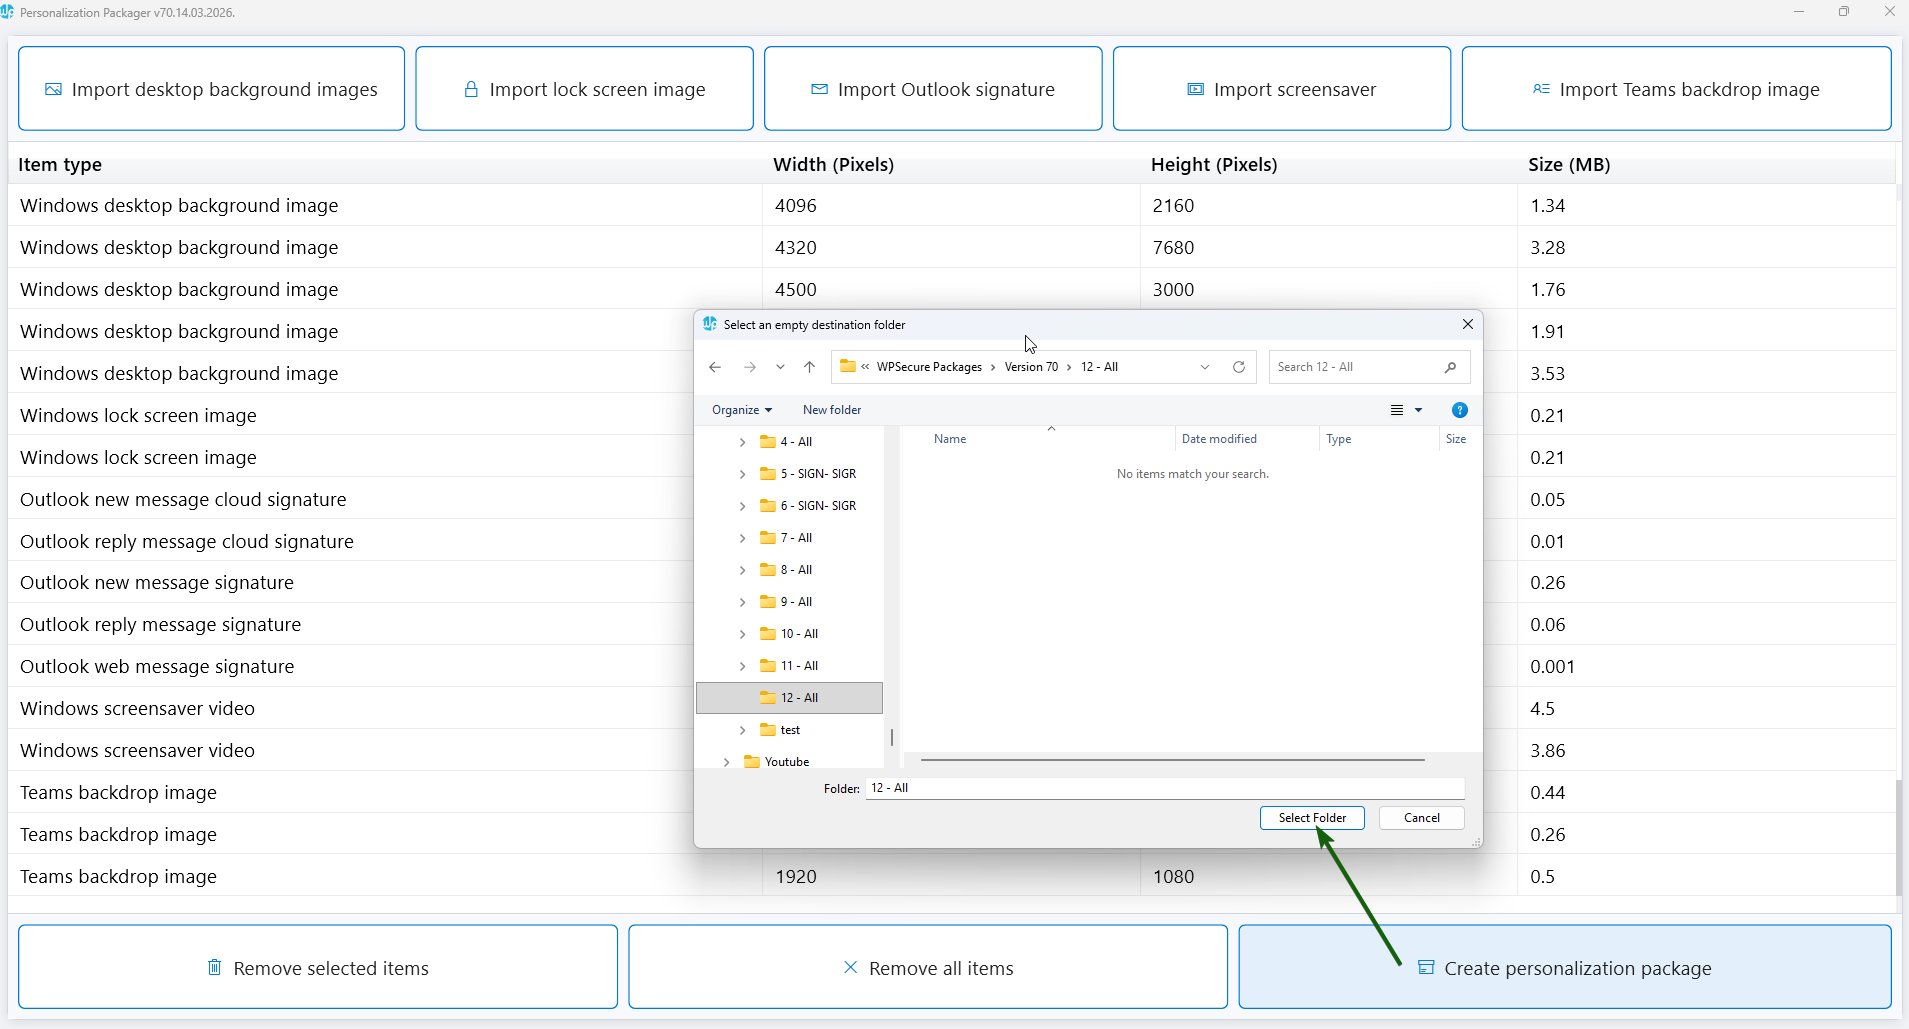
Before generating the package, ensure the destination folder is empty.
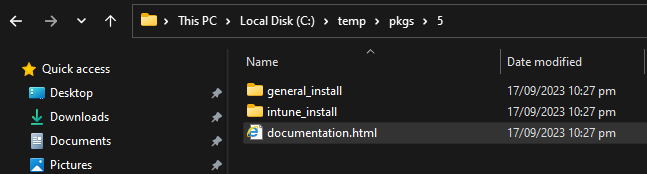
During creation, the tool automatically generates two folders:
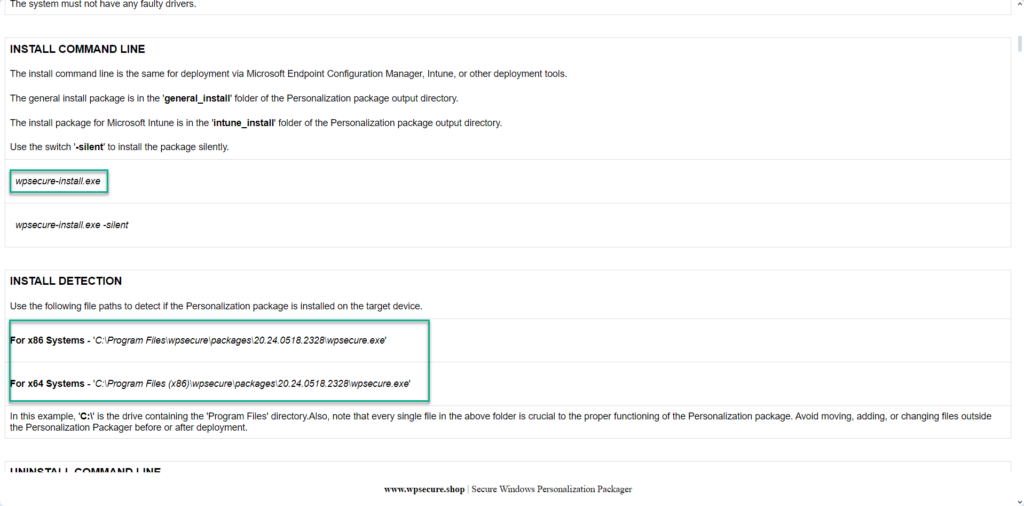
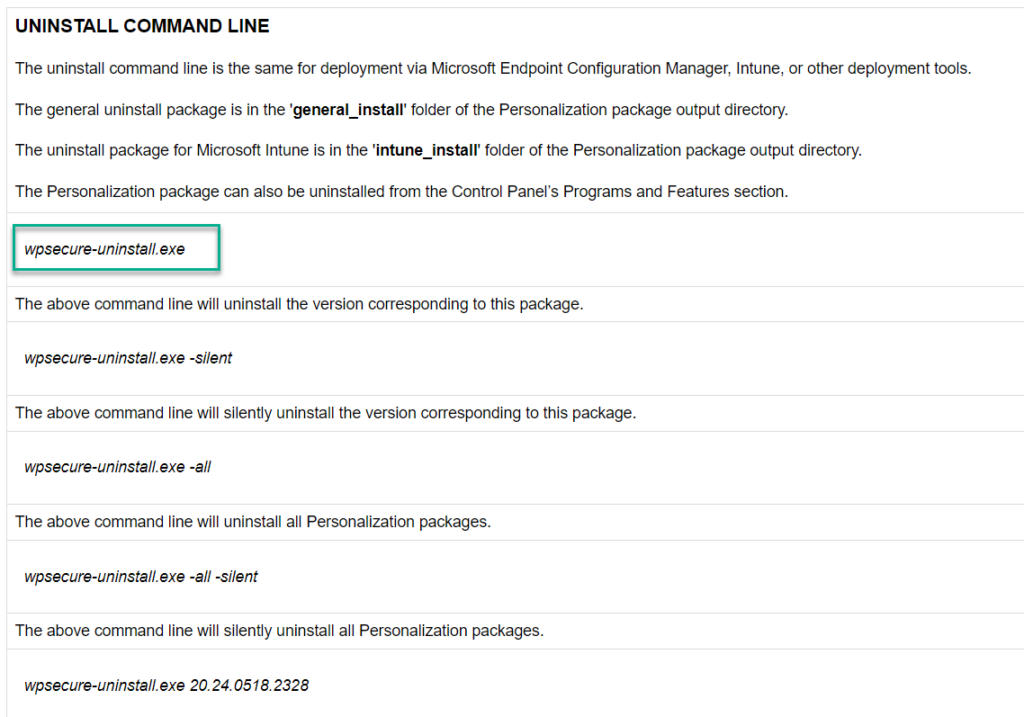
1. general_install Folder
This folder contains installation files designed for deployment through enterprise software distribution tools such as Microsoft Endpoint Configuration Manager (SCCM).
Key details:
- Run
wpsecure-install.exeto install the personalization package on Windows devices. - Additional installation and uninstallation instructions are documented in the included
documentation.htmlfile.
This makes the package fully compatible with traditional software management workflows.
2. intune_install Folder
This folder contains the file:
wpsecure-install.intunewin
This .intunewin package is ready to upload directly to the Microsoft Endpoint Manager admin center (Intune) for deployment as a Win32 app.
The installation command line is identical to the one used in the general installation process.
Documentation File
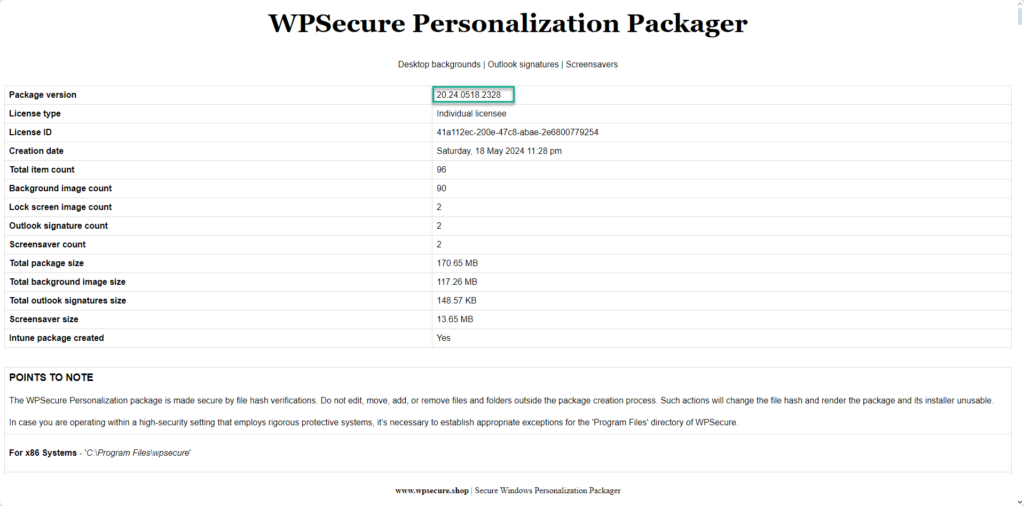
The process also generates a documentation.html file containing all the essential deployment details, including:
- Package version
- Installation command
- Uninstallation command
- Detection methods
- File and directory structure
This file serves as your reference guide for deploying the personalization package across your environment using Intune or SCCM.

7. Deploy the package using Microsoft Intune.
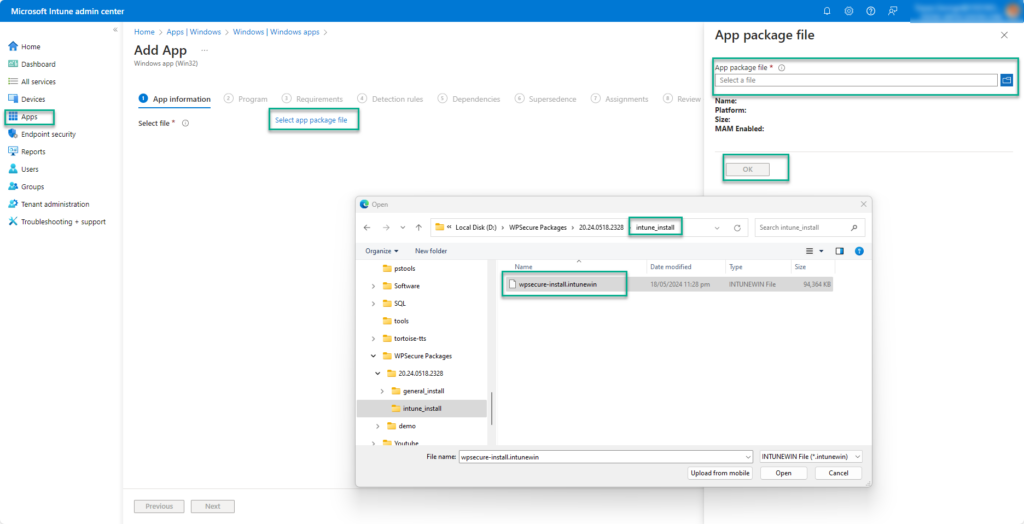
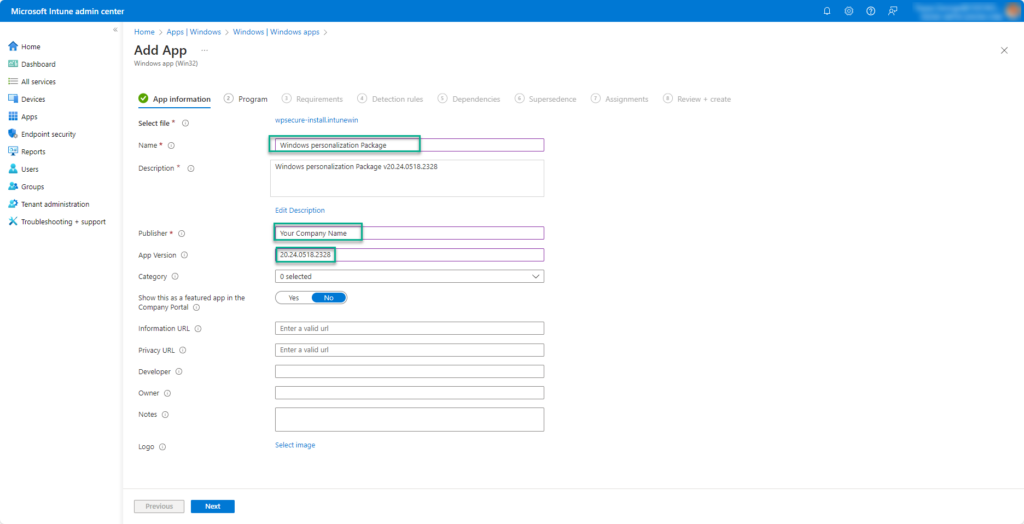
After creating your WPSecure personalization package, upload it to Intune to begin deployment. Use the wpsecure-install.intunewin file to create a Win32 app in the Microsoft Intune console. This file is specifically generated for Intune and contains everything needed for a standard Win32 app deployment.

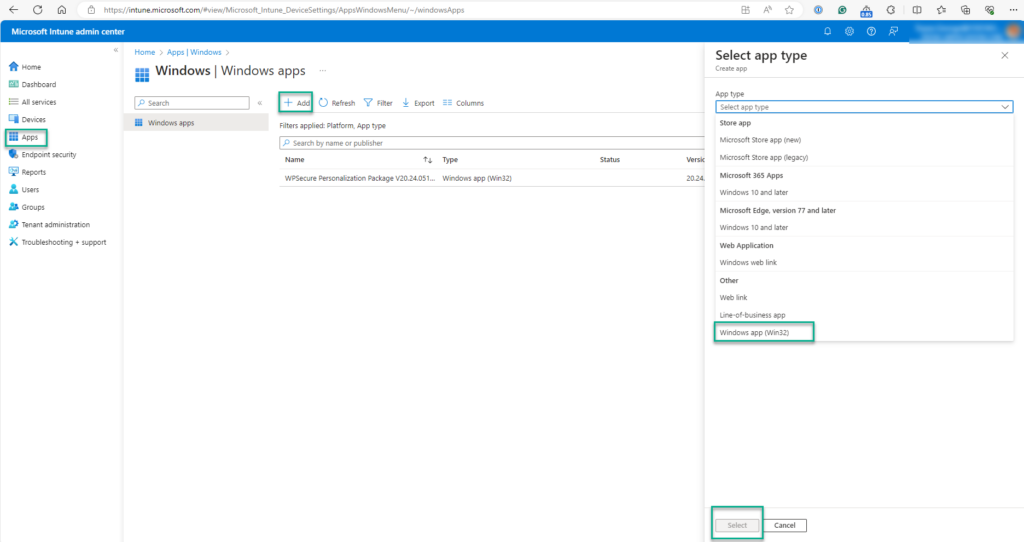
Open the Microsoft Intune Admin Center at 👉 https://aka.ms/intune
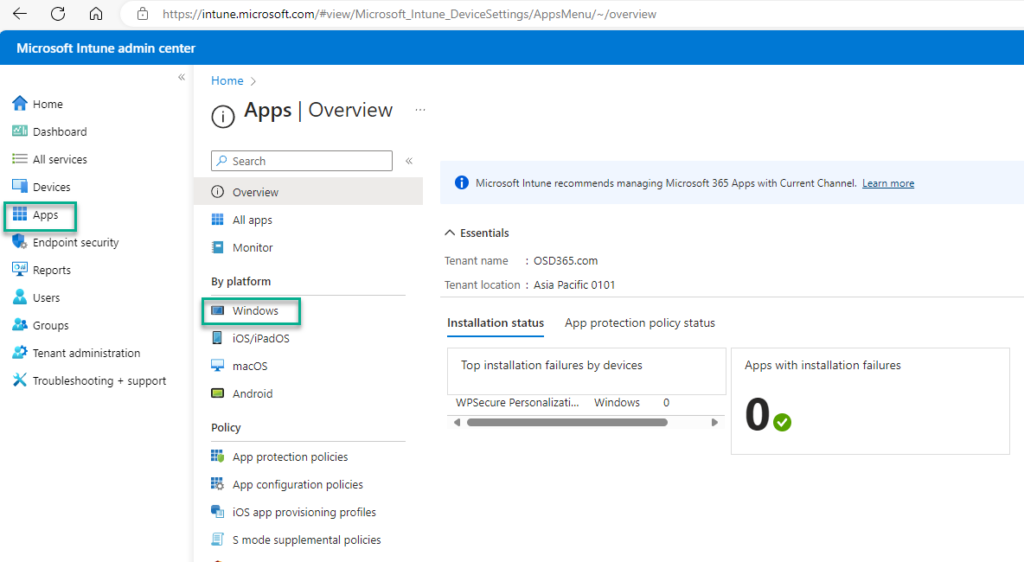
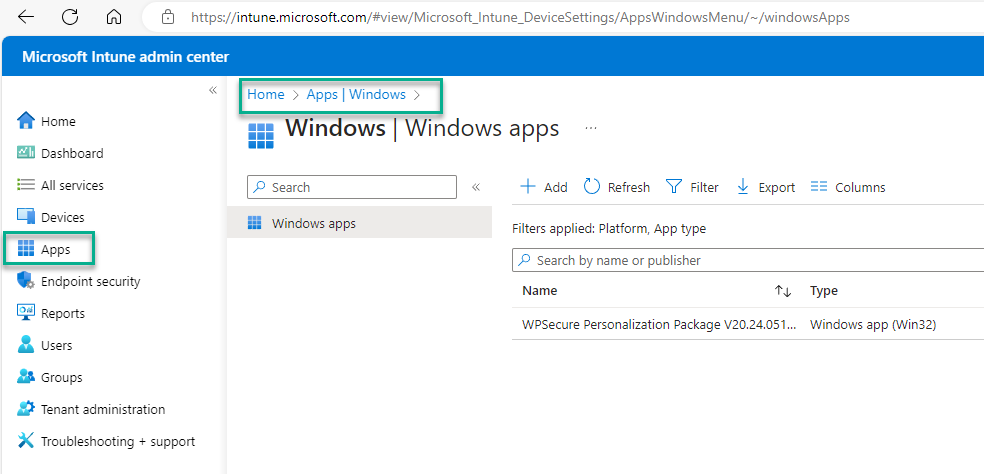
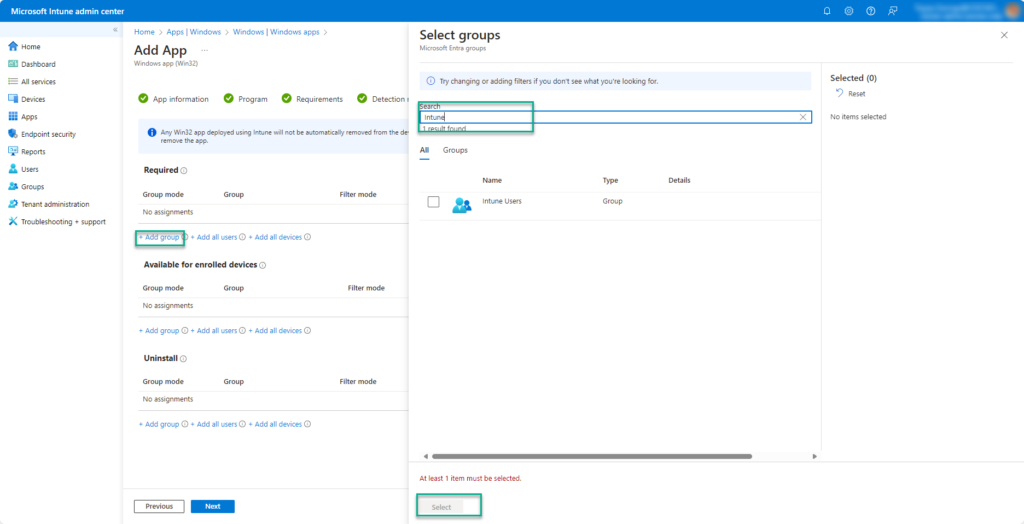
Click the “+ Add” button to begin creating the Win32 app deployment in Intune.
The images below illustrate the initial steps of the setup process.
The documentation.html file contains all the essential details required to deploy the personalization package, including the package version, installation and uninstallation command lines, and the detection methods used during deployment.
Using the details provided in the documentation.html file—such as the package version, installation and uninstallation commands, and detection rules—fill out the required fields in the Intune Win32 application setup form. This information ensures that Intune correctly installs, detects, and manages the personalization package on your Windows devices.
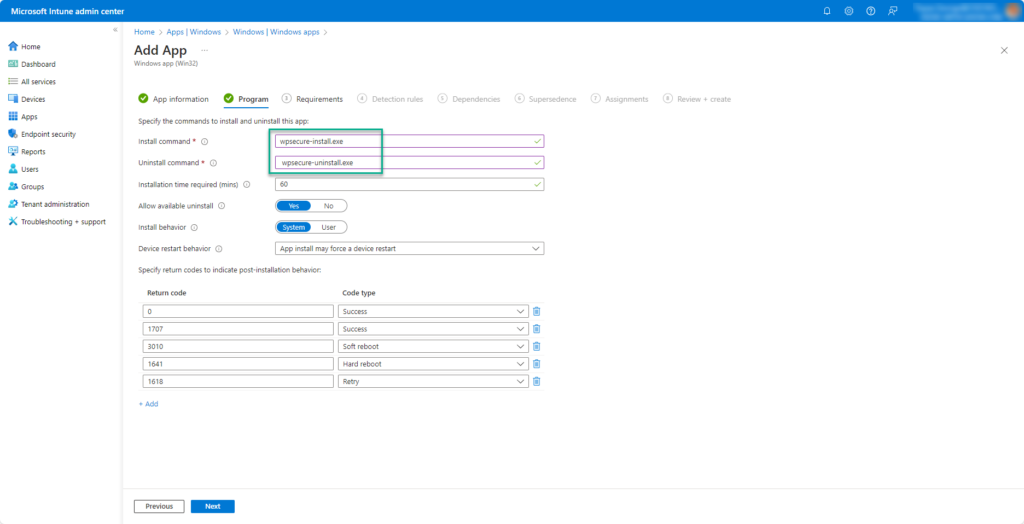
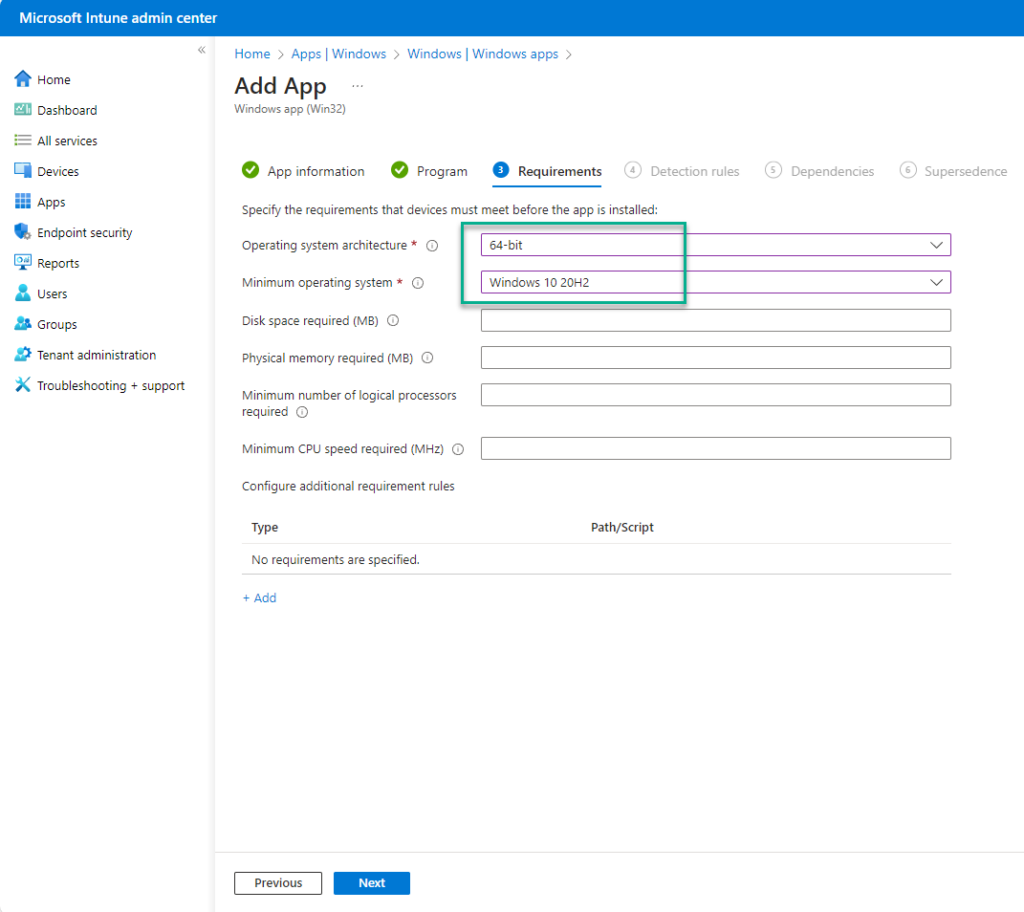
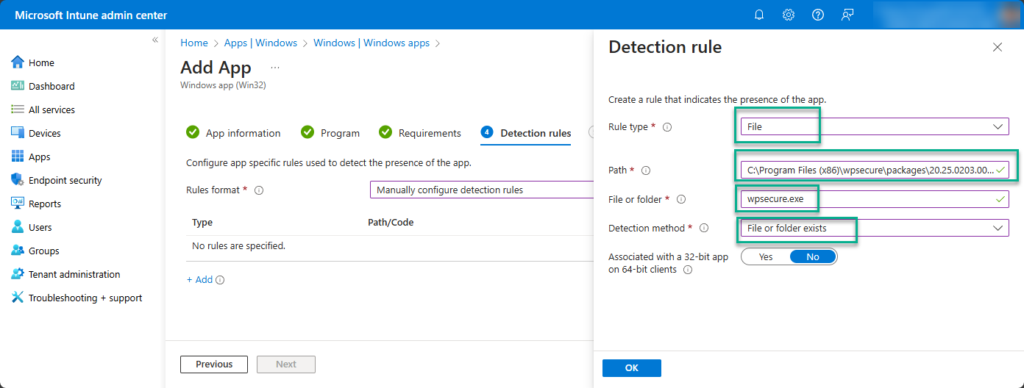
If your installation or detection logic uses environment variables, ensure you select the correct option for “Associated with a 32‑bit app on 64‑bit clients.” This setting determines how Intune handles file paths and environment variables when deploying Win32 applications on 64‑bit Windows devices, ensuring the variables resolve correctly during installation and detection.
Click Next to continue and complete the setup.
Allow Microsoft Intune a moment to upload and configure the Windows Personalization package.
The video below provides a step‑by‑step walkthrough of this article. For demonstration purposes, it was recorded using a workstation with four displays to showcase the capabilities of the WPSecure Personalization Packager.
8. Deploy the package using Microsoft Endpoint Configuration Manager (SCCM).
We will deploy the newly created personalization package using Microsoft Endpoint Configuration Manager (SCCM).
The required source files can be found in the general_install folder.

All deployment details for the personalization package are documented in documentation.html.
This file outlines the package version, install and uninstall command lines, as well as the detection logic needed for configuration in MECM (SCCM).
In the SCCM console, begin the New Application creation process.
Enter the necessary details using the package information outlined in the previous section.


Create a new Deployment Type.
Clicking Add will open a new window where you can configure the deployment settings.


Click Next to close the ‘deployment type’ Window.


Click Next to complete the process.
After the application has been created, distribute the Windows branding package to the required distribution points.
In this article, we covered how to design, create, deploy, and configure a full range of Windows personalization assets—including Outlook email signatures, desktop wallpapers, lock screen images, Microsoft Teams background images, and video screensavers—using Microsoft Intune. By leveraging modern endpoint management tools, you can deliver a consistent, professional, and branded experience across your organization’s Windows devices.
If this guide helped you streamline your Windows personalization or enhance your Intune deployment workflows, please consider sharing it on your social and professional networks. Your support helps others discover best practices for Windows customization and strengthens the community around modern device management.
Advantages of using branding packages |
|---|
Deploy stunning desktop wallpapers via Intune with zero stretching or pixelation—even on 4K monitors and multi-screen setups. Perfect scaling for both portrait and landscape orientations ensures a crisp, professional look. Ideal for businesses seeking flawless wallpaper management across diverse devices. |
Effortlessly push professional Outlook email signatures to all Windows 10 and 11 devices using Intune—no scripts required. Ensure consistent branding across your organization with automated deployment. A simple, secure solution for managing signatures at scale. |
Silently deploy video screensavers across Windows devices using Microsoft Intune or Configuration Manager—no user disruption. Screensavers auto-adjust for both landscape and portrait orientations, ensuring a flawless experience on any display. A scalable, professional solution for enterprise customization. |
Set perfect lock screen images on Intune-managed devices with guaranteed resolution and orientation. Images auto-fit flawlessly on both portrait and landscape screens, delivering a professional, polished look across all Windows endpoints. A simple, scalable solution for enterprise lock screen management. |
Deploy custom Microsoft Teams backgrounds company-wide with Intune or Configuration Manager—no hassle, no scripts. Easily update or remove backgrounds to maintain consistent branding across all Windows 10/11 devices. A secure, scalable solution for professional Teams customization. |
Deploy a complete customization package with Intune or Configuration Manager—desktop background, lock screen image, Outlook email signature, Teams backgrounds, and video screensavers. Guaranteed correct resolution and orientation for portrait and landscape screens. A streamlined, scalable solution for consistent branding across all Windows 10/11 devices. |
Achieve complete control with zero internet dependency—wallpapers, email signatures, and screensavers are stored and applied locally. No need for third-party services, additional infrastructure, or external databases. A secure, cost-effective solution for enterprise customization using Intune or Configuration Manager. |
Run secure PowerShell scripts at startup and user login without complexity—login scripts made easy. Deploy via Intune or Configuration Manager with no need for third-party tools, extra infrastructure, or databases. A streamlined, enterprise-ready solution for automating Windows 10/11 tasks. |
Deploy Outlook email signatures, desktop wallpapers, lock screen images, video screensavers, and Microsoft Teams backgrounds as easily as installing Google Chrome or Adobe Reader. No scripts, no third-party tools, and no extra infrastructure required—just simple, application-style deployment via Intune or Configuration Manager. A streamlined, enterprise-ready solution for Windows 10/11 customization and branding. |
For just $1 per device per year, you can deploy a complete branding and customization package across all Windows 10/11 devices—without scripts, third-party services, or extra infrastructure. Set desktop wallpapers, lock screen images, Outlook email signatures, Microsoft Teams backgrounds, and even video screensavers as easily as deploying Google Chrome or Adobe Reader. Everything is managed through Intune or Configuration Manager, with guaranteed correct resolution and orientation for portrait and landscape screens. No internet dependency—assets are stored and applied locally for maximum security and reliability. A simple, scalable, and cost-effective solution for enterprise customization. |